-
Here’s another way to make a cool anklet for summer…

Like I said before, anklets are going to be a hot ticket accessory this summer, so here’s another way to make an anklet to add to your #ankleparty
You will need the following tools and materials to make your anklet:
1: Pliers. You’ll need flat nose pliers, round nose pliers and cutting pliers for this anklet design.

2: A broken pair of headphones. I used these headphones left over from a different project.

3: Two crimp ends.

4: Two jump rings.

5: A lobster clasp.

6: A long gold coloured bead.

Follow these steps to make your simple anklet:
1: Measure the headphone cord around your anklet and cut it to length using the cutting pliers.


2: Add the bead to the trimmed headphone cord.

3: Add a crimp to either end of the cord, folding it around the cord using the flat nose pliers.


4: Add a jump ring to one end of the anklet and attach the lobster clasp.


5: Add the other jump ring to the other side of the anklet.

Now your anklet is done! How cute is this simple design? Add it to your #ankleparty and dance the night away!

-
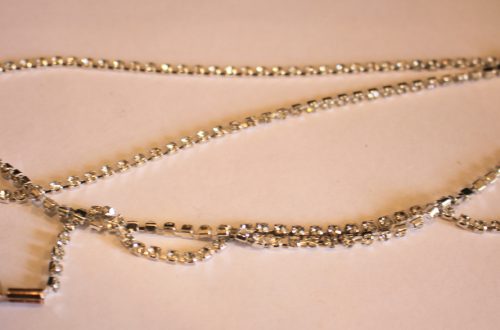
Here’s another cute way to upcycle your broken headphones, a double strand necklace!
If you aren’t sick of my headphone recycling tutorials yet here is another way you can upcycle them into beautiful jewelry. This one gives you all the steps you need to take to make a double strand headphone necklace.
You will need the following tools and materials to make your double strand headphone necklace:
1: Pliers. You’ll need cutting pliers, flat nose pliers and round nose pliers
2: A pair of broken headphones. I used the top part of the headphones that I used in the finger knit bracelet tutorial.

3: Four crimp ends.

4: Four small pieces of chain, one pair longer than the other. My headphone cords weren’t quite long enough to fit around my neck so I added some small pieces of chain to the end of each to make them fit.

5: Two beads. I used these chunky wooden beads with big holes.

6: Four larger jump rings.

7: Four smaller jump rings.

8: A lobster clasp.

Follow these steps to make your double strand necklace out of recycled headphones.
1: Cut the headphone cords using the cutting pliers to separate them and remove the ear buds.


2: Add a crimp end to either end of the headphone cords, folding them in place using your flat nose pliers.


3: Add one pair of chains to either end of one of the cords using two of the larger jump rings.


4: Add the second pair of chains to the other cord using another pair of larger jump rings.

5: Add the beads to each of the strands.

7: Secure the chains together using a smaller jump ring on either side of the necklace.


8: Attach the clasp using another smaller jump ring.

9: Add the remaining jump ring to the other side of the necklace to finish it.
Now your double strand necklace made from recycled headphones is finished! I love coming up with creative ways to save broken products from the trash.

-
Make a beaded chain bracelet… this is my new fave!
This beaded chain bracelet is my new favorite thing, I’ve been making all kinds of accessories with this technique.

You will need the following tools and materials to make your beaded chain bracelet:
1: Pliers. You’ll need flat nose pliers, round nose pliers. You might need your cutting pliers depending on the length of your eye pins.
2: Some eye pins.

3: Some beads. I used these glass beads.

4: A toggle clasp.

5: Two jump rings.

Follow these steps to make your bead chain bracelet:
1: Add beads to the eye pins.

3: Create a loop at the end of each pin to secure the beads in place.


4: Start linking the pins together to form a chain.


5: Attach the toggle clasp components to either end of the chain using the jump rings.


Now your bracelet is finished!
Here are some other pieces I made with different beads.


-
These are amazing! Here’s a tutorial to make some beaded fringe earrings.
These beaded fringe earrings look so pretty! Use a variety of glass beads to make your own versions of the design. Contains affiliate links.

You will need the following tools and materials to make your beaded fringe earrings:
1: Pliers. You will need your flat nose pliers and round nose pliers.


2: Sixteen head pins.

3: Two eye pins.

4: Two earring hooks.

5: Beads of your choice. I used some different colored glass beads and four pink plastic beads.


6: Four jump rings.
Follow these steps to make your beaded fringe earrings:
1: Add beads to twelve of the head pins.

2: loop the tops of the pins to keep the beads in place.


3: Add the different colored beads and the pins in a pattern to the eye pin.

4: Add the earring hook halfway along the beaded eye pin.

5: Finish beading the eye pin and create a loop at the other end of the pin to secure the beads and charms in place.


6: Repeat steps 3 to 5 for the second earring.

6: Add the plastic beads to the remaining four head pins.

7: Loop the ends of the four extra charms.

8: Attach the four charms to either end of the top of the earrings to finish them off.


Now your fringe earrings are finished and ready to wear!
I also made a pair using black and white glass beads.

If you like the look of fringe jewelry, check out this beaded fringe necklace.
This tutorial contains affiliate links.
-
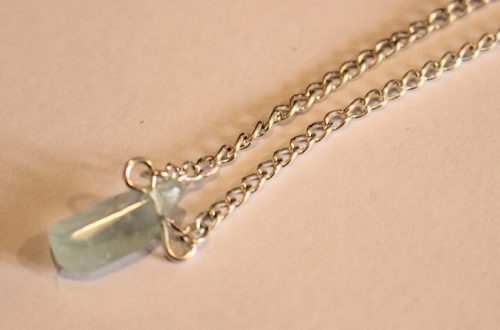
Here’s another way to upcycle broken headphones… into a necklace!

Remember the upcycled bracelet tutorial? Here’s another idea for how you can recycle broken headphones… turn them into a stylish necklace!
You will need the following tools and materials to make your headphone necklace:
1: Pliers. You’ll need cutting, flat nose and round nose pliers.
2: A charm. I used this old vintage earring charm.

3: Two crimp ends.

4: Two jump rings.

5: A lobster clasp.

6: A pair of broken headphones. I used these Sony headphones that don’t work any more.

Follow these steps to make your headphones into a necklace:
1: Clip the headphones so that you have a length that fits around your neck. I used the part between the ear bud and the split.


2: Add the charm to the cord.

3: Add a crimp end to either side of the cord, folding it in place using the flat nose pliers.


4: Add the lobster clasp to one side of the necklace using one of the jump rings.

5: Add the remaining jump ring to the other side of the necklace to finish it.
Now your upcycled headphone necklace is finished and ready to wear!
-
Here’s how to make a beaded body chain for summer!

This body chain looks incredible. Using glass beads and some delicate gold chain it is sure to make a statement with your next summer outfit!
You will need the following tools and materials to make your beaded body chain:
1: Pliers. You will need your flat nose pliers, round nose pliers and cutting pliers to make this body chain.
2: Eight glass beads. I used these blue beads.

3: Eight eye pins.

4: Five jump rings.

5: Two lobster clasps.

6: A necklace length piece of chain.

7: Another piece of chain long enough to fit around your waist (plus another 10cm).

Follow these steps to make your beaded body chain:
1: Add the beads to each of the eye pins.

2: Bend each of the pins to form a right angle.

3: Create a loop at the end of each pin to secure the beads in place.


4: Attach all the beads together to form a beaded chain.


5: Attach the beaded chain to the middle of the shorter piece of chain.

6: Add a jump ring to one side of the short chain.

7: Attach one of the lobster clasps to the open jump ring and close the ring to secure the clasp in place.


8: Add another jump ring to the other side of the necklace chain.

9: Add one end of the long chain to the bottom of the beaded section.

10: Create a loop with the long chain, attach approximately 10cm from the end of the beaded section using one of the jump rings.


11: Split the long loop in the middle (this will be the back of the body chain).

12: Add a jump ring and clasp to one side of the long loop.

13: Add the last remaining jump ring to the other side of the body loop to finish it off.

Now it’s finished and ready to wear! How fun?!

-
Here’s how to make a perfect summer anklet with braided string and beads

Beaded and braided, could this anklet be any more boho perfect?
You will need the following tools and materials to make your braided bead anklet:
1: Pliers. You will need your cutting pliers, round nose pliers and flat nose pliers to make this anklet.
2: Scissors for trimming your string.

3: Three pieces of string approximately 2 feet long (approx. 60cm).

4: Two cord crimp ends.

5: Two jump rings.

6: A lobster clasp.

7: Beads of your choice. I used two green e-beads and a larger glass feature bead.


Follow these steps to make your braided anklet:
1: Collect the strings together and tie one end in a knot.

2: Begin braiding the strings.

3: Continue braiding until the braided section reaches nearly half way around your ankle.

4: Add one of the e-beads to the middle string and continue braiding around it to secure it in place.


5: Braid the strings 3-4 times and then add the large feature bead, braiding around it as you did for the first e-bead.


6: Braid another 3-4 times before adding the final e-bead.

7: Braid around the final e-bead and continue braiding until the anklet is long enough to fit around your ankle.


8: Knot the other end of the anklet.


9: Trim the ends of the strings on each end of the anklet using cutting pliers or scissors.

10: Place one of the crimp ends around the ends of the string so that it sits closely to the knot.

11: Squash one side of the crimp around the strings using the flat nose pliers.


12: Squash down the other side of the crimp using the flat nose pliers.


13: Repeat steps 10-12 for the other side of the anklet.

14: Add a jump ring to one side of the anklet and slide on the lobster clasp and close the jump ring to secure it in place.


15: Add the other jump ring to the other side of the anklet to finish it off.

Now it is completed and ready to wear! Isn’t this just the perfect accessory for warm summer events?