-
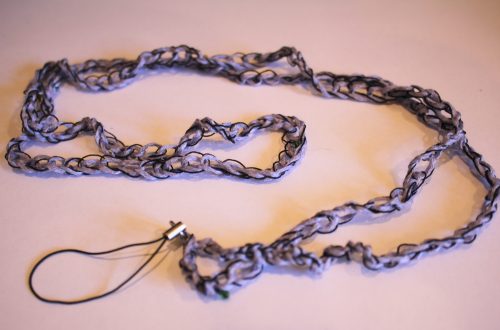
Like to keep track of your phone? Here’s how to make a handy chain phone strap.
This phone strap is minimalist in design and fairly easy to put together. Phone straps seem to be increasingly popular at the moment, so here’s how you can make one of your own. Please note that this tutorial contains affiliate links.
Grab these tools and materials to make your own chain phone strap:
1: Your jewellery pliers. I used my flat nose and round nose pliers.


2: Some chunky chain, I used about 42cm of chain but you could use less or more depending on the size you want your strap.

3: A sturdy jump ring.

4: A keychain with a phone loop.

Follow these steps to make your chunky chain phone strap:
1: Add both ends of the chain to the jump ring.

2: Add the keychain to the jump ring.

3: Close the jump ring using your pliers.

And that’s it, done in three steps! Now you can attach it to your phone case by looping the little loop around a hole in your phone case, pulling the strap through and then pulling it tight.


Here is another phone strap tutorial in case you like some variety when it comes to your phone accessories!
-
Combine gold wire and pearls with these amazing statement earrings
These earrings use different materials to create a loop of gold wire and rainbow beads with a sweet dangly pearl in the centre. This tutorial contains affiliate links.
You’ll need the following tools and materials to make your earrings:
1: Pliers. I used my cutting pliers (left), flat nose pliers (right) and round nose pliers (middle).

2: Two pieces of 0.8mm wire approximately 7-10cm long. I used gold fill wire.

3: Two pieces of tiger tail wire, around 10-15cm long.

4: Four small jump rings.

5: Two head pins.

6: Two larger jump rings.

7: Post earrings with charm loops.

8: Beads. I used mixed glass beads.

9: Two pearl beads.

10: Eight crimp beads.

11: Something round to form your wires around. I used a bead container.
Follow these steps to make your earrings:
1: Take one of the pieces of tiger tail wire and add two crimp beads and a small jump ring to the end.

2: Loop the end of the wire around the jump ring and through the crimp beads. Pull it tight.

3: Squash the crimps using flat nose pliers.

4: Add beads to the tiger tail wire until you have a length you like.

5: Once fully beaded add another two crimp beads and another small jump ring to the end of the wire.
6: Pull the end of the wire around the jump ring and back through the crimps and last few beads.

7: Squash the crimp beads at the end and trim the excess wire.

8: Repeat steps 1 to 8 for the second bead strand.

9: Add each of the pearl beads to the head pins and use round nose pliers to curl the tops, this secures the beads on to the pins.


10: Add the pearls to each beaded strand.

11: Bend the wires around your round thing to form an arch shape.


12: Add a loop to either end of the wire using the round nose pliers.


13: Attach a bead strand to each of the wires using the jump rings.


14: Add an earring post to each earring, attaching it using the remaining two larger jump rings.


Now your earrings are finished and ready to put on! Perfect for adding some color to neutral outfits!


-
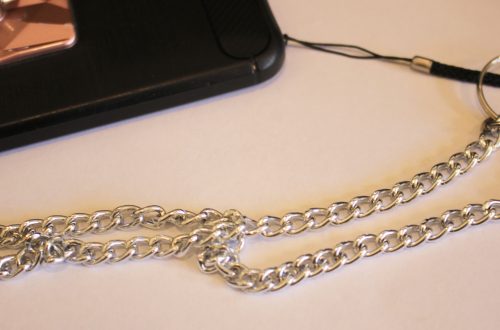
Here’s how to make a 2 in 1 glasses and mask chain.
People are starting to wear masks as part of every day life, if you want to add a bit of your own style to your mask why not make this cute mask chain? Add some glasses holders and you’ve got a piece that works double time! Clip it to your mask or pop it on the arms of your glasses, whatever you like! This tutorial contains affiliate links.
You’ll need the following tools and materials to make your mask/glasses chain:
1: Pliers. I used my flat nose pliers.
2: A ball chain. I used this rose gold-tone ball chain.

3: Two crimp ends. I used these rose gold ones that match my chain.

4: Two large lobster clasps. I used these silver tone ones.

5: Two rubber glasses holders.

6: Two jump rings.

Follow these steps to make your mask/glasses chain:
1: Remove the clasp on the ball chain.

2: Add one of the crimp ends to one end of the ball chain.

3: Use the flat nose pliers to carefully close and squash the crimp end around the end of the chain.


4: Repeat steps 2 and 3 for the other end of the chain.

5: Add one of the jump rings to one of the crimp ends.

6: Add one of the clasps and one of the glasses holders to the jump ring.


7: Close the jump ring to secure the clasp and rubber holder in place.

8: Repeat steps 5 to 7 for the other end of the chain to finish it off!

You can use the clasps to attach the chain to your mask or the rubber holders to secure them to your glasses! How good?!

This tutorial contains affiliate links.
Check out some of our other glasses chain tutorials:
-
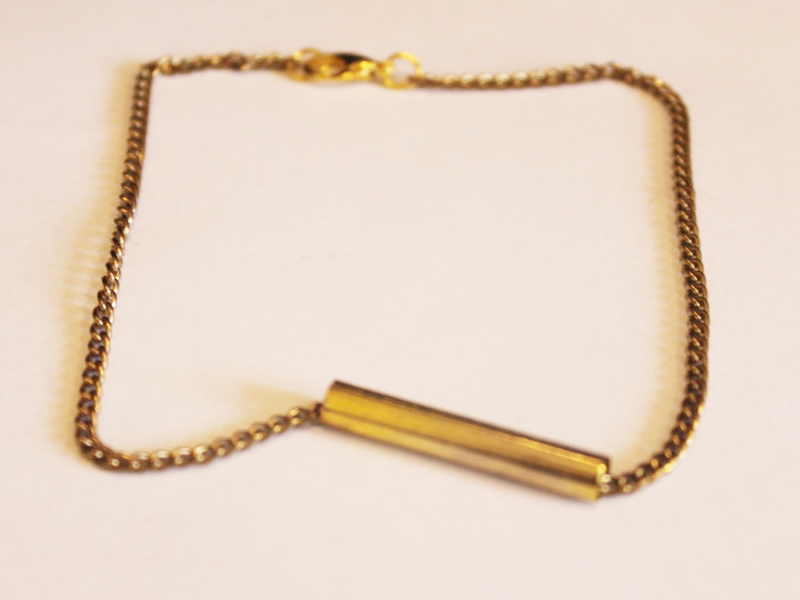
Can’t get enough of ankets? Here’s another cool anklet to DIY.

Anklets are a fun summer accessory you can adorn your legs with. Why not make this simple one to stack with other fun ankle accessories? This article contains affiliate links.
You will need the following tools and materials to make your anklet:
1: One piece of ankle length chain. I used this gold-tone chain.

2: Two jump rings.

3: A lobster clasp.
4: A tube bead. I used this gold-tone tube bead.

5: Pliers. I used my round nose and flat nose pliers.
Follow these steps to make your new anklet:
1: Add the tube bead to the chain.

2: Attach one of the jump rings to one end of the chain. Do this by sliding the open jump ring through the end link of chain.

3: Add the lobster clasp to the open jump ring.

4: Close the jump ring to secure the clasp in place.

5: Add the other jump ring to the other side of the anklet and close it to finish it off.

Now your anklet is finished and ready to wear!
Here’s another one I made using a curved silver bead.
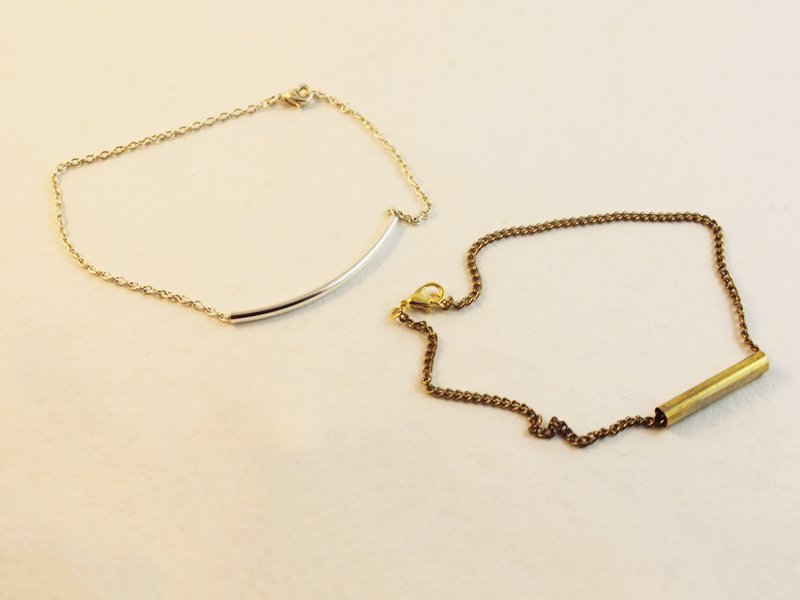
Here is a link so you can buy some curved silver beads if you like that look more!
Note: This article contains affiliate links
-
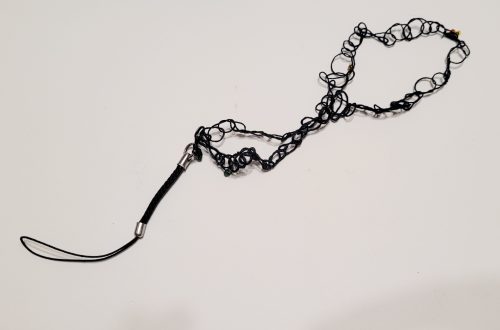
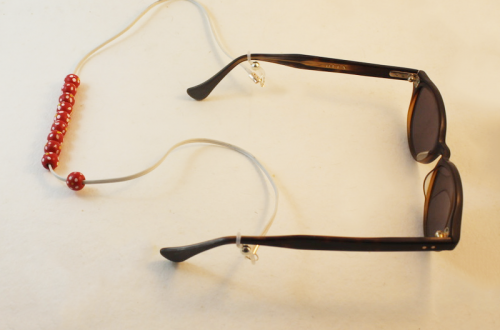
Here’s how to incorporate recycled materials into a glasses chain DIY

Are you interested in incorporating recycled materials in to your DIY jewelry designs? Here’s an idea for you… a glasses chain made with a recycled headphone cord.
You will need the following tools and materials to make your glasses chain:
1: Pliers. You will need your round nose pliers, flat nose pliers and cutting pliers.
2: A piece of cord from an old broken pair of headphones. I used this cord leftover from another project.

3: Beads with holes big enough to fit your cord. I used 10 of these painted wooden beads.

4: Two crimp ends.

5: Two jump rings.

6: Two rubber glasses holders.

Follow these steps to make your glasses chain:
1: Trim excess material from your cord using the cutting pliers.


2: Add the beads to the cord.


3: Fold one of the crimp ends around one end of the cord using the flat nose pliers.


4: Add the second crimp end to the other end of the cord.

5: Attach the glasses holders to each end of the cord using the jump rings.


Now your glasses chain is finished and ready to use. Perfect for windy spring days or for when you’re getting active outside!

Here’s another version I made using some broken apple headphones and some plastic heart shaped beads.

-
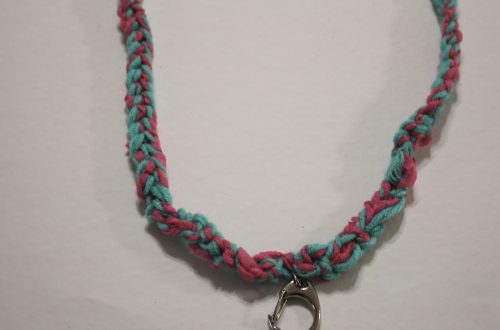
Chunky chains are taking over. Here’s a DIY to get you in on the trend.

Apparently chunky chains are taking over from dainty delicate jewelry. Getting in on this cool new trend is super easy… here’s how to make your own chunky chain necklace.
You will need the following tools and materials to make your chunky chain necklace:
1: Pliers. You’ll need your round nose and flat nose pliers.
2: A chunky chain long in a length of your choice. I used this lightweight silver chain and made it choker length (fitting closely around the neck).

3: Two jump rings.

4: A lobster clasp.

Follow these steps to make your chunky chain necklace:
1: Add one of the jump rings to one end of the chain. Close it to secure it in place.


2: Add the other jump ring to the other end of the necklace.

3: Add the lobster clasp to the open jump ring.

4: Close the jump ring to secure the clasp in place and finish your necklace.

IT IS THAT SIMPLE! Now your chunky chain necklace is ready to wear!

-
Anklets are set to be HOT in the summer months. Here’s one to add to your accessories collection.

According to this article, anklets are set to be the jewelry item that defines summer in 2019. This anklet is sparkly and summery, perfect for evening drinks or beach holidays!
You will need the following tools and materials to make your beaded anklet:
1: Pliers. You’ll need flat nose pliers and round nose pliers.
2: Eye pins.

3: Two jump rings.

4: A lobster clasp.

5: Two head pins.
6: Beads. I used some blue faceted plastic beads recycled from an old necklace, some glass seed beads and some other blue glass feature beads.


Follow these steps to make your beaded anklet:
1: Add beads to the pins and loop the tops. Attach each charm using the end loops to form a chain.


3: Continue making these charms and attaching them in a pattern until your chain is long enough to fit comfortably around your ankle.

4: Add a jump ring to one end of the chain and add the lobster clasp.

5: Add the remaining jump ring to the other side of the chain.

6: At this stage your anklet is ready to wear, but you can perform these extra steps to add some extra charms.
7: Add beads to the two head pins.

8: Curl the tops of the pins using the round nose pliers.


10: Add the charms to the jump ring that attaches the clasp to the anklet. Close the jump ring to secure the charms in place.


Now your anklet is finished with some cute little charms! How adorable is this design? Why not make a whole bunch and have a #ankleparty 😉

-
I am seeing fancy hair clips everywhere, here’s how to make a pair of rhinestone embellished clips.

Continuing the rhinestone trend on DIY Jewelry Hub with these rhinestone embellished clips!
You will need the following tools and materials to make these hair clips:
1: Two hair clips. I used these alligator clips that I had at home and wasn’t using. I added a lick of color using some old nail polish.

2: Two short rhinestone strands. Cut them to the length of the clip you intend to glue them too.

3: Glue. I used superglue but you will probably get a better result using Araldite glue.

or

Follow these steps to make your rhinestone clips:
1: Add a dab of your chosen glue to the top of the clip and stick one end of a rhinestone strand in place, with the long side draping towards the body of the clip.


2: Continue adding glue down the clip and put the rest of the rhinestone strand in place.

3: Set the first clip aside to dry and repeat steps 1 and 2 for the second clip.
Once they’re dry those sparkly hair clips are ready to wear!

Here’s another pair that I made using some resin charms.

here are some more DIYs for rhinestone crystal embellished hair accessories:
- A rhinestone and chain embellished barrette
- This rhinestone crystal hair comb
- Rhinestone crystal headband
- Statement rhinestone headband
This tutorial contains affiliate links
-
I am loving rhinestone right now! Here’s how to DIY a rhinestone headband

I love this headband! Such a cool hair accessory, simple and sparkly… what more could you ask for?
You’ll need the following tools and materials to make this headband:
1: A headband. I used this one covered in a red ribbon.
2: A strand of rhinestones long enough to cover the headband.

3: Superglue.
Follow these steps to make your rhinestone headband:
1: Add some glue to the end of the headband.

2: Place the end of the rhinestone strand on the glued part to secure it in place. Be careful not to glue your fingers!

3: Add some more dabs of glue along the headband securing the rhinestones down as you go.

4: Secure the other end of the rhinestone strand down at the other end of the headband to finish it off!


Now it’s ready to wear!
-
Searching for something different? Make yourself some cute collar clips!

Here’s a fun way to use clip on earring findings… Collar clips! Pop these on your favorite shirt collar to jazz it up.
You will need the following tools and materials to make these collar clips:
1: Pliers. You will need your round nose pliers and flat nose pliers.
2: Two clip on earring findings with charm holes at the end.

3: Two cabochons. I used these sparkly resin cabs.

4: Two jump rings.
5: A piece of chain, mine was approximately 12cm long.

6: Araldite Glue.
7: A Skewer.

8: A scrap piece of paper.

Follow these steps to make your collar clips:
1: Squeeze out the glue in equal parts onto the scrap paper and mix well with the skewer.


2: Add the glue to the charms and place them onto the clip on earrings, leaving the charm loop exposed.


3: Wait for the charms to dry.
5: Once the clips are dry, add a jump ring to one of the charm loops and attach one end of the chain. Close the jump ring to secure the chain in place.


6: Repeat step five to attach the other clip to the other end of the chain.

Once your chain has been attached to both clips your collar clips are ready to wear! How will you style yours?