-
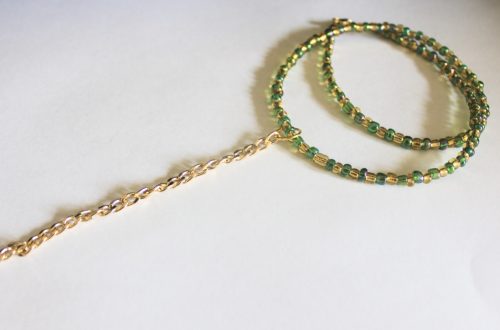
How to make a double-strand knot necklace.
This one didn’t really turn out how I had anticipated, but I thought I would share it with you anyway. I had more success making two beaded strands to knot together compared to this design that knots together a beaded strand with a chunky chain. If you don’t want the chain just make one bead strand and knot it loosely in the middle for a cool knot necklace look! This tutorial contains affiliate links.
You’ll need the following tools and materials to make your double-strand knot necklace:
1: Tiger tail wire. Make it a little longer than the chain you are using.

2: Four crimp beads.

3: Pliers. I used cutting, flat-nose and round-nose pliers.

4: A length of chunky chain.

5: Two jump rings.

6: A lobster clasp.

7: Beads. I used some blue plastic beads and some green glass beads.


Follow these steps to make your two-strand knot necklace.
1: Add the crimps to one end of the tiger tail wire.

2: Add the jump ring and loop the end of the wire around it and back through the crimp beads.

3: Squash the crimp beads using the flat nose pliers.

4: Begin adding the beads in your chosen pattern.


5: Bead until it is at your desired length.

6: Add the second pair of crimp beads to the wire and repeat steps 2 and 3 to secure the beads onto the strand.


7: Trim the excess wire using the cutting pliers.


8: Add the chain to the bead strand by opening the jump rings at either end of the necklace and adding the ends of the chain.


9: Add a lobster clasp to the necklace.


10: Tie the strands into a loose knot that sits at the centre of the necklace opposite the lobster clasp closure.

Now your necklace is finished and ready to wear! Like I said, the chain looks a bit weird on this one, so you can leave it out if you like. You could also make the double strand necklace and skip the knot!

You can make this necklace with materials you already have, but if you need some new supplies this tutorial contains affiliate links.
-
I keep hearing that chunky chain necklaces are trendy right now… here’s how to make a gold chunky chain necklace that makes a statement.

You might have seen our other tutorial that shows you how to make a chunky chain necklace. Well this one is a little different. It uses two gold chunky chains to make a cool statement. Please note that this tutorial contains affiliate links,
You’ll need these materials and tools to make your gold chunky chain necklace:
1: Pliers. Flat nose pliers and round nose pliers are the only tools you need to make your chunky gold chain statement necklace.


2: Two pieces of necklace length chunky gold chain.

3: Two large gold jump rings.

http://rover.ebay.com/rover/1/705-53470-19255-0/1?ff3=4&pub=5575554392&toolid=10001&campid=5338626756&customid=5338626756&mpre=https%3A%2F%2Fwww.ebay.com.au%2Fitm%2F250-pce-Brass-Gold-Tone-Open-Jump-Rings-5mm-Jewellery-Findings%2F173217759617%3Fhash%3Ditem2854954181%3Ag%3ACX0AAOSwYJNaqgxG
4: A gold toggle clasp.

Here are the steps you need to make your gold chunky chain statement necklace:
1: Fold the first piece of chain in half.

2: Fold the second chain in half and loop it around the first chain so that they are looped together.


3: Gather the matched chain ends together and secure them by attaching one of the jump rings.

4: Add one side of the toggle clasp and close the jump ring to secure one side of the necklace.

5: Repeat steps 3 and 4 for the other side of the necklace using the remaining jump ring and the other side of the toggle clasp.


Now your statement chunky chain necklace is finished! I think this is such a cool version of the current chunky gold chain necklace trend happening right now.
Here’s what it looks like on:

And here’s a sketch I did on my phone when I had the original idea… how cool is it that you can make sketches and write down your ideas when you’re on the go without any paper?!


Here are some other chunky chain tutorials: