-
How to make some stud earrings at home out of wire.
These wire earrings are super cute! Hammer some wire flat and then curl the ends to create some adorable little stud earrings that you can stack in multiple piercings.
You’ll need these tools and materials to make these stud earrings:
1: Cutting pliers, flat nose pliers and round nose pliers.

2: A hammer.

3: A steel hammering block.
4: Two small pieces of wire, around 4-5cm long. I used this rose gold filled wire.

5: A file or some sandpaper.

Follow these steps to make your cute little stud earrings.
1: Take the wires and place them on the hammering block.
2: Hammer one end of the wires flat using the hammer. Leave 1cm untouched.


3: Bend the wires at a right angle using the flat nose pliers. Bend at the point where the flat side ends.


4: Curl the flattened ends around the round nose pliers to form a little loop.


5: File or sandpaper the ends of the wires so that they are smooth and comfortable to wear.
6: Pop some butterfly backs onto each earring to finish them off.

Now your cute little curled wire earrings are finished and ready to wear! Super adorable and fun.

-
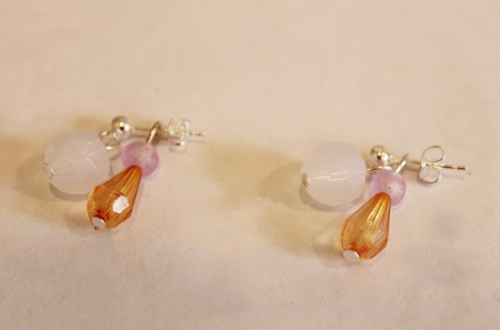
Stud Earrings are Classic! Use some beads to make your own statement studs
These stud earrings are made using some plastic beads and some head pins and they look adorable!
You will need the following tools and materials to make your stud earrings:
1: Two flat bed earring findings.

2: Two large head pins.

3: Two small head pins.

4: Two small jump rings.

5: Two part epoxy glue, I used Araldite.

6: A piece of scrap paper.

7: A skewer.

8. Four beads. I used two large resin beads and two small blue plastic beads.


9: Pliers. You’ll need your cutting pliers, flat nose pliers and round nose pliers.
Follow these steps to make your stud earrings:
1: Add the small beads to the small head pins.

2: Curl the ends of the pins around your round nose pliers to secure the beads in place. Do this for both beads.


3: Add the larger beads to the larger head pins.

4: Bend and trim the pins so that the pins protrude around 1cm from the bead.

5: Loop the ends of the pins using the round nose pliers.


6: Attach the small beads to the larger ones using the small jump rings.


7: Squeeze out the glue in equal parts onto the scrap paper and mix with the skewer.



8: Add the glue to the earring posts and place them on the backs of the large beads and leave them to dry.


Once the earrings are dry you can wear them! How cute are they?!

Note: This article contains affiliate links
-
Do you love florals? Why not make these cute beaded flower stud earrings?!

These earrings are a little fiddly to make but the results are so cute! I have made a bunch in different colours so I can mix and match in my multiple piercings.
You will need the following tools and materials to make your flower stud earrings:
1: Cutting pliers.

2: Thin wire.

3: A glue on earring stud with an earring back.

4: Seven glass e-beads beads, six in one colour and one in another colour. I used six white e-beads and one blue bead in a similar size.


5: Some nail polish. I didn’t have any clear polish so I used this sparkly polish that is mostly clear 🙂

6: Araldite glue.
7: A skewer.
8: Scrap paper for mixing glue.
Follow these steps to make your flower stud earrings:
1: Add the six white beads to the thin wire. Move the beads closer to one end of the wire.

4: Take the long end of the wire and thread it through the bead closest to the other end.

5: Pull the wire tight to create a circle shape and loop the short wire around so that the end can’t be seen anymore.


6: Wrap the long wire through the bead again to tighten the circle.
7: Add the blue bead to the wire.

8: Fold the wire to place the blue bead in the centre of the circle.

9: Loop the long wire through one of the white beads and pull it tight.


10: Pull the long wire towards the back and trim it.

11: Put a dab of nail polish on the ends of the wires to secure them and set it aside to dry.

12: Once the nail polish is dry you can start preparing the glue.
13: Squeeze out the Araldite glue in equal parts onto the scrap paper and mix it with the skewer.
14: Add glue to the back of the flower and the front of the stud finding.


15: Add the pieces together and set it aside to dry.
Once your earring is dry it is finished and ready to wear! It’ll be spring all year round with these adorable studs!

Here’s a selection I made in different colours.

-
Here’s how to make some cute studs out of some wire!
These tiny studs are made using a hammer and some gold-fill wire, I love them!

You will need the following tools and materials to make your wire stud earrings.
1: Two short pieces of wire. I used some rose-gold fill wire.

2: A steel block.

3: A hammer.

4: Some plastic nose pliers for bending the wire.

5: A file.
Follow these steps to make your wire stud earrings:
1: Place the wires on the steel block and hammer one side of each wire flat.


2: File the ends of the wires so that they are smooth.
3: Fold the wires around the pliers. Make sure you leave the posts long enough to fit in your lobes. I had to adjust mine a little bit after I took this photo.


4: Add the earring backs and now you’re done! How cute are these little guys?

Here’s another pair I made using thicker gold-fill wire.

-
Here’s how to make your own shell stud earrings! So cute for summer!!!
These shell studs are simple to make and will defs be your summer staple (or perfect for bringing some summer vibes to the winter months).
You’ll need the following tools and materials to make your shell stud earrings:
1: Two shells. Look for shells that have a flatish base to glue your stud onto. I used these mismatched shells that I found a while ago (If you can’t find any try buying some, but I think that making earrings with shells you have found yourself is more special!).

2: Blu tack. You’ll need this to keep your shells still while the glue is drying.

3: Two earring posts (and earring backs).
4: Araldite Glue.
5: A Skewer.
6: A piece of scrap paper for mixing glue on.
Follow these steps to make your earrings:
1: Pop your shells onto the blu tack with the underside exposed.

2: Squeeze out the glue in equal parts and mix it using the skewer.
3: Add glue to each of the shells and the tops of the earring posts. Place the posts onto the shells and leave them to dry.


4: Once the earrings are dry they are ready to wear! How easy was that?!

Here’s another pair I made using a matching pair of shells (as matching as unique shells can be).

Another tip: If your shells are looking a bit dull and dusty rub them with a soft cloth and a little bit of cooking oil (I used peanut oil because it was in the kitchen) to give them back their lustre!