-
Here’s how to combine a beaded necklace with a silk scarf to create a gorgeous new necklace.
Sick of your existing accessories game and want to wear your stuff in a new, more exciting way? Why not combine your pieces to make something unique? This simple tutorial shows you how to loop a scarf together with a necklace for an interesting look.
Please note that this tutorial contains affiliate links for which we may receive a commission.
You’ll need the following materials to make your new necklace:
1: A beaded necklace. I used this beaded one that slips over my head.

You can get something similar here:
2: A square silk scarf. I used this pink and yellow one.

If you don’t have anything similar you can get a similar scarf here:
Once you’ve chosen your scarf and necklace, you can follow these steps to make your new necklace:
1: Fold the scarf into a thin length and fold it in half.

2: Loop the scarf through the necklace.

Now your new necklace is ready to wear. Just tie the ends of the scarf around the other end of the necklace to secure it around your neck.


Here’s what it looks like on.

If you like this, here are some other necklace ideas that combine two existing pieces to make something new:
-
Love layering your necklaces but hate when they tangle? Here’s a trick to fix that!
I love layering my necklaces, but I can’t stand it when they tangle and twist together, so here’s how to use two clasps and a couple of jump rings to make a handy necklace stacker clasp that allows you to layer your necklaces with ease. This is a super simple tutorial that will transform your jewelry styling!
Please note that this tutorial contains affiliate links for which we may receive a commission.
You’ll need the following tools and materials to make your necklace stacker clasp:
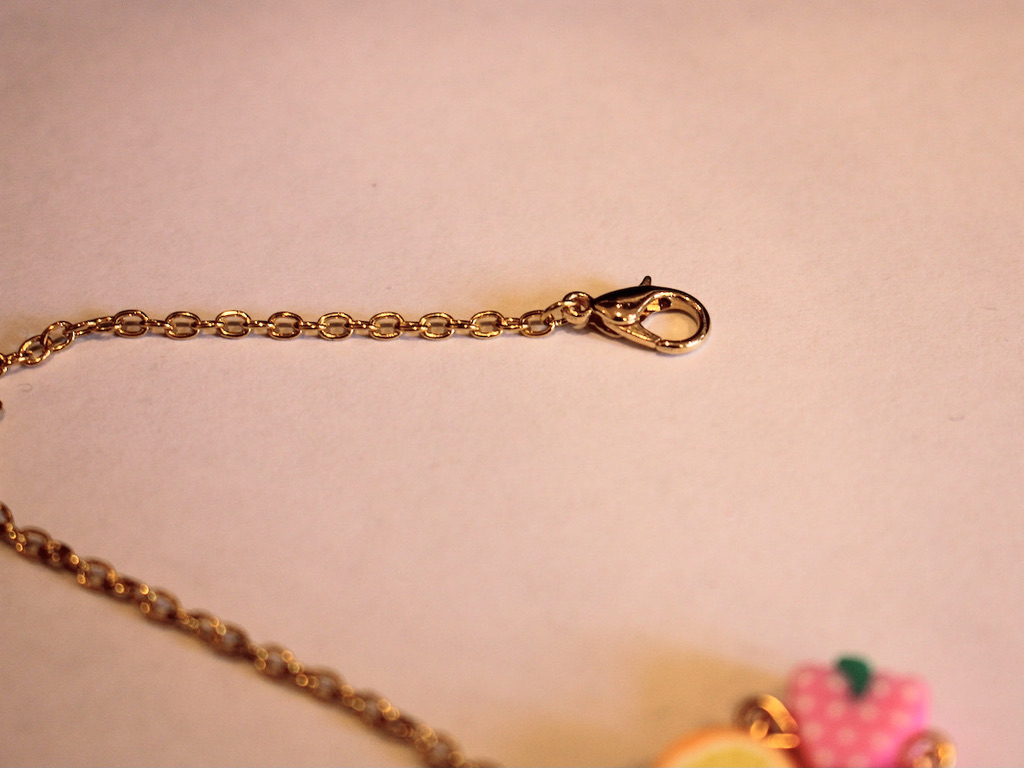
1: Two sterling silver lobster clasps with jump rings attached.

You can get some here:
2: Two large jump rings.

You can get some here:
3: A pair of flat nose pliers for opening and closing the jump rings.

You can get a pair here:
4: Any necklaces you want to wear stacked. I used this selection of beaded and chain necklaces of different lengths.

Follow these steps to make your game-changing necklace stacker clasp:
1: Take one of the jump rings and attach it to one of the clasp ends. Close it carefully using the flat nose pliers, making sure to get the ends close together.


2: Add the second large jump ring to the end of the second clasp and close it with the pliers.

3: Clip the second clasp to the large jump ring that you attached to the first clasp.

4: Now the clasp is complete and you are ready to start stacking necklaces. The clasp of each necklace is attached to the jump ring end of the clasp, while the other end is attached to the lobster clasp end.
5: Add the first necklace by clipping it onto the jump ring.

6: Then add the other end to the clasp end by opening the clasp and sliding the ring onto it before closing it again.

7: Repeat steps 6 and 7 for the other necklaces, being careful to attach them in the same order on either side.


Once you’ve attached all your necklaces, your new stacked piece is ready to wear. You can use bigger or smaller jump rings depending on how many necklaces you wish to stack. How handy?!
Here’s the finished clasp again.

And here it is with all the necklaces attached.


Here’s how it looks when it is being used.

-
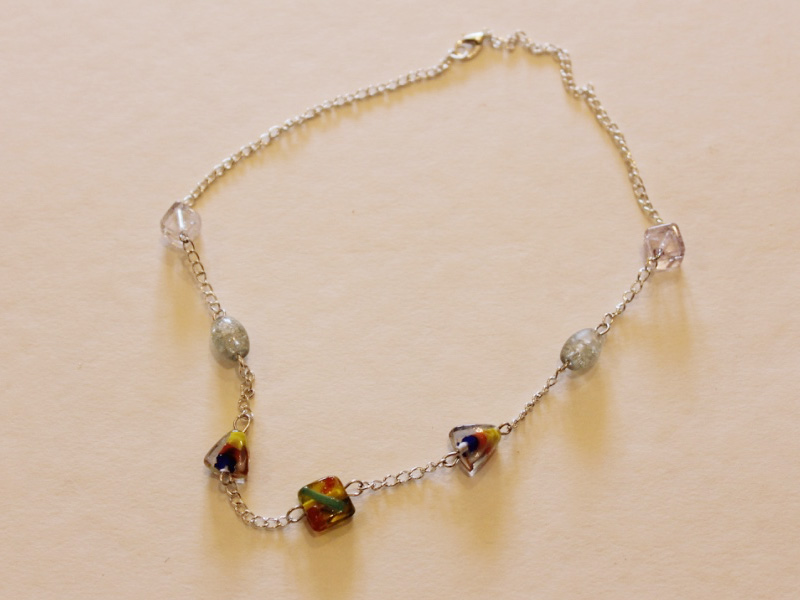
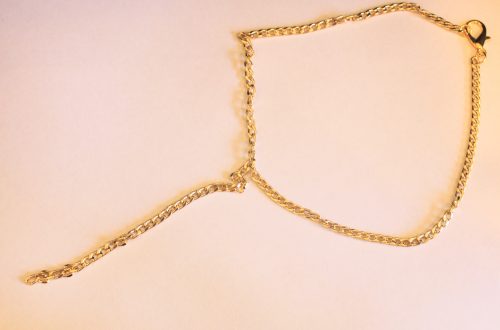
Here’s how to turn two necklaces into one unique statement piece.
I’ve made a few tutorials that show you how to reuse your existing jewellery to make something new, and this tutorial is another technique to add to your set of jewelry styling skills. This tutorial requires two different necklaces, I used a beaded one and a chain one, that are looped together to make something new. Please note that this tutorial contains affiliate links for which the website may receive a commission.
You will need the following tools and materials to make your looped mixed material necklace:
1: A chain necklace. I used this gold tone chain.

You can get something similar here:
2: A beaded necklace of a similar length. I used this rainbow beaded one I made earlier.

You can make your own by following these instructions (just skip the pearl), or you can buy a similar one here:
Follow these steps to make your new necklace:
1: Undo each of the necklaces and loop them together.

2: Clip the ends of each necklace closed to make two loops.
3: Open one of the clasps and attach it to the other side (without letting go of the loop you just made) to secure it around your neck.


The different materials of these necklaces allows you to create a more sculptural piece that shows off your unique style. I think it looks elegant and edgy at the same time. So cool. Here’s what it looks like on.


If you like this tutorial, here are some similar ones you can follow:
-
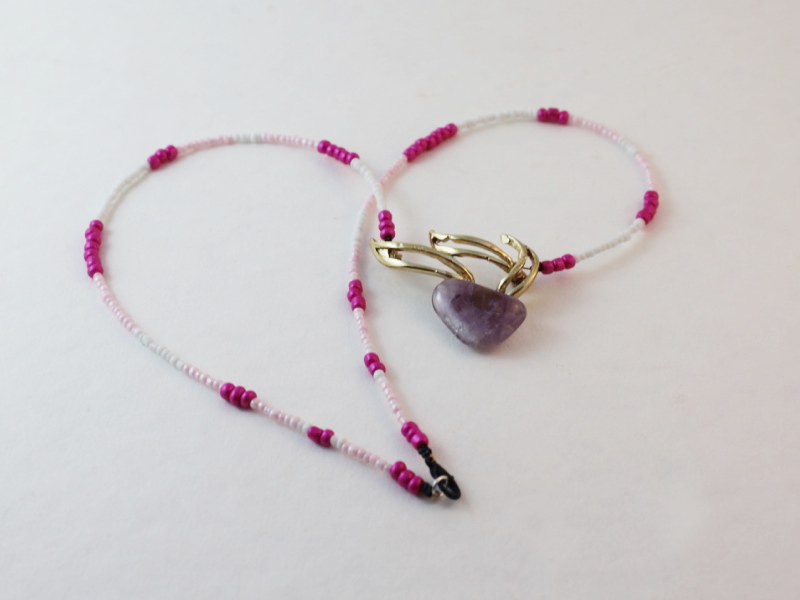
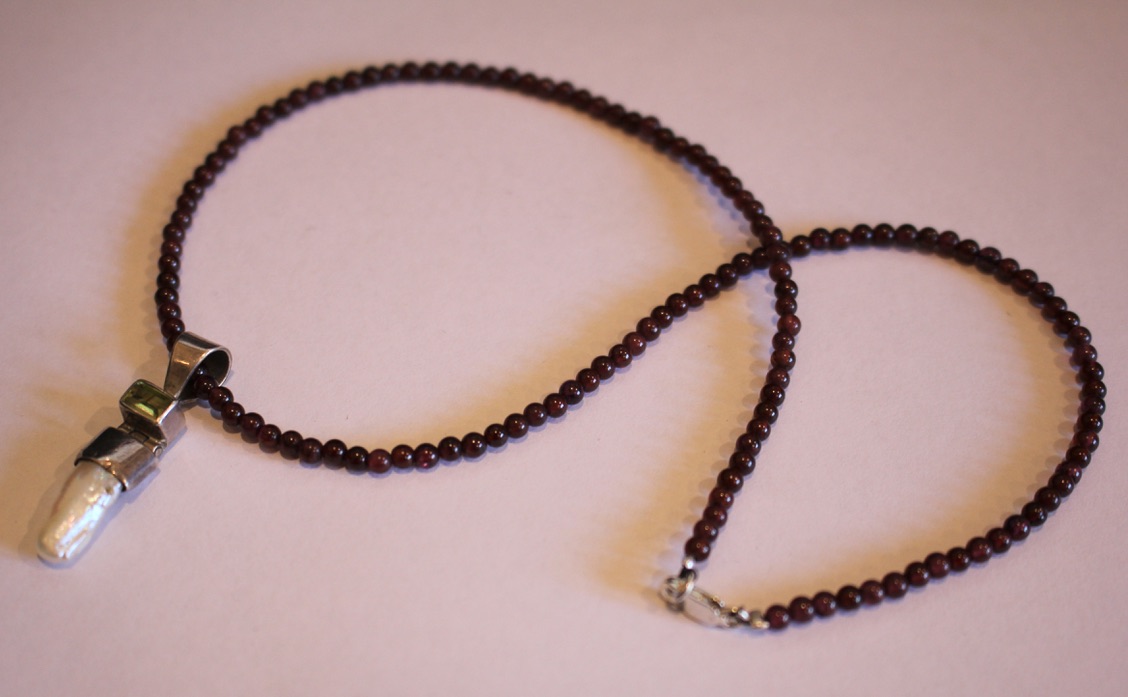
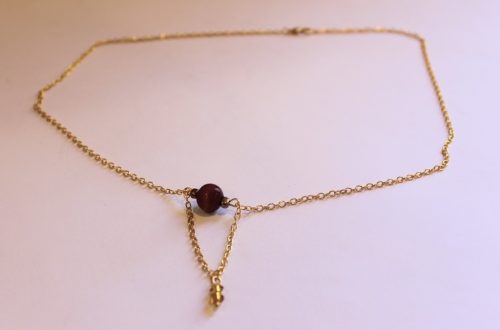
DIY Beaded Necklace Tutorial: Creating a Stunning Strand for Silver Pendants
I love necklaces, but I don’t always need my pendants to sit on a matching chain, sometimes I love the look of metal pendants on a beaded necklace strand. If you love this look too, here’s a fun tutorial that shows you how to make your own so that you can wear your favourite pendants on bead embellished necklaces! Please note that this tutorial contains affiliate links.
You’ll need the following tools and materials to make your beaded necklace strand for your pendant:
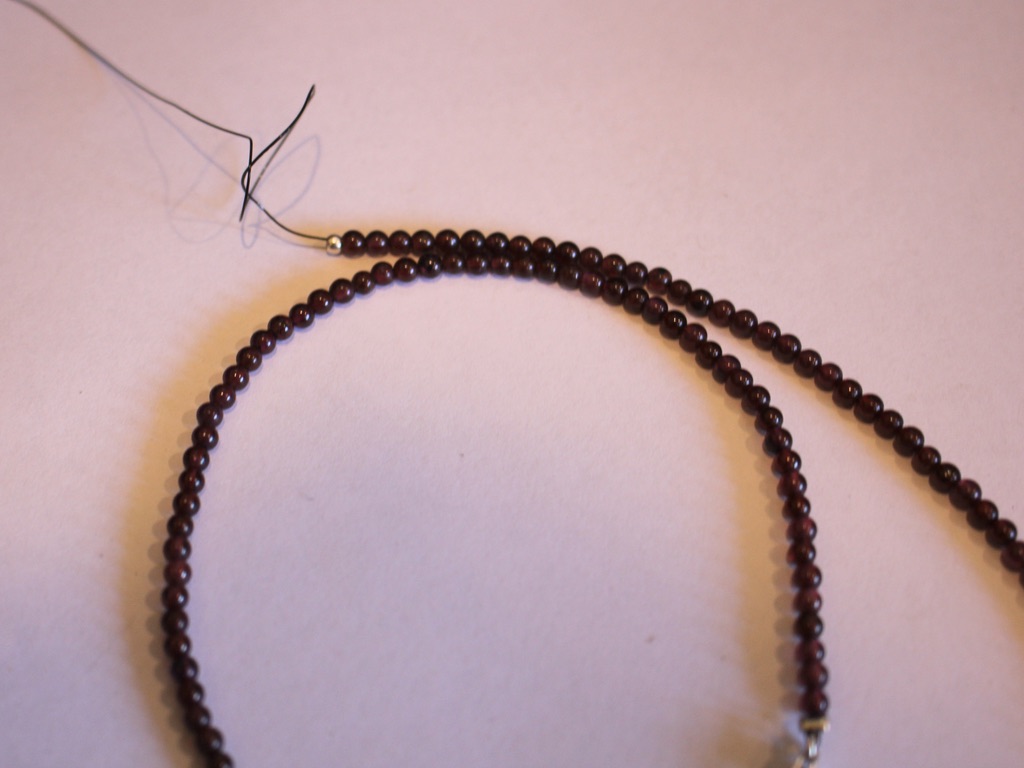
1: Some tiger tail wire. I used some thin tiger tail wire. Cut it to length by measuring out the length you would like your necklace to be, and add around additional 15 centimetres.

You can get wire here:
2: Pliers. I used my cutting pliers and flat nose pliers. I kept my round nose pliers on hand in case I needed them.

You can get plier sets here:
3: Some beads. I used these small round garnet beads. (Choose smaller beads to ensure that your pendant will slide over them easily).

You can get round gemstone beads here:
4: A pendant. I used this silver gemstone pendant. Make sure it has a bail (the loop at the top) that is large enough to fit over the beads you choose. I purchased this one at a local flea market, which can be a place to buy interesting jewellery.
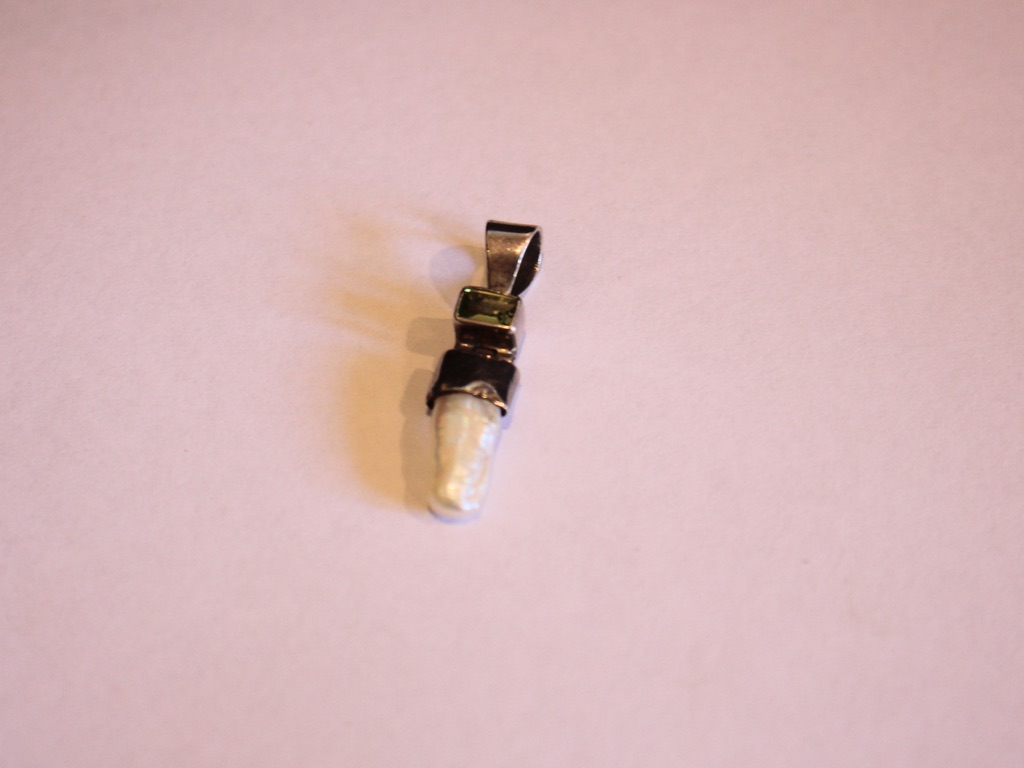
You can get silver and gemstone pendants here:
5: Two sterling silver crimp beads.

You can get sterling silver crimp beads here:
6: A sterling silver clasp and additional jump ring.

You can get silver clasps and jump rings here:
Here are the steps to follow to make your beaded necklace strand to wear your pendant on:
1: Add the crimp bead and clasp to the end of the tiger tail wire.

2: Loop the end of the wire around the jump ring on the clasp twice so that it is secure, then thread it through the crimp bead.


3: Squash the crimp bead using the flat nose pliers.

4: Begin adding beads, continue beading until you have a length you like.


5: Add the second crimp bead to the necklace (excuse my bent wire, it got a little tangled, if this happens to you, continue adding beads and it will smooth out, or try to avoid having kinks in the working section of your necklace).
6: Add the second jump ring to the end of the wire.
7: Loop the wire around the jump ring twice like you did in step two.

8: Thread the wire back through the crimp and the first few beads on the wire. Make sure to pull it tight, extra pliers can be useful for getting a tight fit.

9: Squash the crimp using the flat nose pliers again.

10: Trim the excess wire using the cutting pliers.

11: Now you can add your pendant!

12: Once your pendant has been added, your necklace is complete!


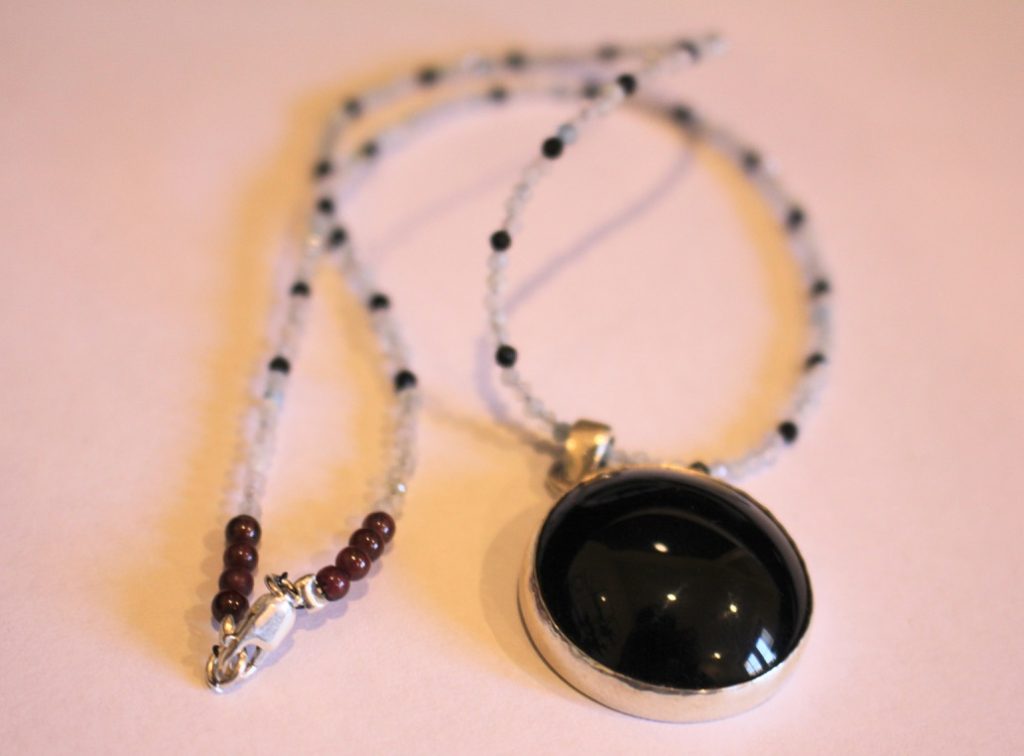
Here’s another one I made using a black cabochon pendant on a necklace made with faceted gemstone beads. So pretty! There are so many options using this technique! What combination will you make?
Here are some other pendant necklace tutorials to follow:
-
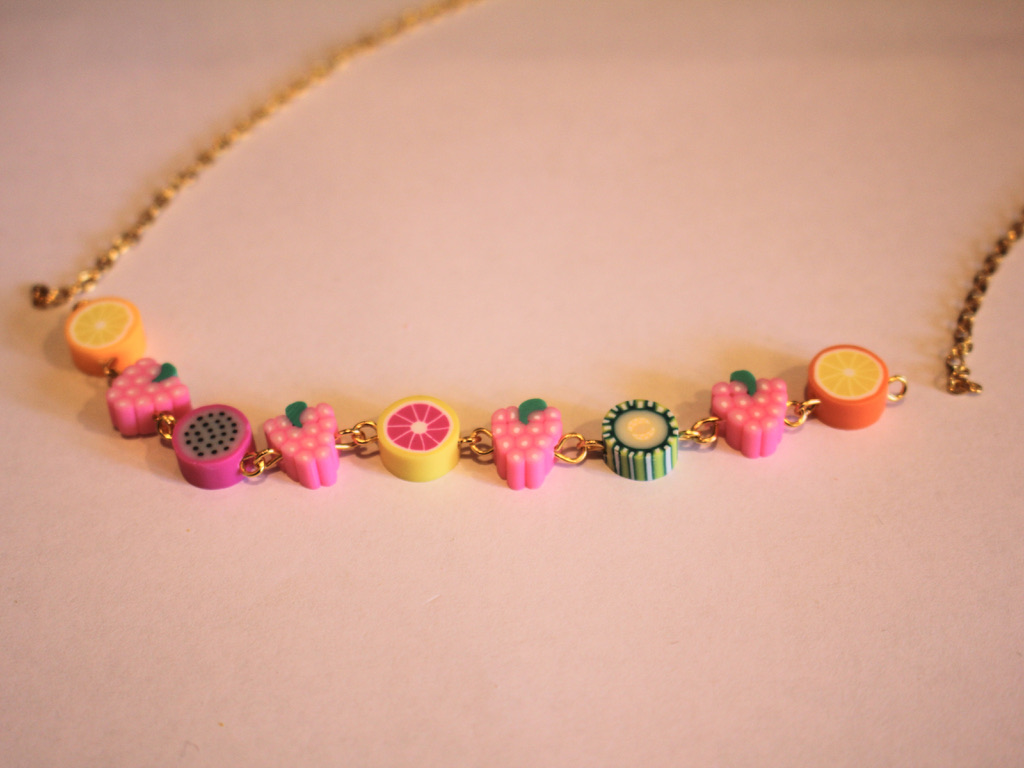
How to make a sweet fruity necklace with beads and some chain!
This necklace is super duper cute! Add some fruity polymer clay beads to eye pins and chain to create a fun beaded chain necklace perfect for adding some color and summer vibes to your wardrobe. Please note that this tutorial contains affiliate links.
You’ll need these tools and materials to make your fruity necklace:
1: A selection of polymer clay fruit beads.

2: The same number of eye pins.

3: Two pieces of chain slightly shorter than the necklace you want to make (The bead elements will make the necklace longer).

4: Two jump rings.

5: A lobster clasp.

6: Some pliers. I used my round nose and flat nose pliers for this piece.


Follow these steps to make your fruit necklace:
1: Add one of the beads to one of the eye pins.

2: Bend the pin to form an angle with the bead.
3: Loop the end of the pin using the round nose pliers. This will secure the bead onto the pin.


4: Repeat steps 1-3 for the rest of the fruit beads.

5: Attach all the fruit beads on their pins together to form a chain. Do this by slightly opening the loops with your pliers and then closing them again after sliding a charm onto the open loop.

6: Add one side of the chain to one end of the fruit chain you have just made attaching it as you did the fruit links in step 5.


7: Add the other side of the chain to the other side of the fruit section as you did in step 6.

8: Add a jump ring to one end of the chain and add the lobster clasp before closing it.

9: Add the other jump ring to the other side of the jump ring to finish it off.

Now your necklace is finished! How perfect and cheerful is this fruity design?!


Here are some other fruity jewelry tutorials you can make if you loved this one:
- A fruit themed waist chain
- Beaded hoops with glass fruit charms
- This perfectly simple apple bracelet
- This cute peachy anklet
- Strawberry dangle charm earrings
- Hot hot hot, a single chilli and pearl earring
- Orange threader earrings
- This yummy bell pepper necklace
- Fruit also features on this mixed bead necklace
- And on this simple strawberry necklace
- This letter bead bracelet has a happy banana on it
-
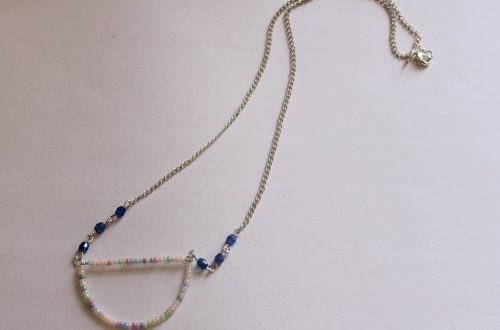
Here’s how to make a trendy mixed bead necklace!
I’ve been seeing playful mixed bead necklaces like this all over social media. These necklaces sure are pretty, they’re also really really easy to make! So instead of splurging on a pre-made one, why not make your own custom design for much cheaper? This is also a great way to use any special and one-off beads in your collection and to show off your own particular style through the beads and charms you use. I used a variety of beads in my own piece including a polymer-clay bead I made years ago, some special glass beads and some gemstones as well. Please note that this tutorial contains affiliate links, I hope you find them useful for acquiring the materials to make your own special necklace.
You’ll need these tools and materials to make your own maximalist, playful beaded necklace:
1: A mixture of beads. I used some glass seed beads, glass statement beads, pearls in different sizes and shades, polymer clay fruit beads, fluorite chip beads, coral beads and a variety of plastic beads. For the best result, choose beads that have different shapes, patterns and bright colours.

Mixed glass beads:
Fluorite chip beads
Polymer clay fruit beads
Pearls
Mixed gemstone beads
Seed beads
2: A piece of tiger tail wire that is slightly longer than your desired necklace length.

3: Four crimp beads.

4: A clasp. I used this gold-filled one with jump rings attached.

5: An extra jump ring.

6: Pliers. I used my round nose pliers (middle), cutting pliers (left) and flat nose pliers (right).
Follow these steps to make your own whimsical pearl embellished beaded necklace:
1: Add two crimp beads to one end of the tiger tail wire.

2: Add a jump ring to the wire as well.

3: Fold the wire around the jump ring and put it through the crimp beads.

4: Squash the crimp beads to secure the jump ring in place.


5: Begin adding beads. Add them in random order to create the perfect chaotic but playful look!

6: Continue adding beads until your necklace is at its desired length.

7: Add the remaining two crimp beads to the other end of the necklace.

8: Add the clasp.

9: Loop the wire around the clasp and through the jump rings and the last few beads of the necklace. Pull the wire tight.

10: Squash the crimps to secure the wire in place.

11: Trim the excess wire.

Now your unique, cool and fun beaded necklace is ready to wear! What different beads will feature on yours? I bet if you make this necklace it will be your new lucky charm 😉


If you love unconventional pearl jewelry, here are some other pearl designs you can make at home:
- 1: Rainbow and gold wire pearl statement earrings
- 2: A pearl embellished hand harness.
- 3: A cute pearl charm that you can put on a necklace or earrings!
- 4: An anklet with pearls and colorful glass beads.
- 5: This trendy necklace that features a single pearl surrounded by mixed glass beads.
- 6: Dangly beaded pearl hoops.
- 7: Construct some pearl tassels for your silver hoop earrings.
- 8: Y2K nostalgia jelly earrings with pearl charms.
- 9: A single earring with pearls and a glass charm.
- 10: Rainbow pearl drop earrings!
-
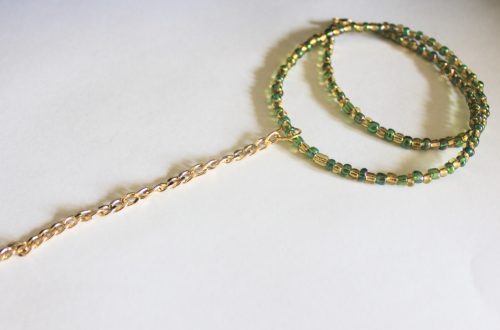
How to make a beaded necklace with cute little bead charms!
This is a cute little piece that looks great layered with chains! Use some fun gemstone beads to add some pizazz to your design. Please note that this tutorial contains affiliate links.
You’ll need these tools and materials to make this necklace:
1: Some tiger tail wire long enough to fit around your neck, plus some extra.

2: A set of pliers. I used my cutting pliers (left), flat nose pliers (right) and round nose pliers (middle).
3: Some glass beads. I used these green glass e-beads.

4: Some statement beads. I used 5 stone beads.

5: Four crimp beads.

6: Two jump rings.

7: Five head pins.

8: A lobster clasp.

Follow these steps to make your beaded charm necklace:
1: Add each of the statement beads to each of the head pins.

2: Curl the tops of each pin using the round nose pliers. This will keep the bead in place.


3: Set the charms aside.
4: Put two of the crimp beads onto the tiger tail wire.

5: Add one of the jump rings.
6: Loop the wire around the jump ring and back through the crimp beads. Pull the wire tight.

7: Squash the crimp beads using the flat nose pliers.


8: Begin adding beads to the wire.

9: Bead until you get to a length you like, before the middle of the wire.

10: Add the first bead charm from the set you made earlier.

11: Add some more glass beads and then add another bead charm.

12: Continue adding charms in your chosen pattern until they are all in place.


13: And now you can add the glass beads until your necklace is at the right length and is beaded evenly so that the bead charms are at the bottom.


14: Add the second pair of crimp beads and the jump ring.

15: Loop the wire around the jump ring and back through the crimps and the last few beads on the strand.

16: You should now pull the wire tight and squash the crimps with the flat nose pliers.


17: Now you can trim the excess wire with cutting pliers.

18: Open one of the jump rings and attach the lobster clasp. Close the ring to secure the clasp in place.


So now your necklace is finished and ready to wear! So so cute. What necklaces will you layer yours with?


Or maybe you’ll wear it as a statement on its own?!


-
Need a new necklace? Look no further than this tutorial!
Here’s a new necklace you can make and customise to your liking. It uses memory wire and chain to make a layered effect for extra visual interest.
Here’s what you need to make this necklace:
1: Pliers. I used my cutting pliers, round nose pliers and flat nose pliers.
2: Two half circle pieces of necklace length memory wire.

3: Two pieces of chain that, when measured together, are long enough to fit around your neck.

4: Six jump rings.

5: A lobster clasp.

6: Beads. I used yellow glass beads.

Follow these steps to make your necklace:
1: Curl one end of one of the pieces of memory wire using the round nose pliers to form a loop.


2: Add beads to the wire until there is approximately 1cm left unbeaded.


3: Curl the other end of the wire using the round nose pliers again to secure the beads in place.

4: Repeat steps 1 to 3 for the second piece of memory wire.

5: Attach the two pieces of memory wire together using two of the jump rings.


6: Attach one of the pieces of chain to one side of the memory wire arches using another of the jump rings.

7: Repeat step six for the other side of the necklace attaching the second piece of chain.

8: Attach the lobster clasp to one side of the necklace using one of the remaining two jump rings.

9: Attach the last jump ring to the other side of the necklace to finish it off.

Now your new necklace is ready to wear!


-
Got a ring that doesn’t fit anymore? Turn it into a fun pendant!
I popped this ring on the other day… and it got stuck on my finger! After panicking a little I managed to get it off and decided it needed a new life as a pendant rather than a ring. Here’s how to transform your too small ring into a cool necklace pendant…
This tutorial contains affiliate links.
You’ll need the following tools and materials:
1: A ring that doesn’t fit you anymore. I used this steel ring.

Here’s something similar:
2: Pliers. I used my cutting pliers, round nose pliers and flat nose pliers.
3: Some tiger tail wire, long enough to make a necklace.

4: Four crimp beads.

5: Two small jump rings.

6: A lobster clasp.

7: Beads. I used this mix of pastel glass seed beads. I also used six larger beads to fit over the folded tiger tail wire.


Follow these steps to make your ring pendant necklace:
1: Add two of the crimp beads and a jump ring to one end of the tiger tail wire.


2: Loop the end of the wire around the jump ring and back through the crimp beads, pull the wire tight.

3: Squash the crimp beads using the flat nose pliers.


4: Bead the wire in any pattern you wish. I beaded mine randomly with no particular pattern.


5: Once you have your necklace at the length you want it, add the remaining crimp beads and jump ring.

6: Loop the end of the wire around the second jump ring and back through the crimp beads and the last few glass beads, pull it tight.

7: Squash the crimps using the flat nose pliers and then trim the excess tiger tail wire using the cutting pliers.


8: Add the ring to the strand.

9: Attach a lobster clasp to one of the end jump rings to finish it off.

Now your ring pendant necklace is finished and ready to wear!


Here’s another idea, pop your rings onto a chain. Here’s one I made with two brass rings on a silver-tone chain.

Here are some other ways to use rings in your jewellery:
- How to turn a ring into the central feature of a choker necklace
- Here’s how to turn a costume ring into a different kind of pendant
This tutorial contains affiliate links.
-
Here’s how to make a bead chain lariat
Bead chains are pretty cool, and a fun way to use any random beads you have lying around. I recently made this kitschy hodgepodge lariat necklace using the bead chain technique. This tutorial features affiliate links.
Here are the tools and materials you need to make your bead chain lariat:
1: Pliers. I used by round nose and flat nose pliers for this design.
2: An assortment of beads. I used a random assortment of plastic, timber and glass beads.

3: A bunch of eye pins.

4: Two head pins.

5: A lobster clasp.

6: Two medium jump rings.

7: Two smaller jump rings.

Follow these steps to make your bead chain lariat:
1: Add some feature beads to one of the head pins. I used this silver plastic heart bead and some glass seed beads.

2: Bend the pin at a right angle and use the round nose pliers to form the top into a loop.


3: Set this pin aside.
4: Begin adding beads to the eye pins.

5: Once each pin is beaded, bend the top to form a loop using round nose pliers. This will secure the beads in place.

6: Repeat this step for the other pins, attaching the pins together by opening one of the loops and sliding it through another to form the chain.


7: Once you have a chain long enough to fit your neck, attach the two ends together using one of the larger jump rings.


8: Create a few extra links and attach them to the middle of the necklace, finishing with the first head pin you beaded.


9: Split the top of the chain opposite the lariat chain you just attached.

10: Attach the clasp to the chain using one of the smaller jump rings and add another jump ring to the other side.


11: Bead the other head pin, looping it at the top as you did the others. Attach this pin to the chain behind the clasp using the other larger jump ring.


Now your necklace is finished! So fun!


This tutorial contains affiliate links.