-
Here’s how to make a sweet daisy chain necklace using tiger tail wire!
Daisy chains are a classic beaded jewellery technique, and they look amazing! Here’s how to make one using some tiger tail wire and a selection of glass beads. Please note that this tutorial contains affiliate links.
You’ll need these tools and materials to make this daisy chain necklace:
1: A length of tiger tail wire, you’ll need quite a lot as the daisy chain technique uses some extra wire. I cut mine about 4x the length I wanted for my necklace, approximately 1.5m long. I suggest using your best guess rather than taking an exact measurement.

2: Some beads. I used a variety of glass beads including recycled orange e-beads, some gold tone beads and some blue seed beads.

Blue seed beads: https://amzn.to/3S8agp8
3: Four crimp beads.

4: A clasp and jump ring. I used a gold-filled parrot clasp.

5: Pliers. I used cutting pliers, round nose pliers and cutting pliers to finish my necklace.

Follow these steps to make your beaded daisy chain necklace:
1: Add two crimp beads and the clasp to the end of the wire.


2: Fold the wire around the clasp and back through the crimps.

3: Squash the crimp beads to secure the clasp to the end of the wire.


4: Begin adding beads. I made mine a pattern of blue beads and orange flowers so started by adding 15 blue seed beads.

5: Add six beads for your first flower.
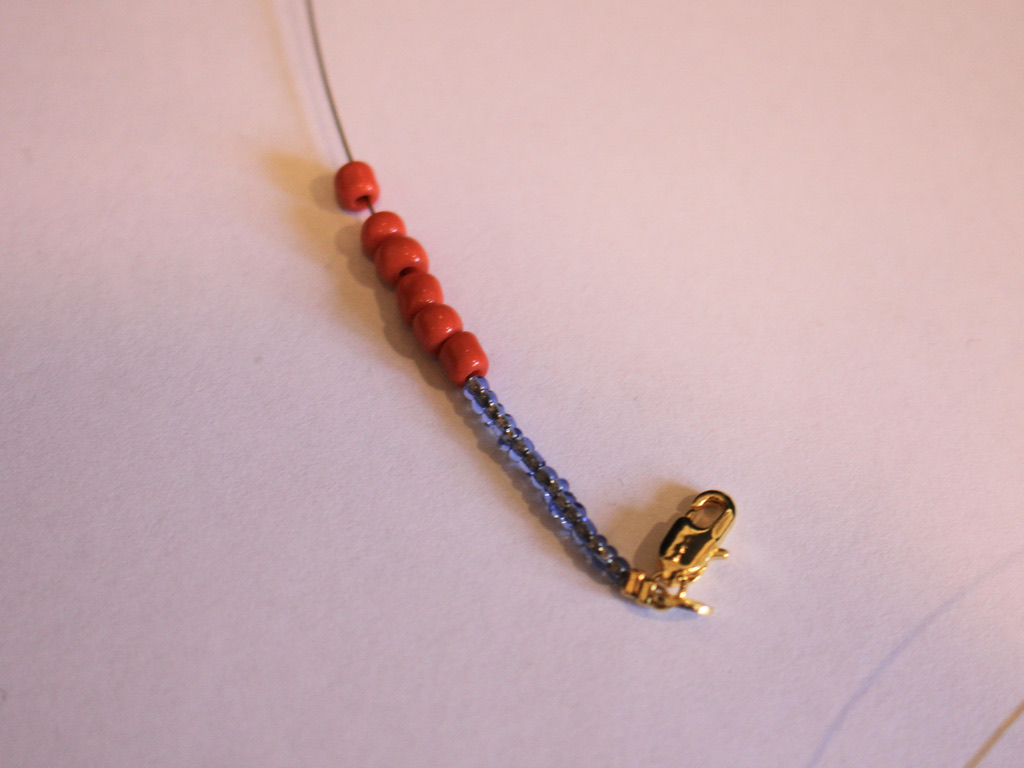
6: Take the end of the wire and thread it through the first flower bead to form a circle shape.


7: Pull the wire tight and add another bead to make the centre of the flower, I used my gold e-bead.

8: Put the bead in the middle of the circle and then thread the end of the wire though a flower bead directly opposite the first one you threaded it through to make the flower. This will keep the middle bead in place at the centre of the flower.


9: Repeat steps 4 to 8 to create a pattern of beads and flowers until you have a length you like and that is comfortable for a necklace.


10: Once you have reached your desired length, add the remaining crimp beads to the wire.


11: Add the jump ring to the end of the wire as well.
12: Loop the wire around the jump ring and back through the crimps and beads at the end, then pull the wire tight.

13: Squash the crimps using the flat nose pliers.

14: Trim the excess wire using your cutting pliers.

Now your necklace is finished and ready to wear! Whats colours will you make yours in?


If you love making flowers out of beads, here are some more floral tutorials for you.
-
Want versatile jewellery? This bracelet can also be part of a necklace!
Remember this tutorial? Well here’s how you can make this design work even harder for you. Make a necklace strand that will also fit around your wrist as a bracelet. (Please note that this tutorial contains affiliate links).
You’ll need these tools and materials to make this necklace:
1: Pliers. I used my round nose (middle), flat nose (right) and cutting pliers (left).
2: Tiger tail wire, long enough to wrap around your wrist twice plus a little bit extra.

3: Four crimp beads.

4: Two jump rings.

5: Two large lobster clasps.

6: Beads. I used opalite beads and some recycled orange glass beads.


Follow these steps to make your wrap bracelet that can also be used as a component in the customisable necklace design.
1: Add two of the crimp beads and a jump ring to one end of the tiger tail wire.


2: Loop the wire back through the jump ring and through the crimps.

3: Squash the crimp beads using the flat nose pliers.


4: Add beads to the wire in your pattern of choice.

5: Once you have the length you want, add the remaining crimp beads to the end of the wire and the other jump ring.


6: Loop the wire around the jump ring and back through the crimps and the first few beads. Pull the wire tight.

7: Squash the crimp beads using the flat nose pliers.

8: Trim the excess wire.

9: Attach a lobster clasp to either end of the beaded strand by opening each jump ring and sliding them on. Make sure you close the jump ring again to secure the clasps in place.


Now your convertible bracelet/customisable necklace strand is finished. How will you wear yours?


-
I’m not sure what to call this design, but it sure is cute! Here’s a new beaded earring tutorial.
These earrings are made from four pieces of bracelet length memory wire, attached together to form an eye shape. These cute earrings can be beaded up in lots of different colors to suit your preference. This tutorial contains affiliate links.
You’ll need the following tools and materials to make your earrings:
1: Pliers. I used my cutting pliers and round nose pliers.


2: Bracelet length memory wire cut into four equal half circle pieces.

3: Earring hooks.

4: Four small jump rings.

5: Two big jump rings.

6: Beads. I used orange and clear glass beads.


Follow these steps to make your new earrings:
1: Curl one end of one of the wires to form a loop using the round nose pliers.

2: Add beads to the wire and leave a 1cm section unbeaded.

3: Use the round nose pliers again to curl the other end of the wire and secure the beads on the wire.

4: Repeat steps 1 to 3 for the remaining three wires, beading two wires in one colour and two in the other.


5: Start attaching the wires together. Take one of the clear beaded wires and one of the orange ones and attach them together using one of the small jump rings.

6: Now attach the other side together to form a squashed circle/eye shape.

7: Repeat steps 6 and 7 for the other earring.

8: Add the earring hooks to each of the beaded eye shapes using the large jump rings. I made mine asymmetrical so that one has an orange top and the other has a clear top.


Now your earrings are finished! How cute is this design?


-
Do your earrings need an update? Try making these interchangeable earring jackets!
Here’s a tutorial for some earrings that you can switch up! Make multiple charms to add to the backs of your earrings for a new look each time.

You will need the following tools and materials to make your earrings with interchangeable ear jackets:
1: Pliers. You will need round nose pliers, flat nose pliers and cutting pliers.
2: Six head pins.

3: Two charm connector stud earrings.

4: Beads of your choice. I used these faceted plastic beads.

Follow these steps to make your interchangeable earrings:
1: Add beads to each of the head pins in your choice of pattern.

2: Bend the tops of each head pin to form a right angle with the beaded section.


3: Trim any pins that are too long using the cutting pliers.


4: Create loops at the top of each pin to secure the beads in place.


5: Add two of the bead charms to the loops on the charm connector stud earrings.

6: Slip the ear jackets onto the posts of the earrings behind your ears. Switch them up as you see fit!


-
This necklace is special… gems and ribbons!
I really love the combo of gemstone beads on a ribbon to make a cool necklace. I made this one a statement using a bright orange ribbon. This tutorial contains affiliate links.
You will need the following tools and materials to make your ribbon gemstone necklace:
1: Pliers. You’ll need your flat nose pliers and round nose pliers to make your ribbon gemstone necklace.

2: A piece of ribbon long enough to be a necklace.

3: Two flat crimp ends.

4: A large jump ring.

5: Two small jump rings.
6: Three head pins.

7: A lobster clasp.

8: Gemstone beads. I used this selection of beads including a shell bead and a coral bead.

Follow these steps to make your gemstone ribbon necklace:
1: Place each of the beads on the head pins.

2: Create a loop at the end of each pin using the round nose pliers to secure the beads in place.


3: Add the beads onto the large jump ring and close it.


4: Add the bead charm to the ribbon and tie a knot to secure it in the middle of the ribbon.


5: Add a crimp to either side of the ribbon ends using the flat nose pliers to squash it in place. I had to fold my ribbon a little to make sure it fit.


6: Add a jump ring to one side of the ribbon end and add the lobster clasp to the end.

7: Add the other jump ring to the other side of the necklace to finish it off.


Now your gemstone ribbon necklace is ready to wear! So cool!