-
Here’s How to Make a Funky Rhinestone Brooch For Shining up Your Fave Old Outfit!

Do you need a little brooch to brighten up your favorite outfit or trusty winter scarf? This piece is super easy to make and looks great.
You will need the following tools and materials to make this brooch:
1: A glue-on brooch pin.

2: Araldite 2-part glue.

3: A skewer.

4: A scrap piece of paper.

5: A flat piece of plastic to make the base of your brooch. I used this green piece of laser-cut acrylic.

6: Some assorted rhinestones with flat-back settings. I also used a small round mirror to decorate my brooch.

Follow these steps to make your brooch:
1: Mix up the glue on some scrap paper. To do this you will need to squeeze out equal parts from the tube and mix them well using the skewer.



2: Add glue to the backs of the rhinestones and apply them to the piece of acrylic in any pattern you choose. I made the mirror the center of my brooch and added an extra rhinestone on top.


3: Wait for the glue on the rhinestones to dry. You might need to mix some extra glue to use to attach the brooch pin.
4: Add the glue to the brooch pin and place it carefully on the back side of your plastic base. If your base is translucent like mine you might want to ‘hide’ your pin behind the decorations on the front.


Once the glue on the pin is dry your brooch is finished and ready to wear! How easy was that?
Here are some other brooch DIY’s that you can try:
-
How to Make Stud Earrings. You’ll Wanna Get These Stunners on Your Ear Lobes!
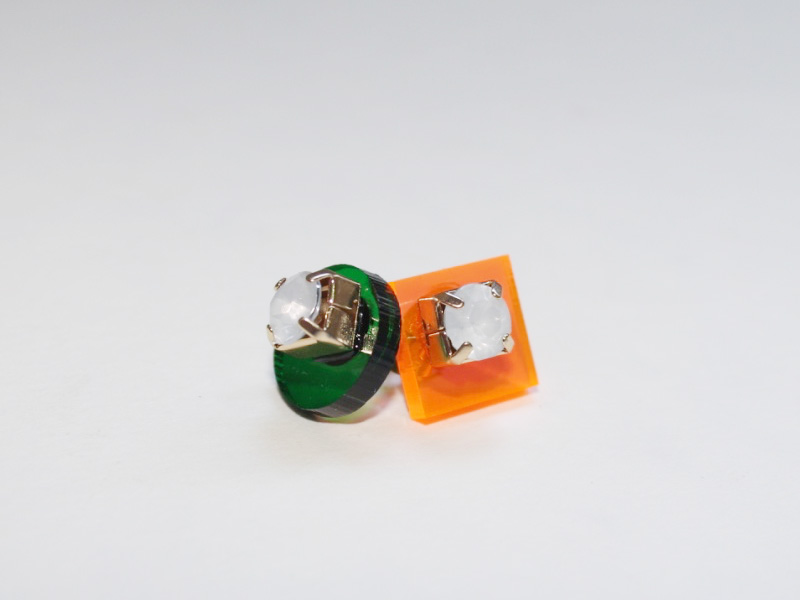
These earrings are easy to make and make a great impact. This design is made using your choice of components, some stud earring posts and some Araldite glue. If you’ve tried out the statement ring tutorial then you’ll already have an idea of how easy this design is to make, all you need to do is to mix up the glue and piece together your components.
You will need the following tools and materials to make these earrings:
1: Glue. I used Araldite two part glue to make these earrings. Make sure you use this glue in a well ventilated area.
2: A skewer for mixing glue with.
3: A piece of scrap paper to mix the glue on.

4: Post earrings and earring backs.

5: Two base pieces to attach the earrings to. In this design I used two pieces of laser cut acrylic in different shapes.

6: Two decorations to attach to the front of your chosen base pieces. In this design I chose to use two rhinestones.

The Steps:
1: Squeeze a little bit of glue out of the tube, keeping it in equal parts. This glue sets quickly so you might need to make a few batches to finish off your earrings.
2: Mix the glue carefully using the skewer.
3: Collect some glue on the end of the skewer and apply it carefully to the back of the rhinestones.

4: Carefully place each rhinestone onto each of the acrylic pieces. Once they are in place, leave the pieces to dry.

5: Once the rhinestones have dried, begin applying glue to the bed of each earring post.

6: Carefully place each post on the back of each acrylic piece. Once they are in place you will need to prop up the earrings to be level to prevent the earring backs from moving out of place before they dry.

9. Once the glue has dried your earrings are complete and ready to wear.
Stud earrings are a wardrobe staple and we’ve got many different styles for you to DIY, check out these other stud earring tutorials:
- Beaded flower stud earrings
- Shell stud earrings
- Adorable pompom stud earrings
- Cute bow studs
- How to turn old clip on earrings into studs for pierced ears
- Tiny hammered wire studs
- Crystal statement studs
- Sweet ladybug studs
- How to transform buttons into stud earrings
- DIY Design Inspiration: Asymmetrical stud earrings
This tutorial contains affiliate links.
You May Also Like
Do you love simple earrings made from fine materials? Here’s how to make a pair of hammer detail threader earrings!

Here’s how you can make your own sterling silver earring hooks that are embellished with gorgeous beads!

Do you like geometric jewelry? Here’s how to make a pair of square beaded earrings
-
Bling Up Your Look With This Epic Statement Ring
This DIY jewelry tutorial is a little different, instead of relying on beads, pins and wire to create a ring, this design uses a flat bed ring finding and an assortment of bright and shiny materials to make a statement. All you need to construct a ring like this are your materials and some strong glue.
To make this design you will need to use the following tools and materials:
1: Glue. When I am working with translucent materials I prefer to use Araldite glue. Using super glue or hot glue from a glue gun can affect the appearance of your materials and the finish of your overall design.
2: A skewer or stick for mixing and applying the glue.
3: A piece of paper or plastic to mix your glue on.
4: A flat bed ring finding.

5: A base piece to build your decoration on. In this design I used a piece of green laser cut acrylic.

6: Decorations. For this design I used two faux pearls and a large pink rhinestone.


The Steps:
1: Squeeze some glue out of the tube, Araldite is a two part glue that requires mixing to make it set. You might need to mix a few batches as the glue can harden while you are waiting for your components to dry. I recommend using this glue in a well ventilated area.
2: Mix the glue carefully using the skewer.
3: Add some glue to the end of the skewer and carefully apply it to the pink rhinestone centerpiece.

4: Carefully place the rhinestone onto the green backing piece. Once the piece is in place, begin adding glue in the same manner to the pearl decorations, placing them either side of the pink rhinestone centerpiece.

5: Once all your decorations are in place, let the piece sit for a few minutes to dry. Try to keep the piece flat to prevent the decorations from sliding around on the base piece.

6: Once the ring decoration is dry, turn it over to prepare for the attachment of the ring finding.

7: Add some glue to the flat part of the ring finding. You might have to mix up some more glue at this stage as your initial batch may have hardened.

8: Carefully place the ring finding onto the backside of the base piece so that it sits directly behind the pink rhinestone centerpiece.


9: You might need to hold the piece still until it begins to dry. Alternatively, you can prop it up, being careful to keep the piece straight so that the ring finding doesn’t move and set in the wrong spot.
Once all the components are dry and set in place your stunning statement ring is ready to wear!



