-
Here’s how to make a necklace strand for your cute beaded person charm…
Remember this charm? Here’s how to make a crazy mixed bead necklace to hang it on and wear about! This tutorial makes use of those random mixed beads you aren’t sure what to do with! Please note, this tutorial contains affiliate links.
You’ll need these tools and materials to make your beaded necklace:
1: A person charm, you can follow the tutorial here.
2: A piece of tigertail wire, long enough for your desired necklace length, plus a few extra centimetres.

3: Four crimp beads.

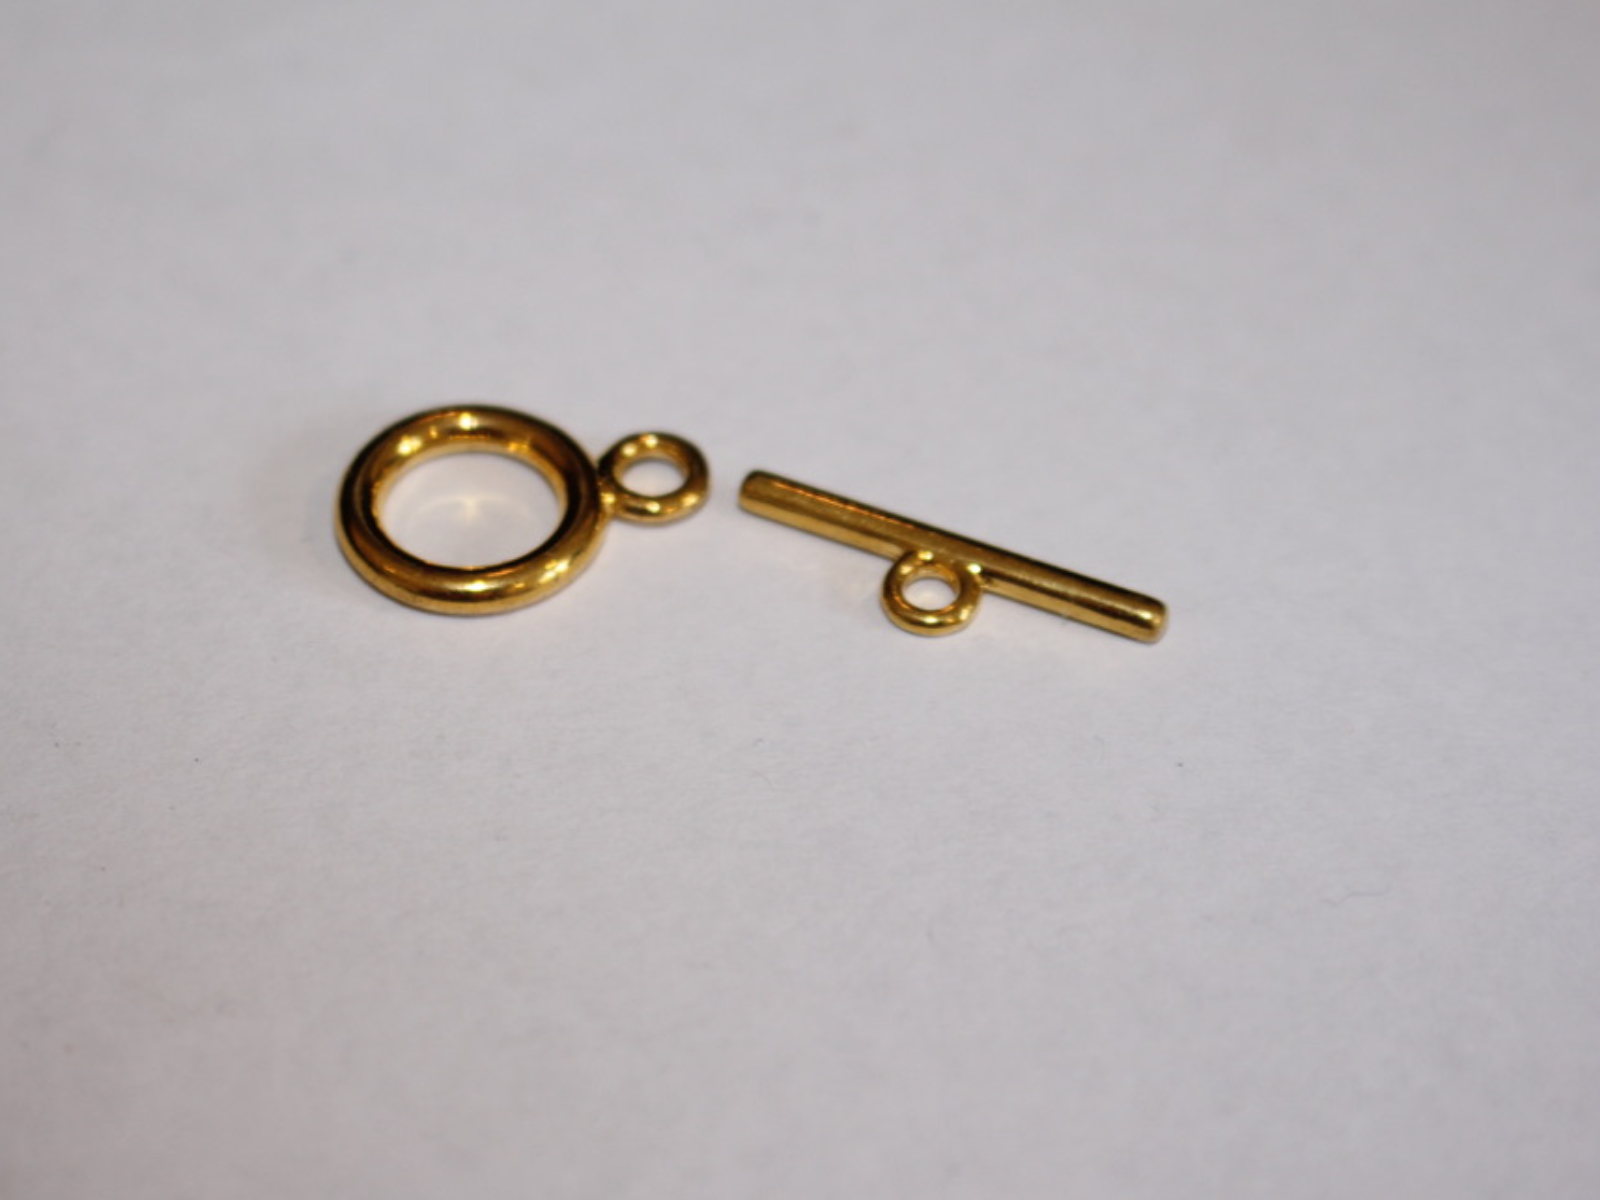
4: A toggle clasp.

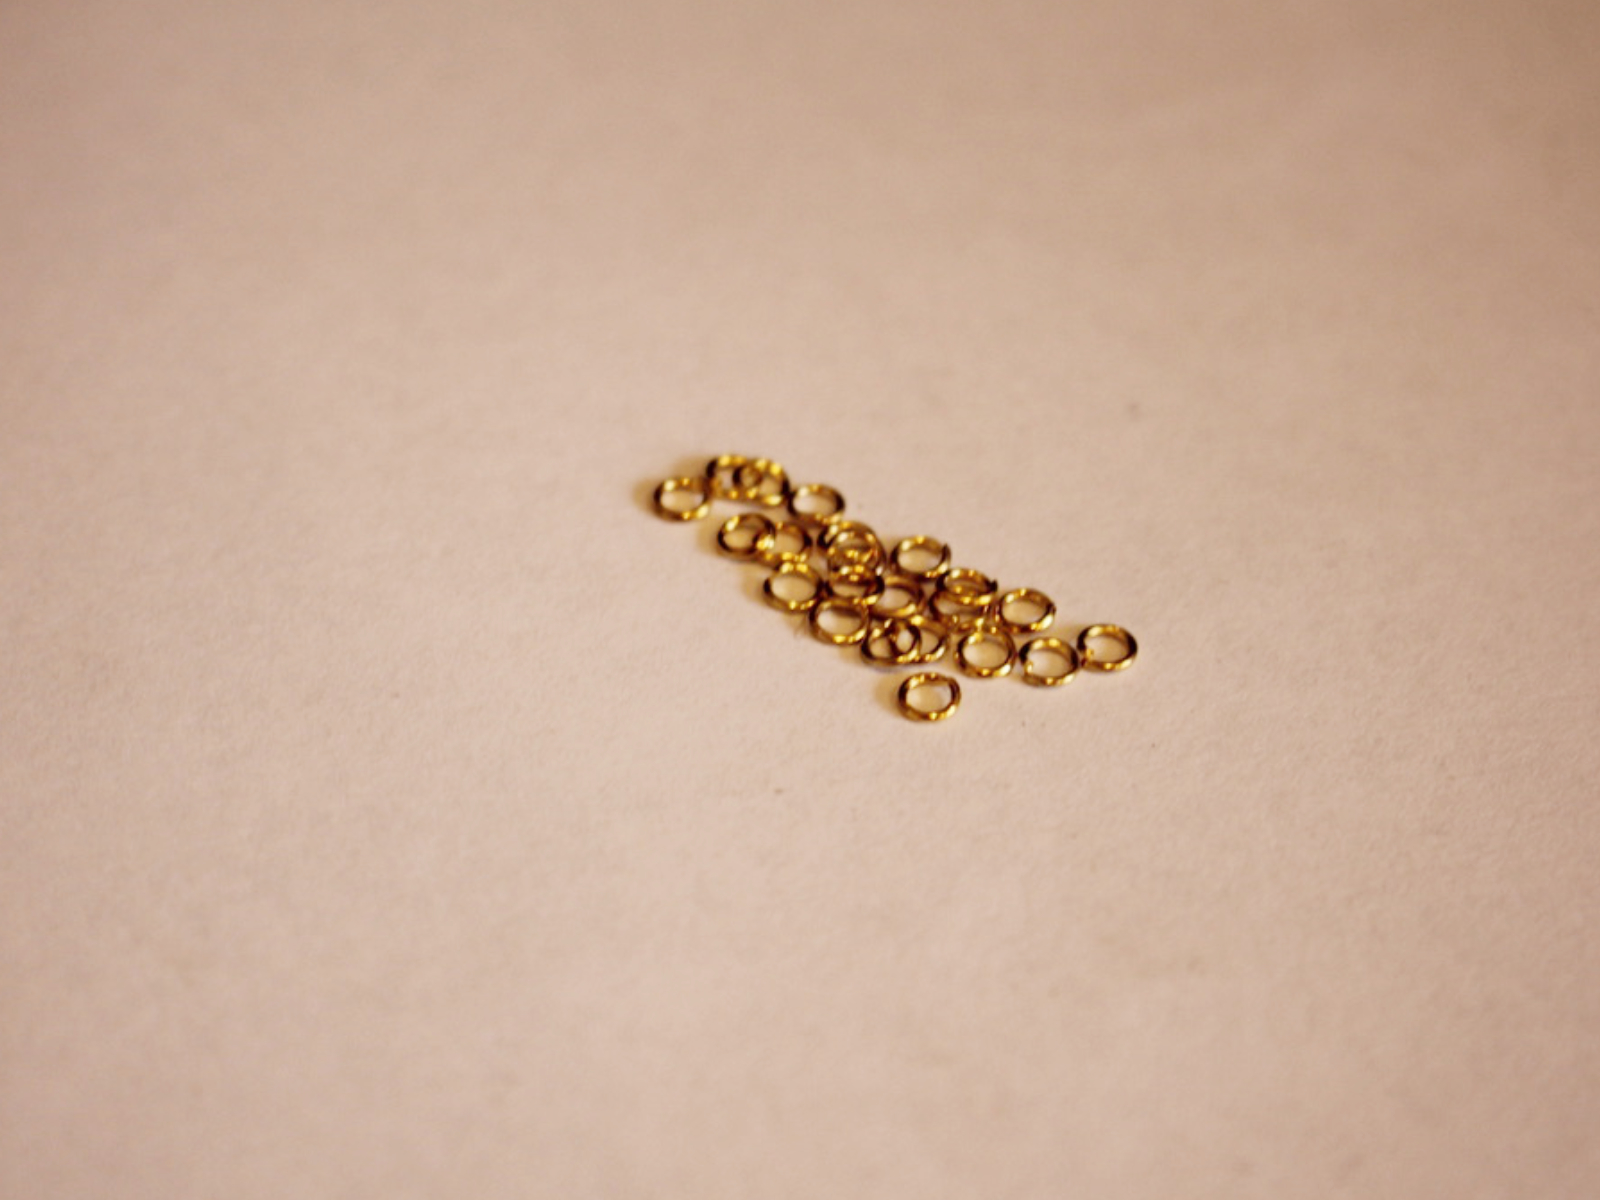
5: Two jump rings.

6: Pliers.

7: A selection of beads.

Follow these steps to make your necklace for your cute person charm:
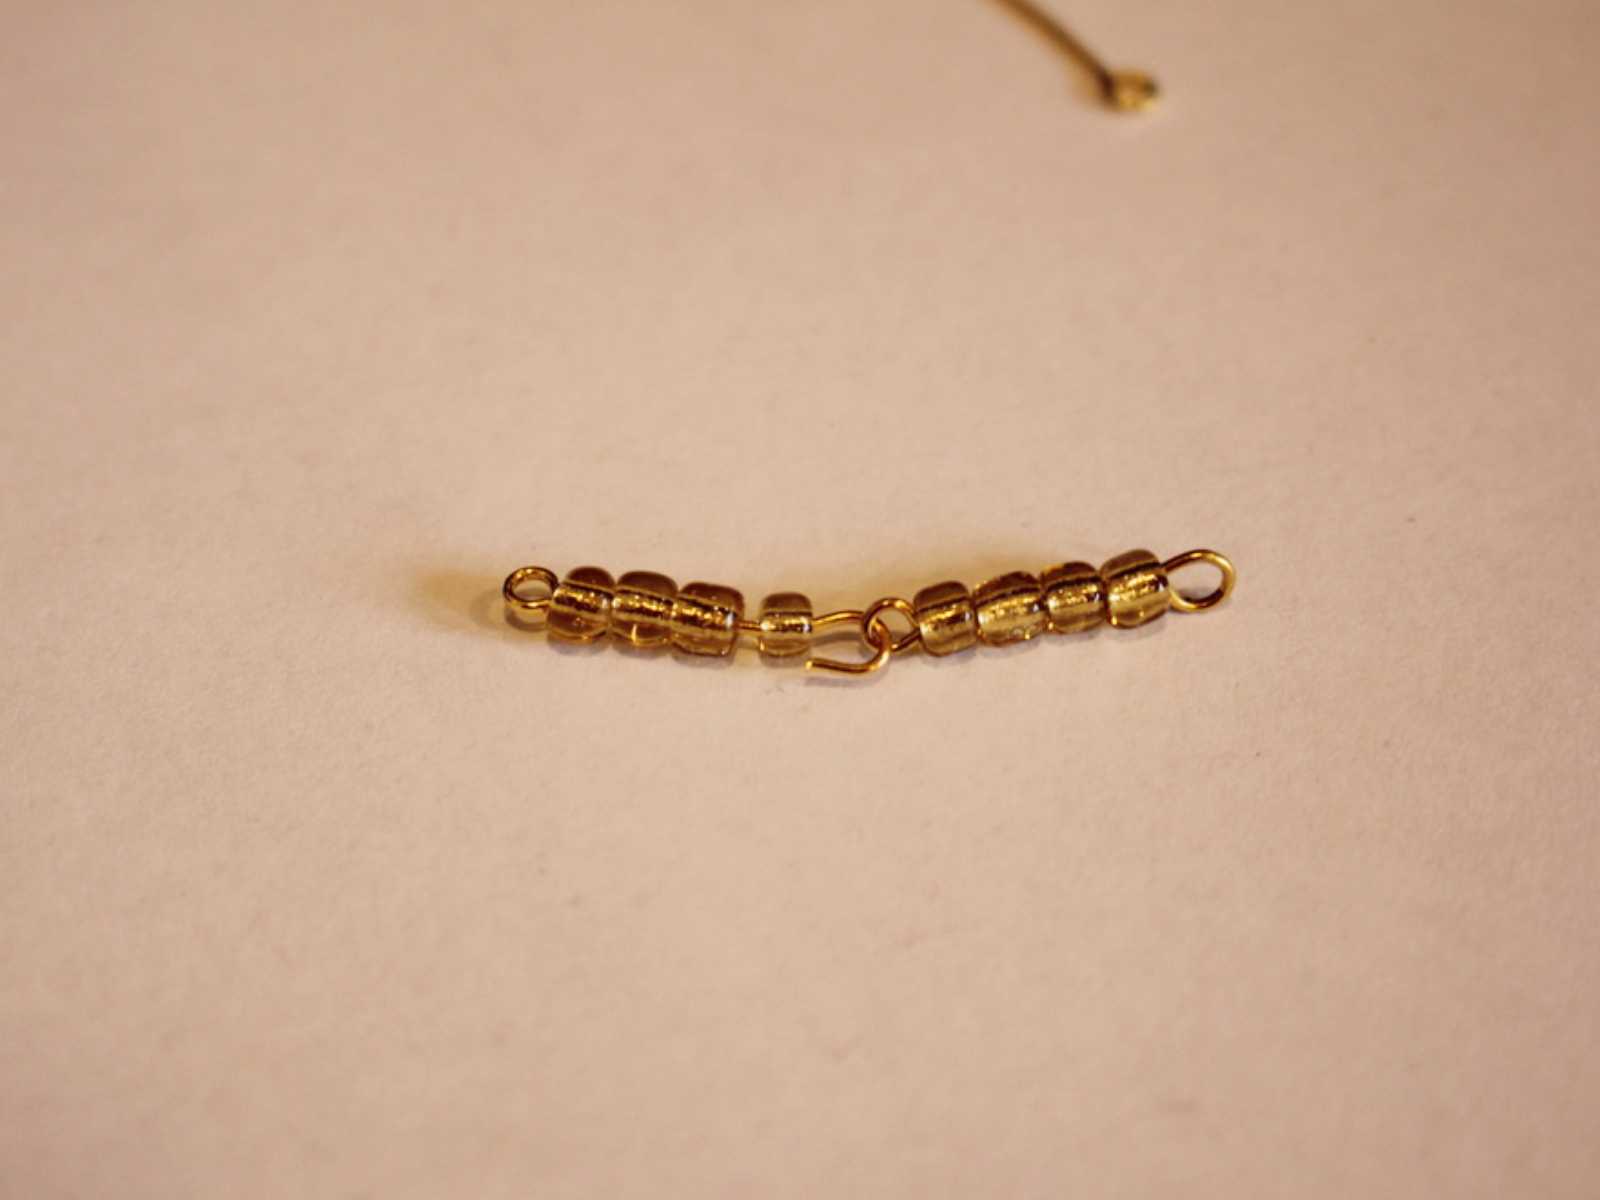
1: Take the tigertail wire an add two crimps to one end.

2: Add a jump ring to the end of the wire.

3: Fold the end of the wire around the jump ring and through the crimp beads.

4: Squash the crimp beads using the flat nose pliers.


5: Begin adding beads.

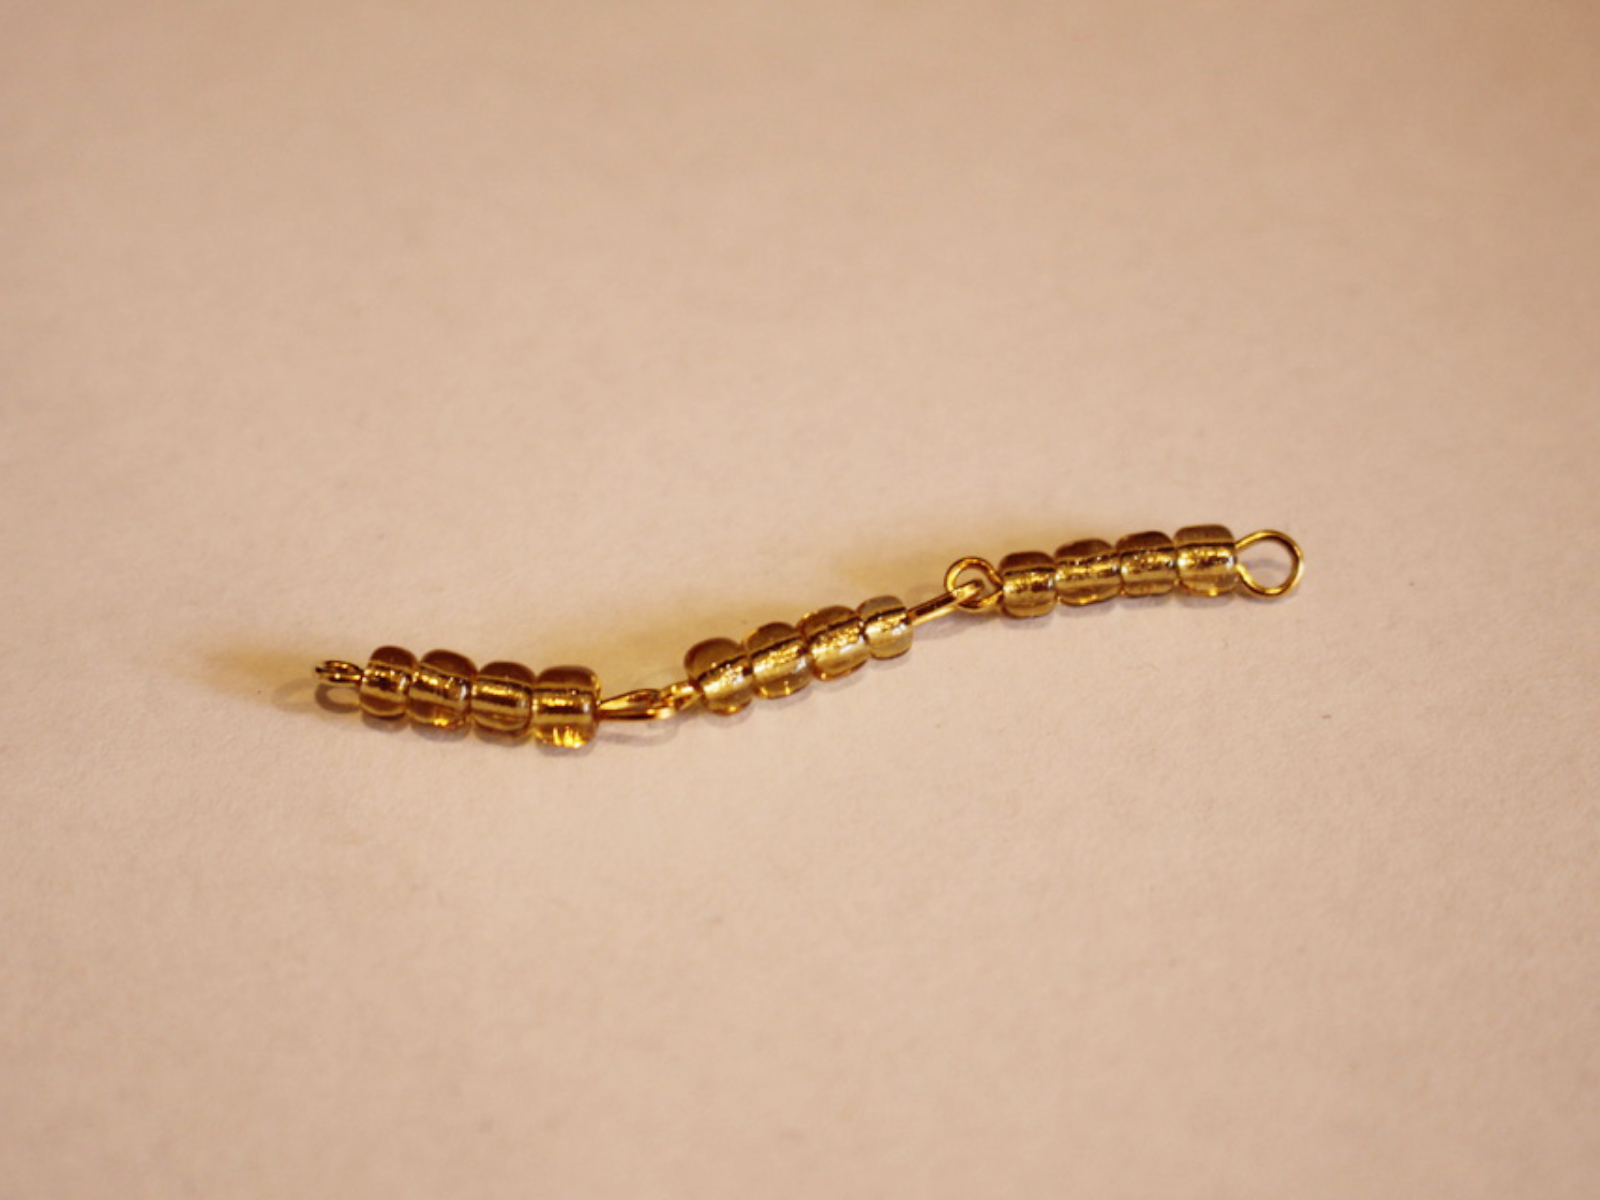
6: Continue adding beads until you have a length you like.

7: Add the second set of jump rings to the other end of the necklace.

8: Add the second jump ring.

9: Loop the end of the wire around the jump ring and back through the crimp beads and the last couple of beads on the strand. Pull the wire tight.

10: Squash the crimp beads to secure the jump ring in place at the end of the necklace.

11: Trim the excess wire.

12: Open one of the jump rings using pliers and add the person charm.

13: Add the circle side of the toggle clasp and close the jump ring to secure the components together.


14: Add the other side of the toggle clasp and close the jump ring to finish the necklace off.


Now your adorable person charm necklace is finished and ready to wear! How cute!!


-
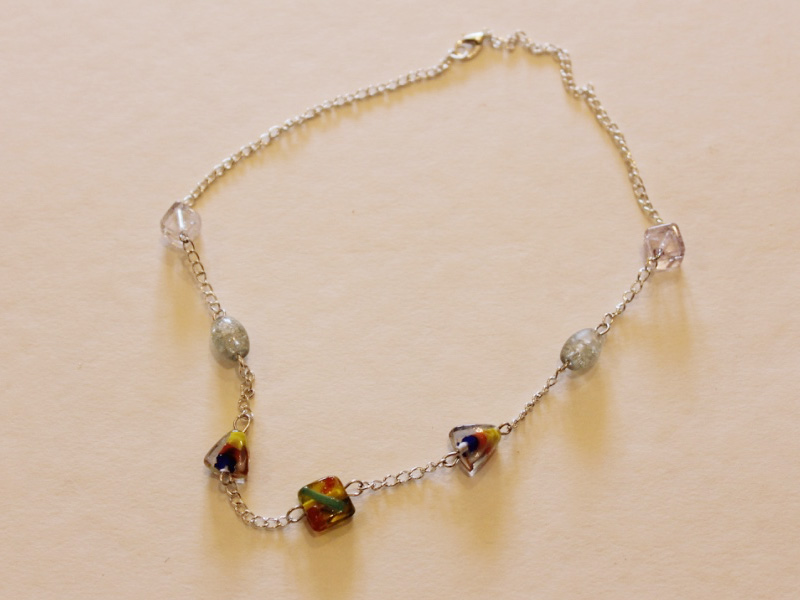
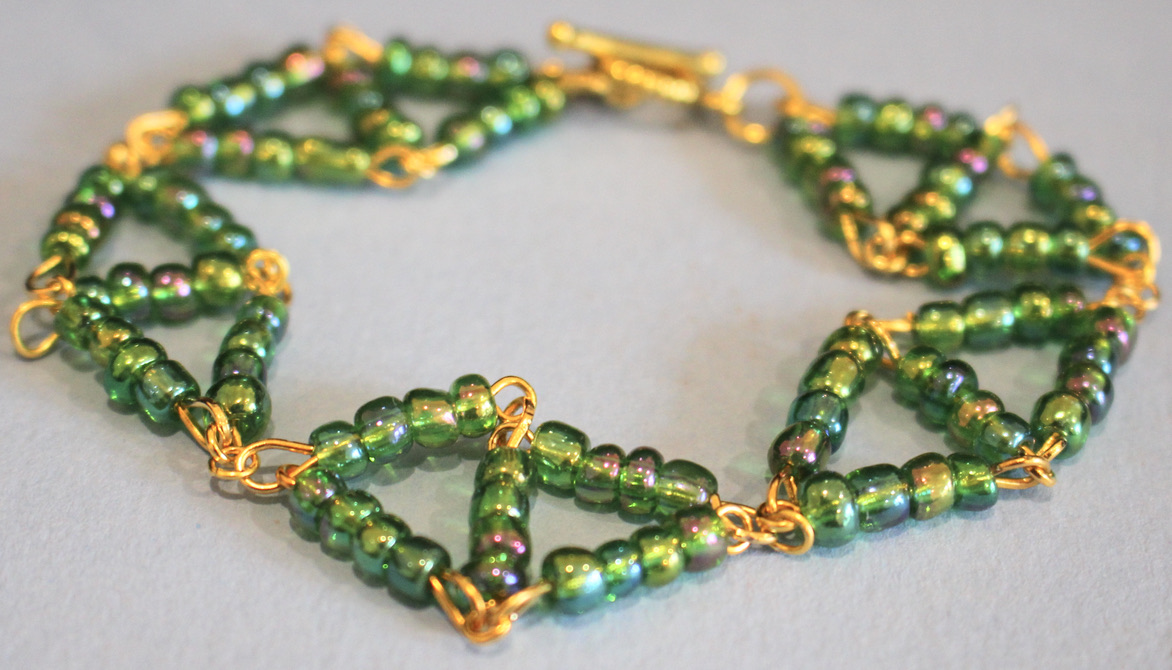
How to make a super cute bracelet with beaded diamond shapes!
This is a cute little bracelet that looks great! the beaded diamond bracelet design uses eye pins and beads to form a series of diamond shapes that link together to create a bracelet. This diamond shaped bracelet is eye-catching and fun to put together, perfect for constructing on a quiet afternoon at home.
You’ll need these tools and materials to make your beaded diamond bracelet:
1: Pliers. I used my round nose and flat nose pliers.


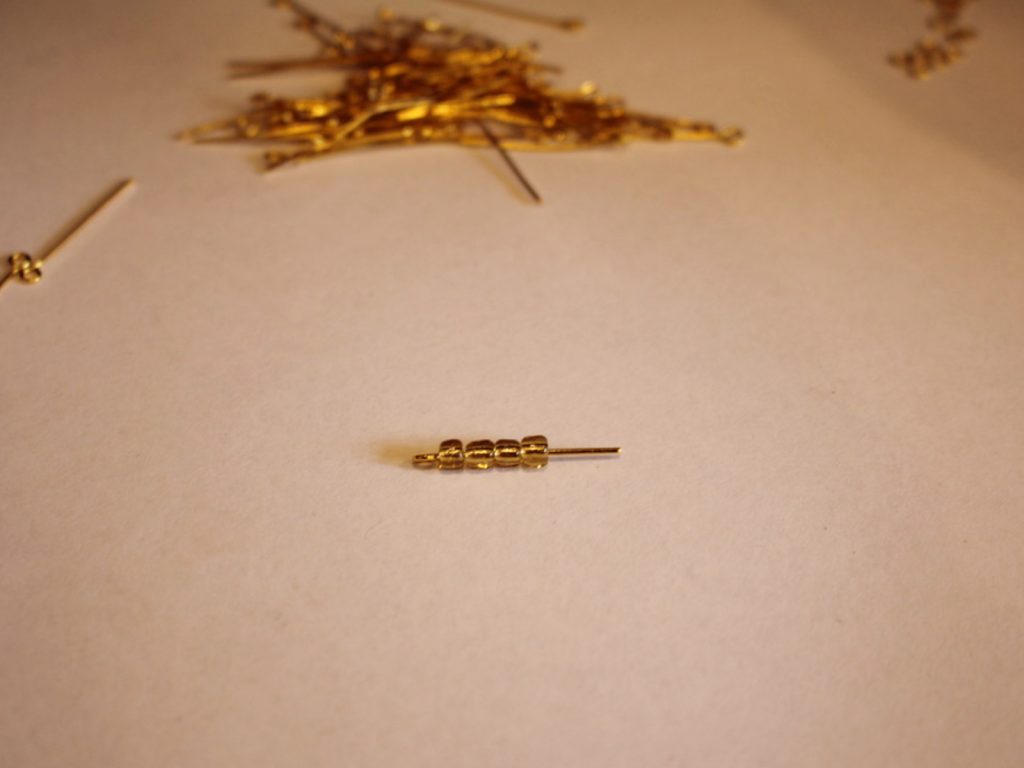
2: A bunch of eye pins. I ended up using about 25 pins. You may need more or less depending on your wrist size.

3: Some small jump rings. I used four, you may need more or less depending on the size of the bracelet.

4: Two larger jump rings.

5: A toggle clasp.

6: Beads of your choice. I used these green glass e-beads.

Follow these steps to make your beaded diamond bracelet:
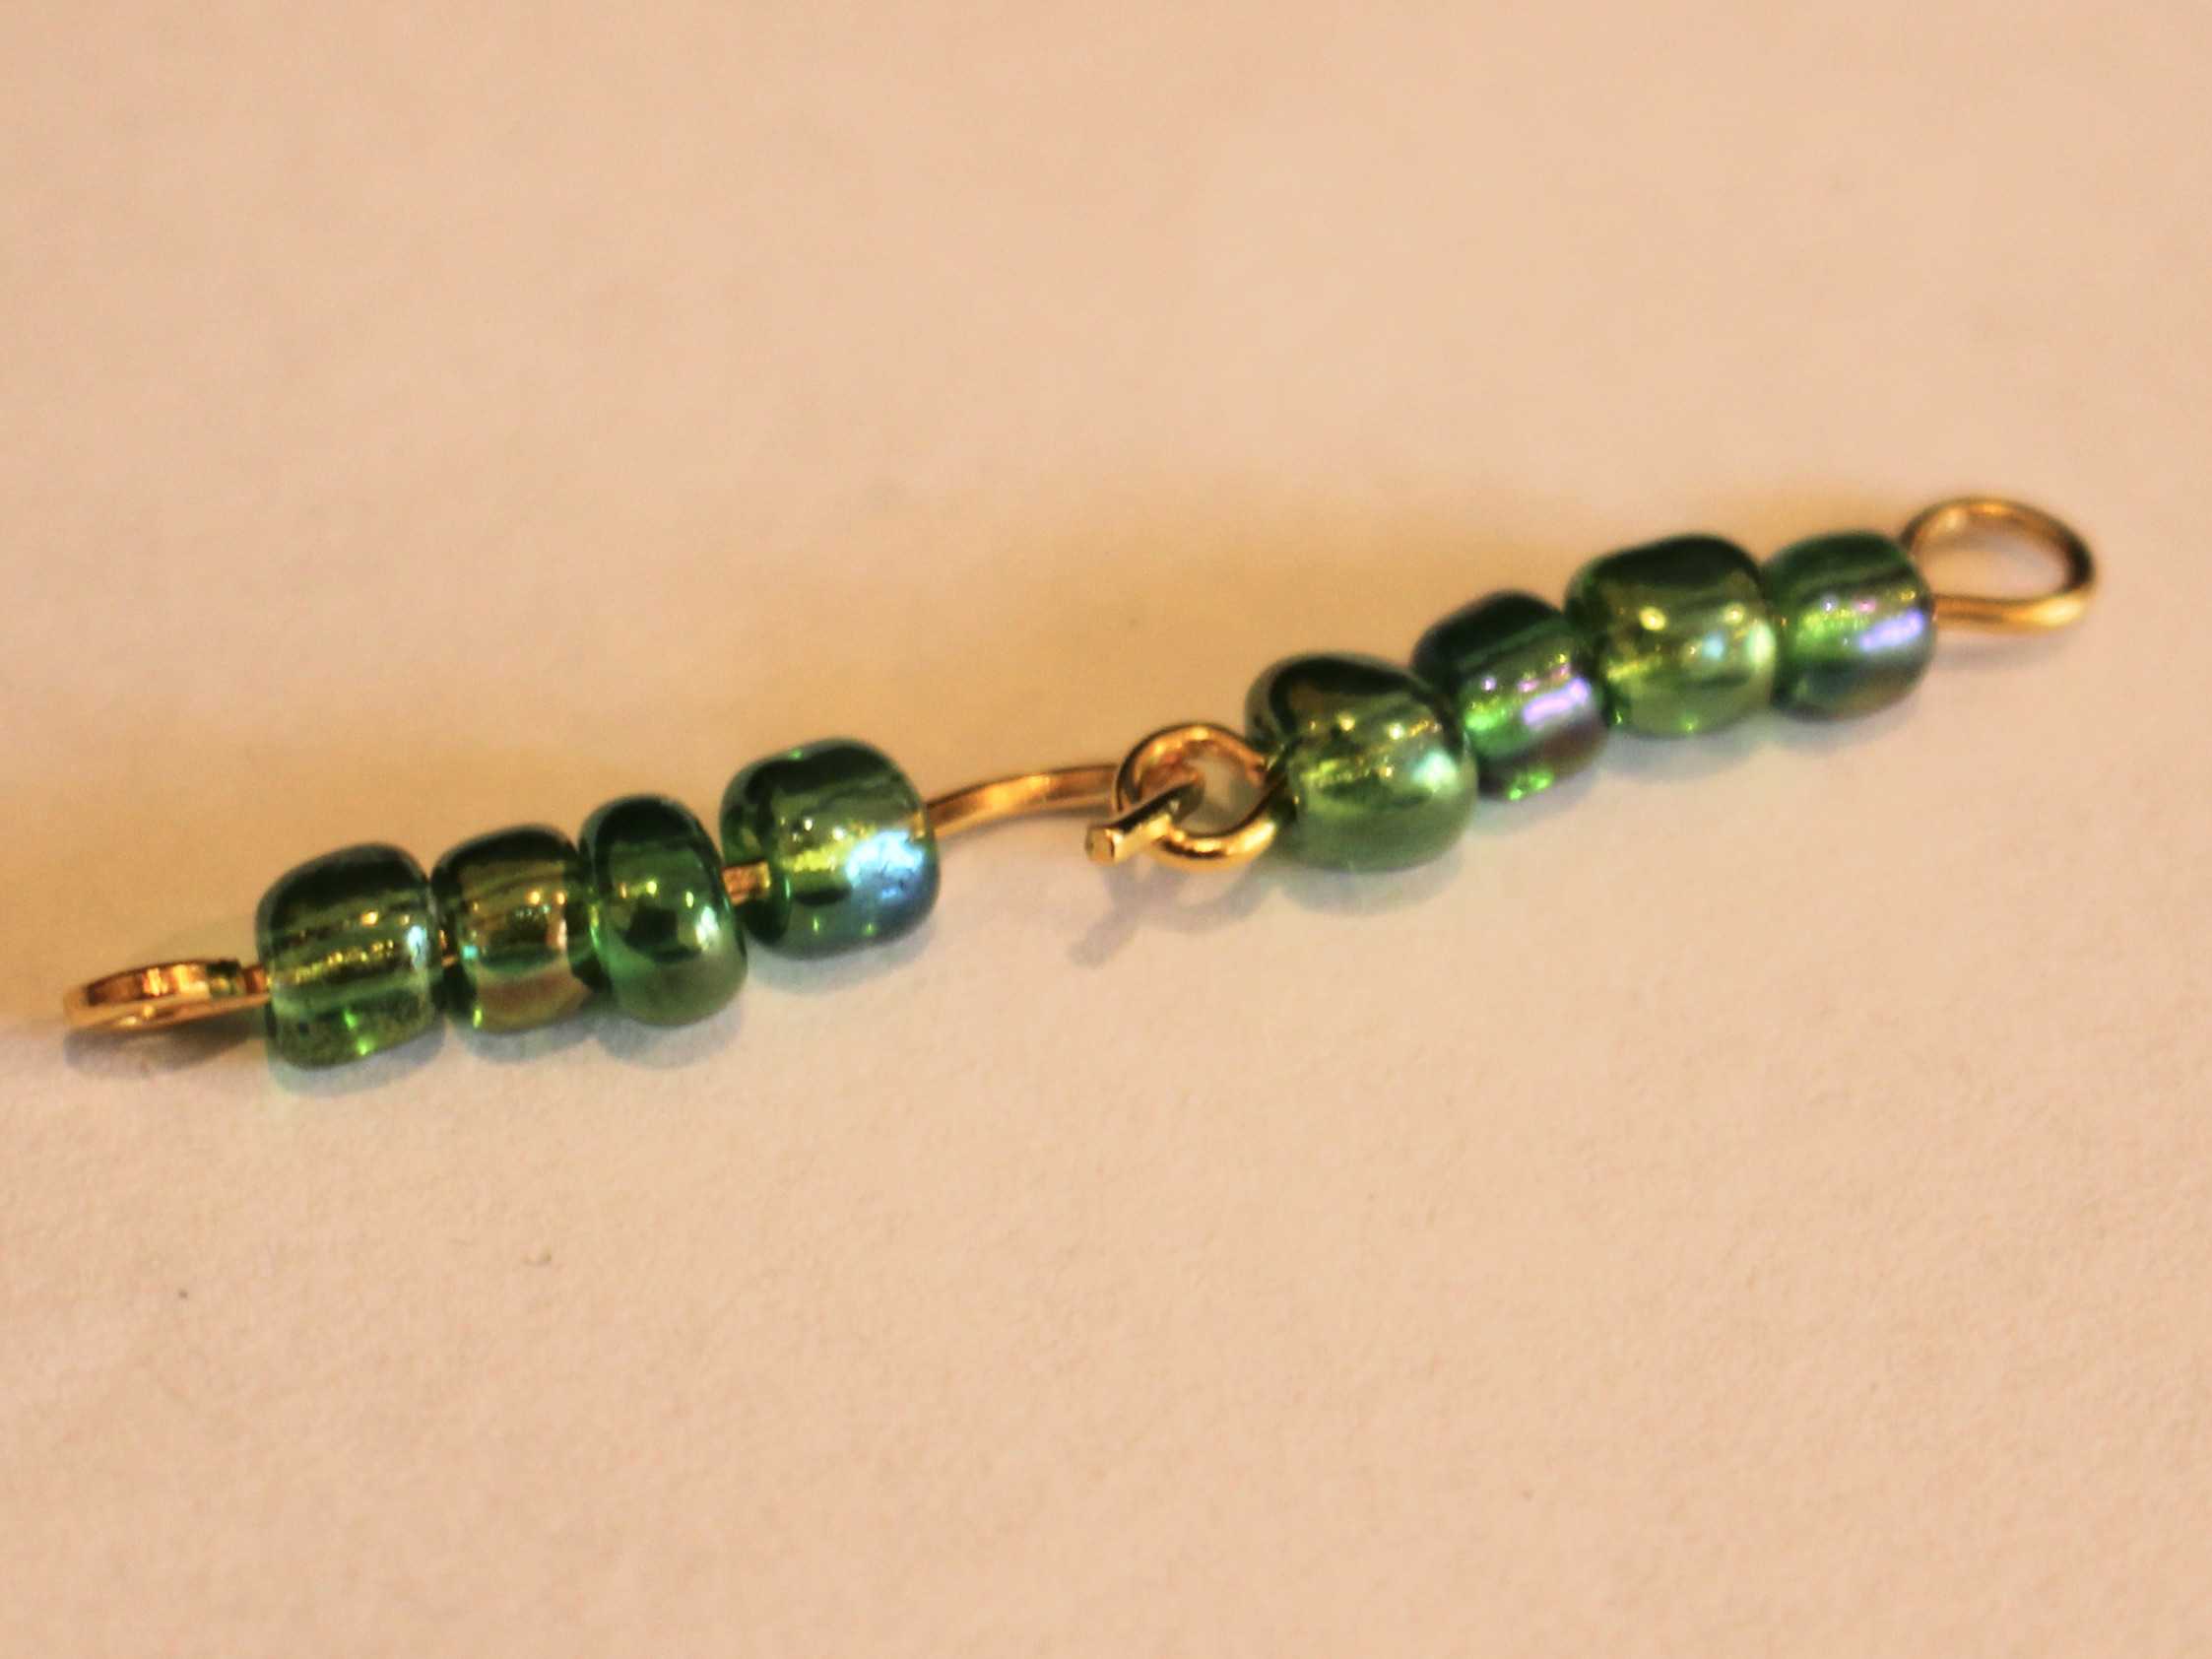
1: Add beads to two of the eye pins.
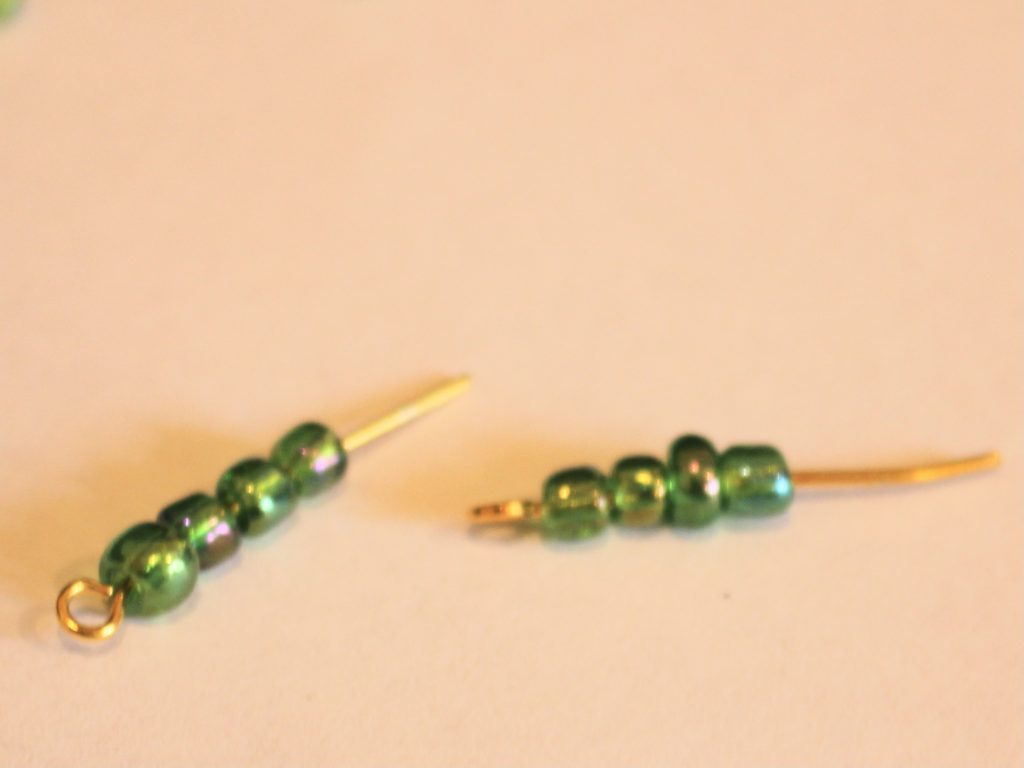
2: Leave about 1cm without beads.
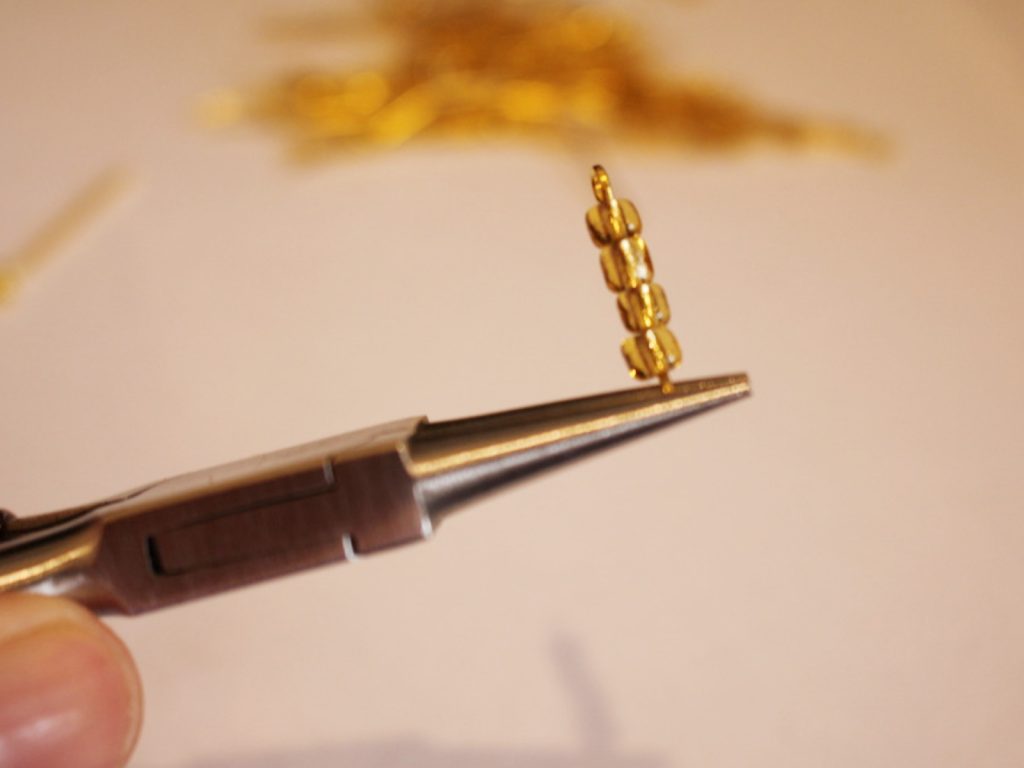
3: Bend the pins to form an angle with the beaded section.

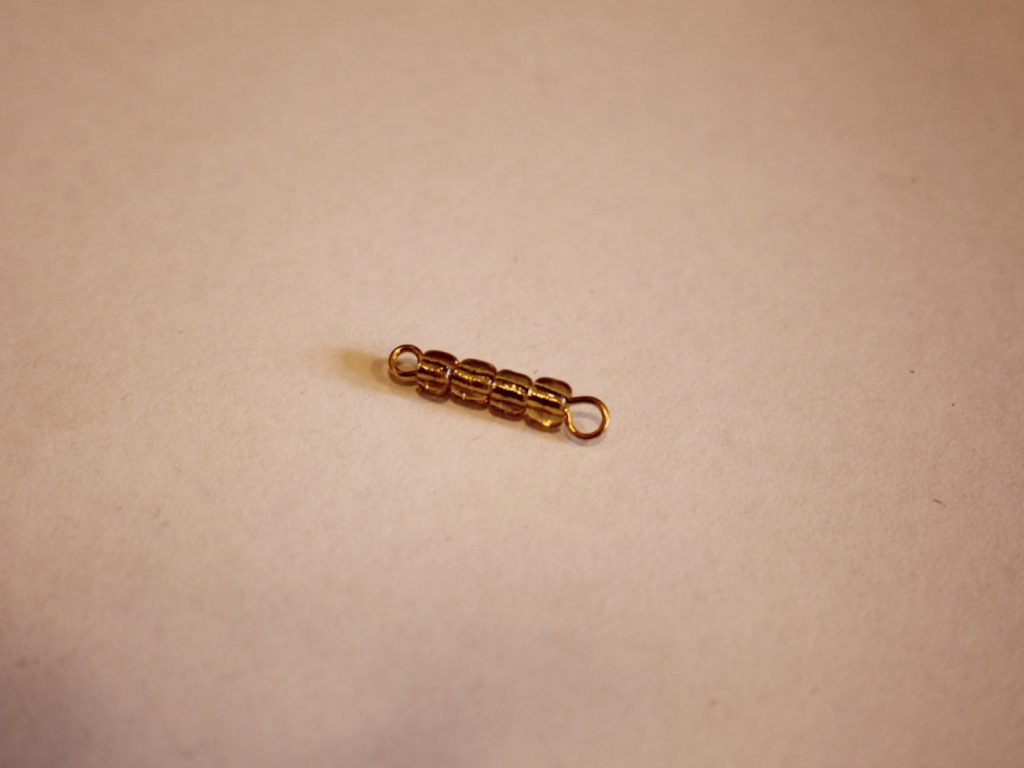
4: Loop the end of the pins around the round nose pliers to create a loop that secures the beads onto the pins.


5: Link the two pins together.

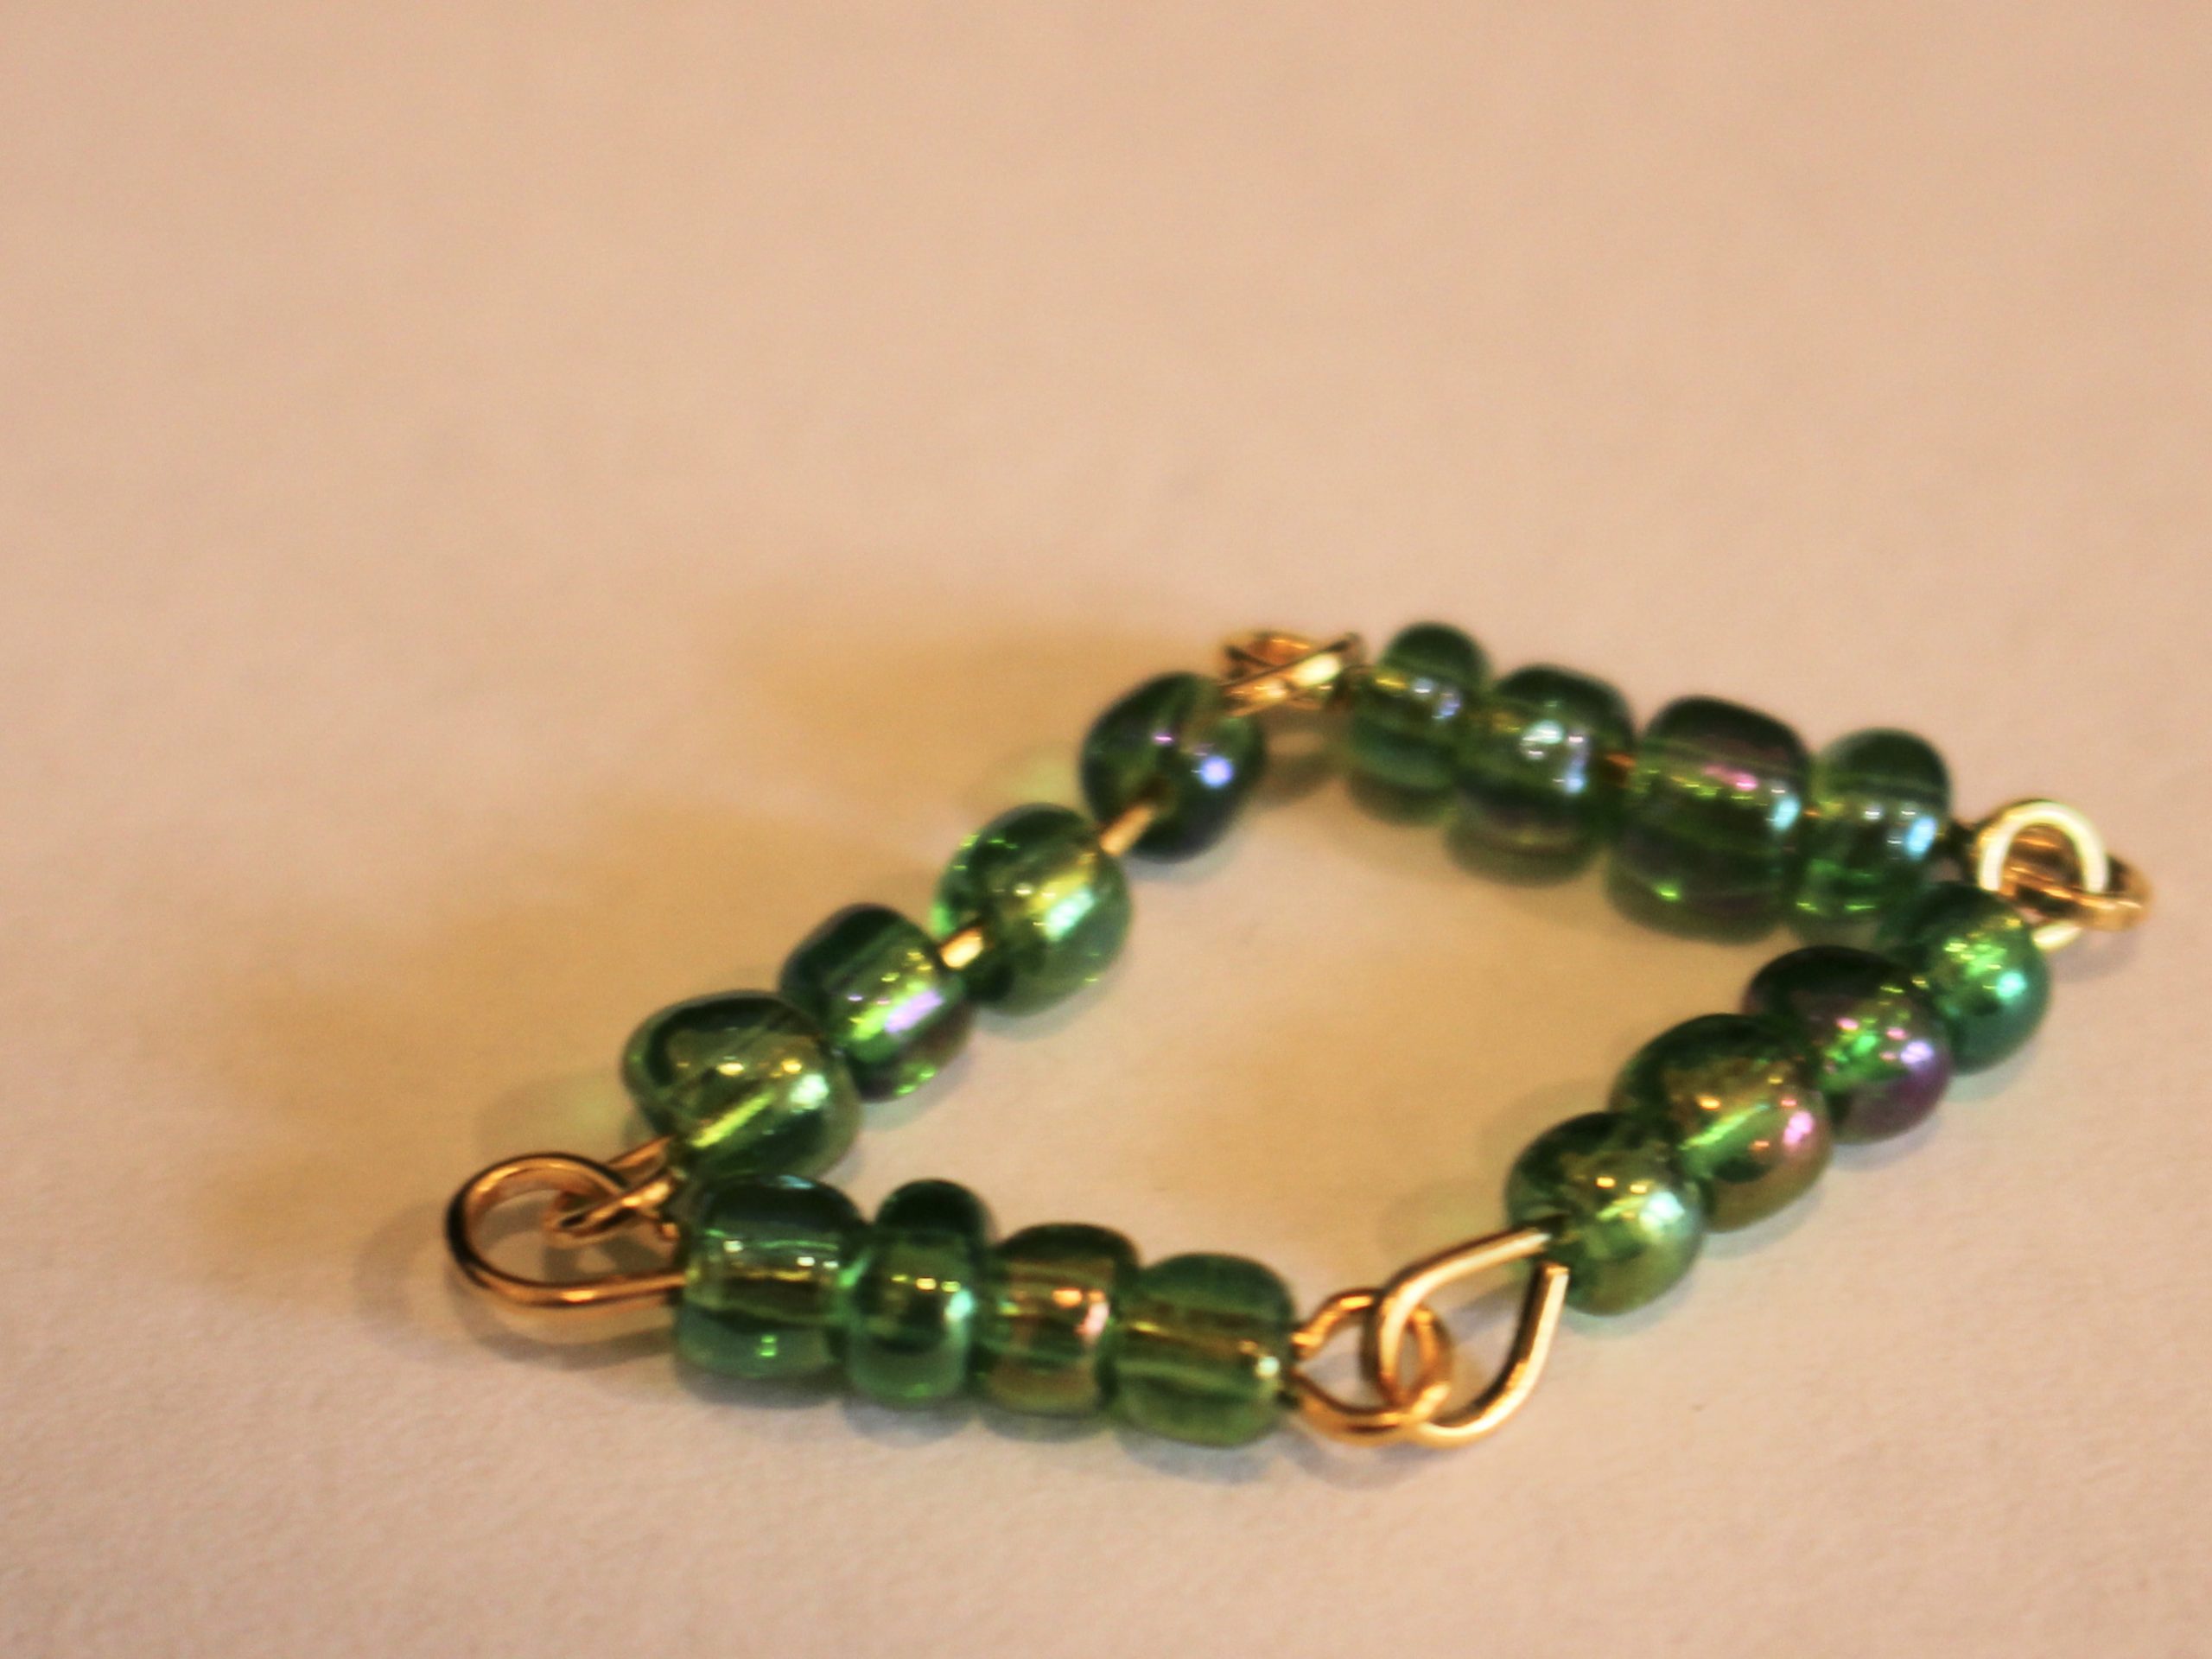
6: Repeat steps 1-5 three more times so that you have 5 beaded pins.
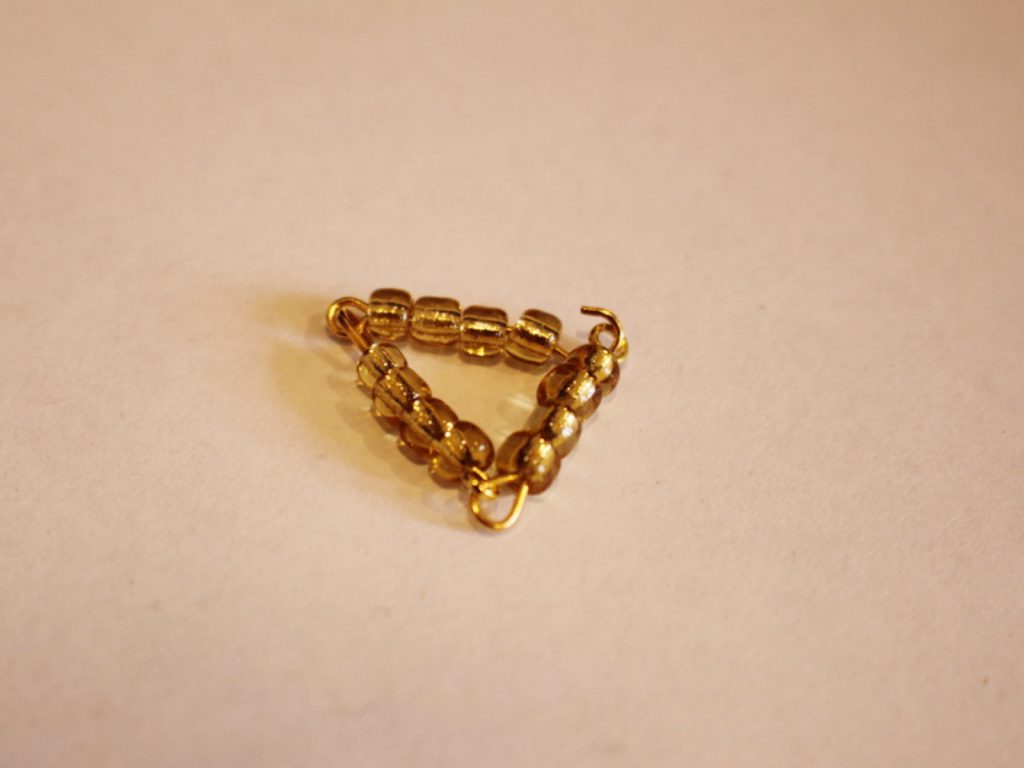
7: Link two more pins to the first two, so you have a square shape.


8: Add the last pin to the middle of the four linked pins so that you have a diamond shape that doesn’t shift around.


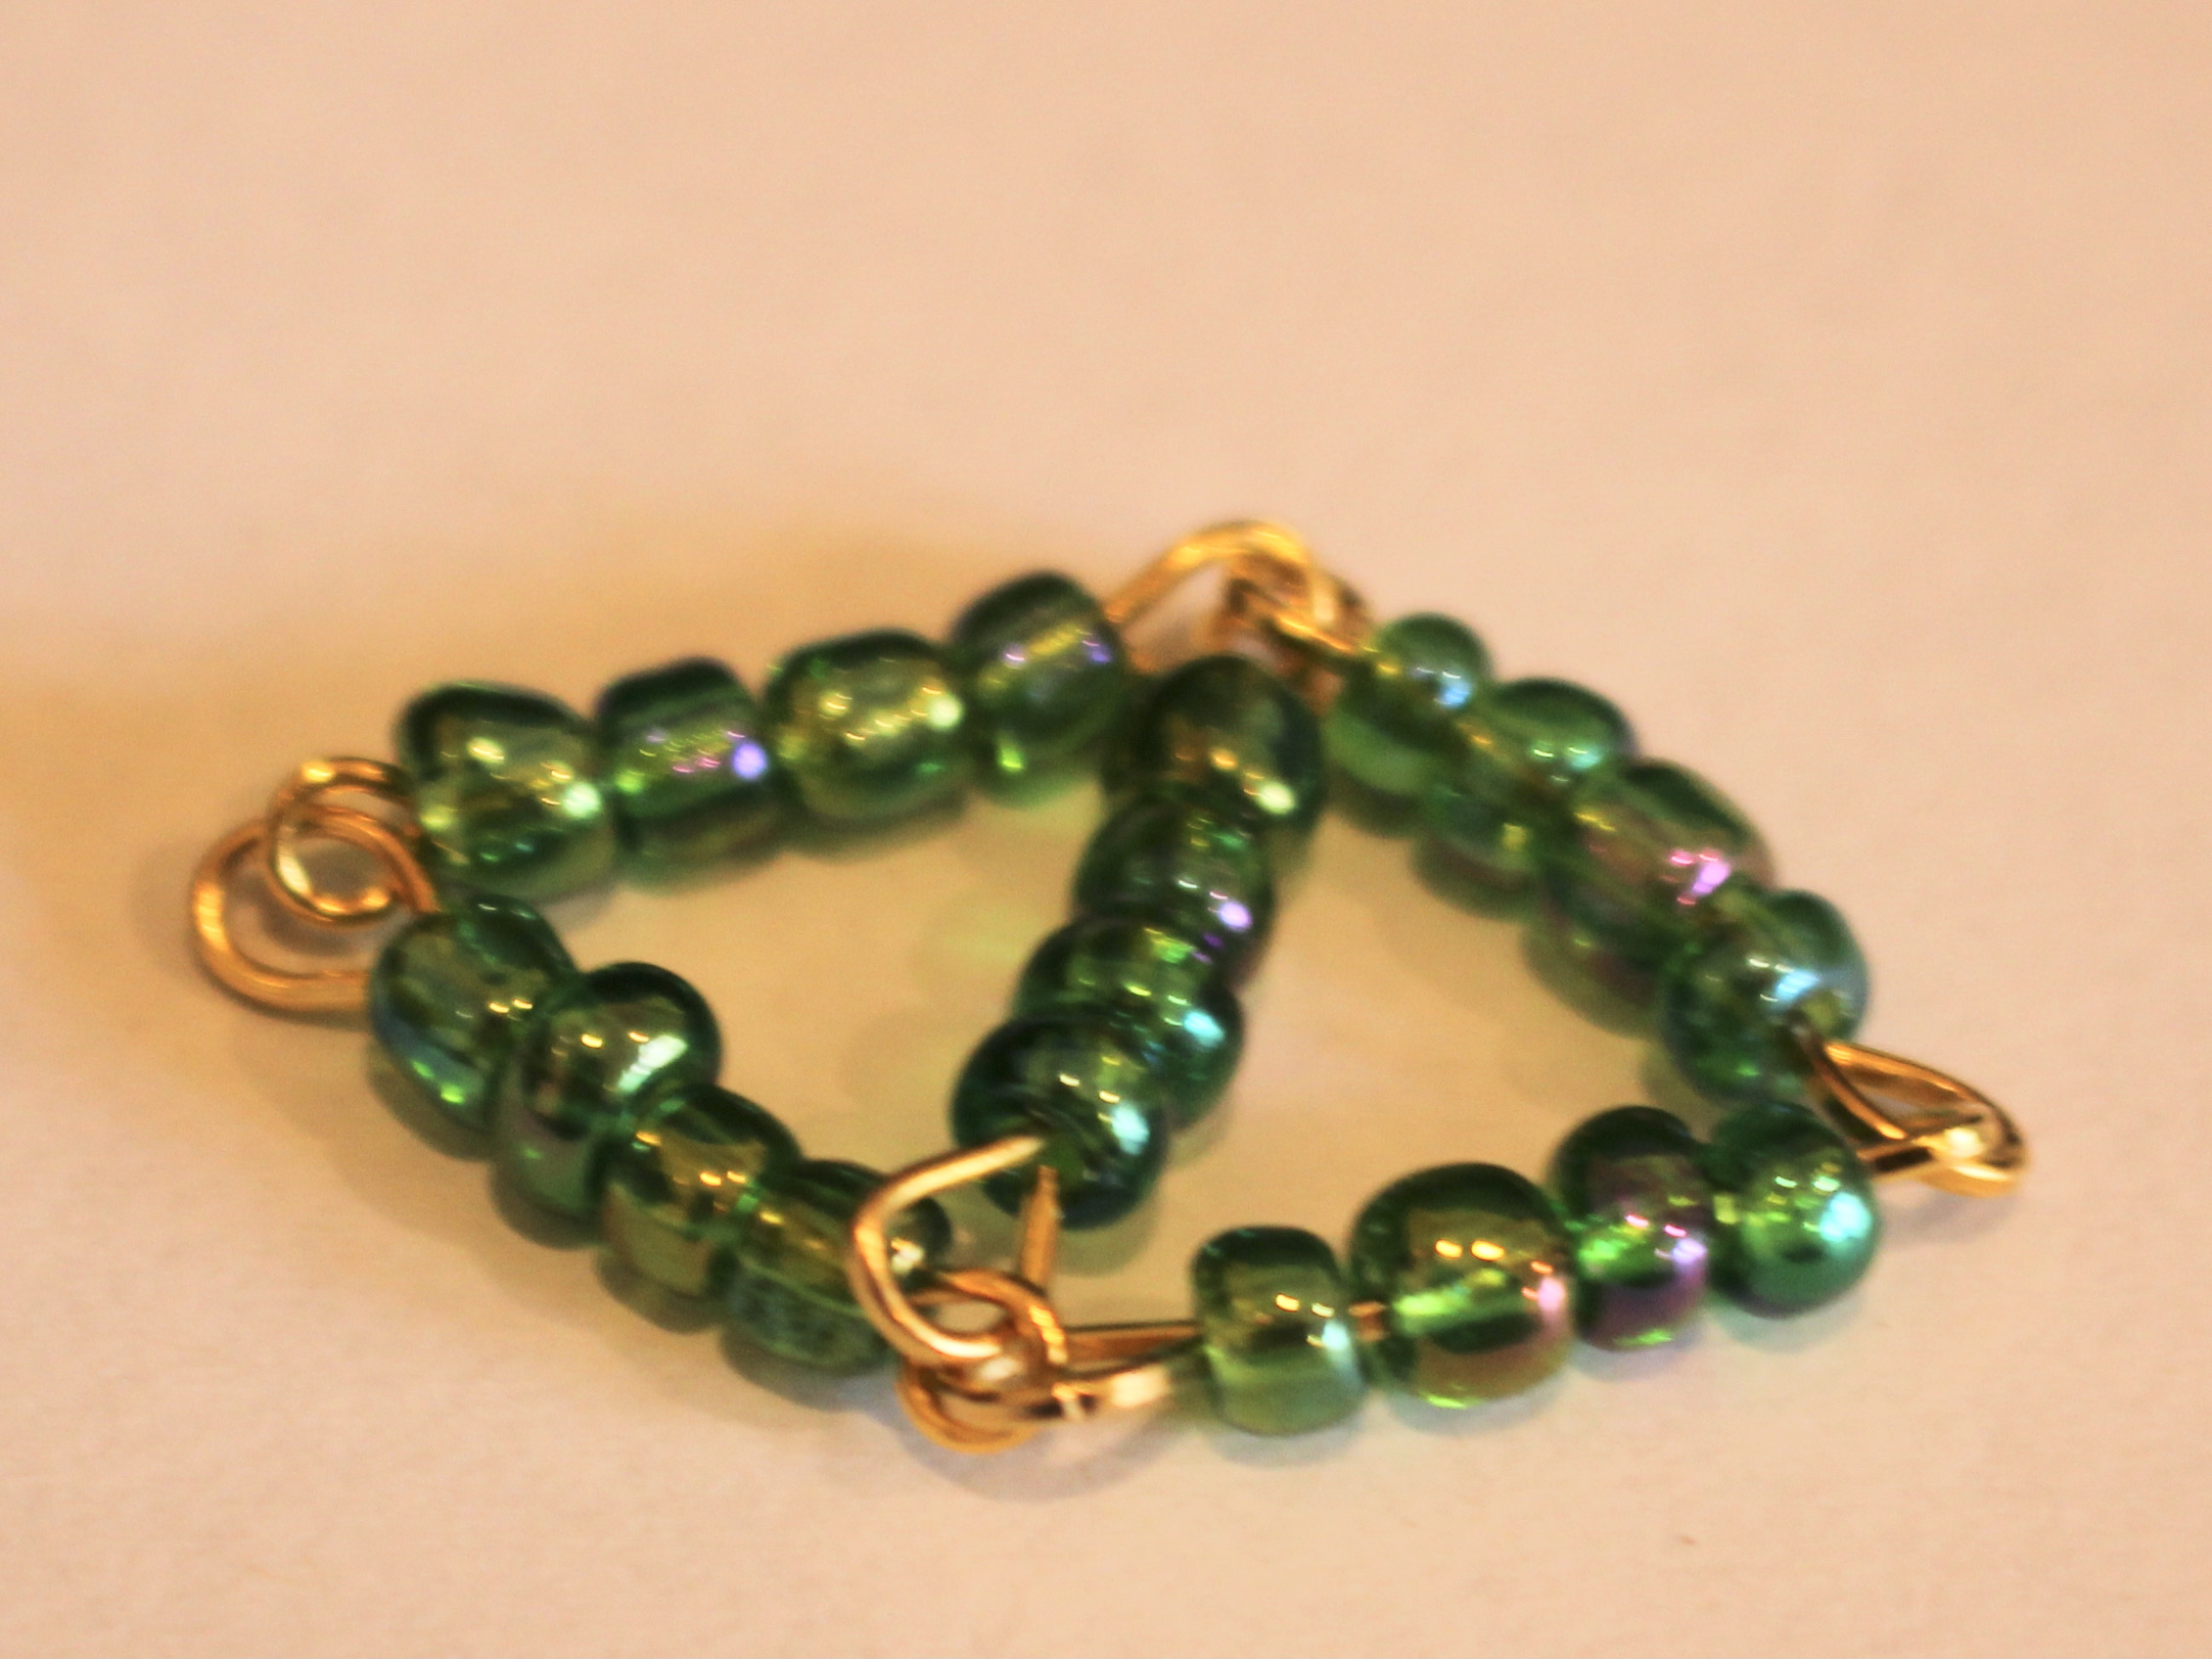
9: Repeat steps 1-8 until you have enough diamond shapes to fit around your wrist. I ended up making 5 diamonds.


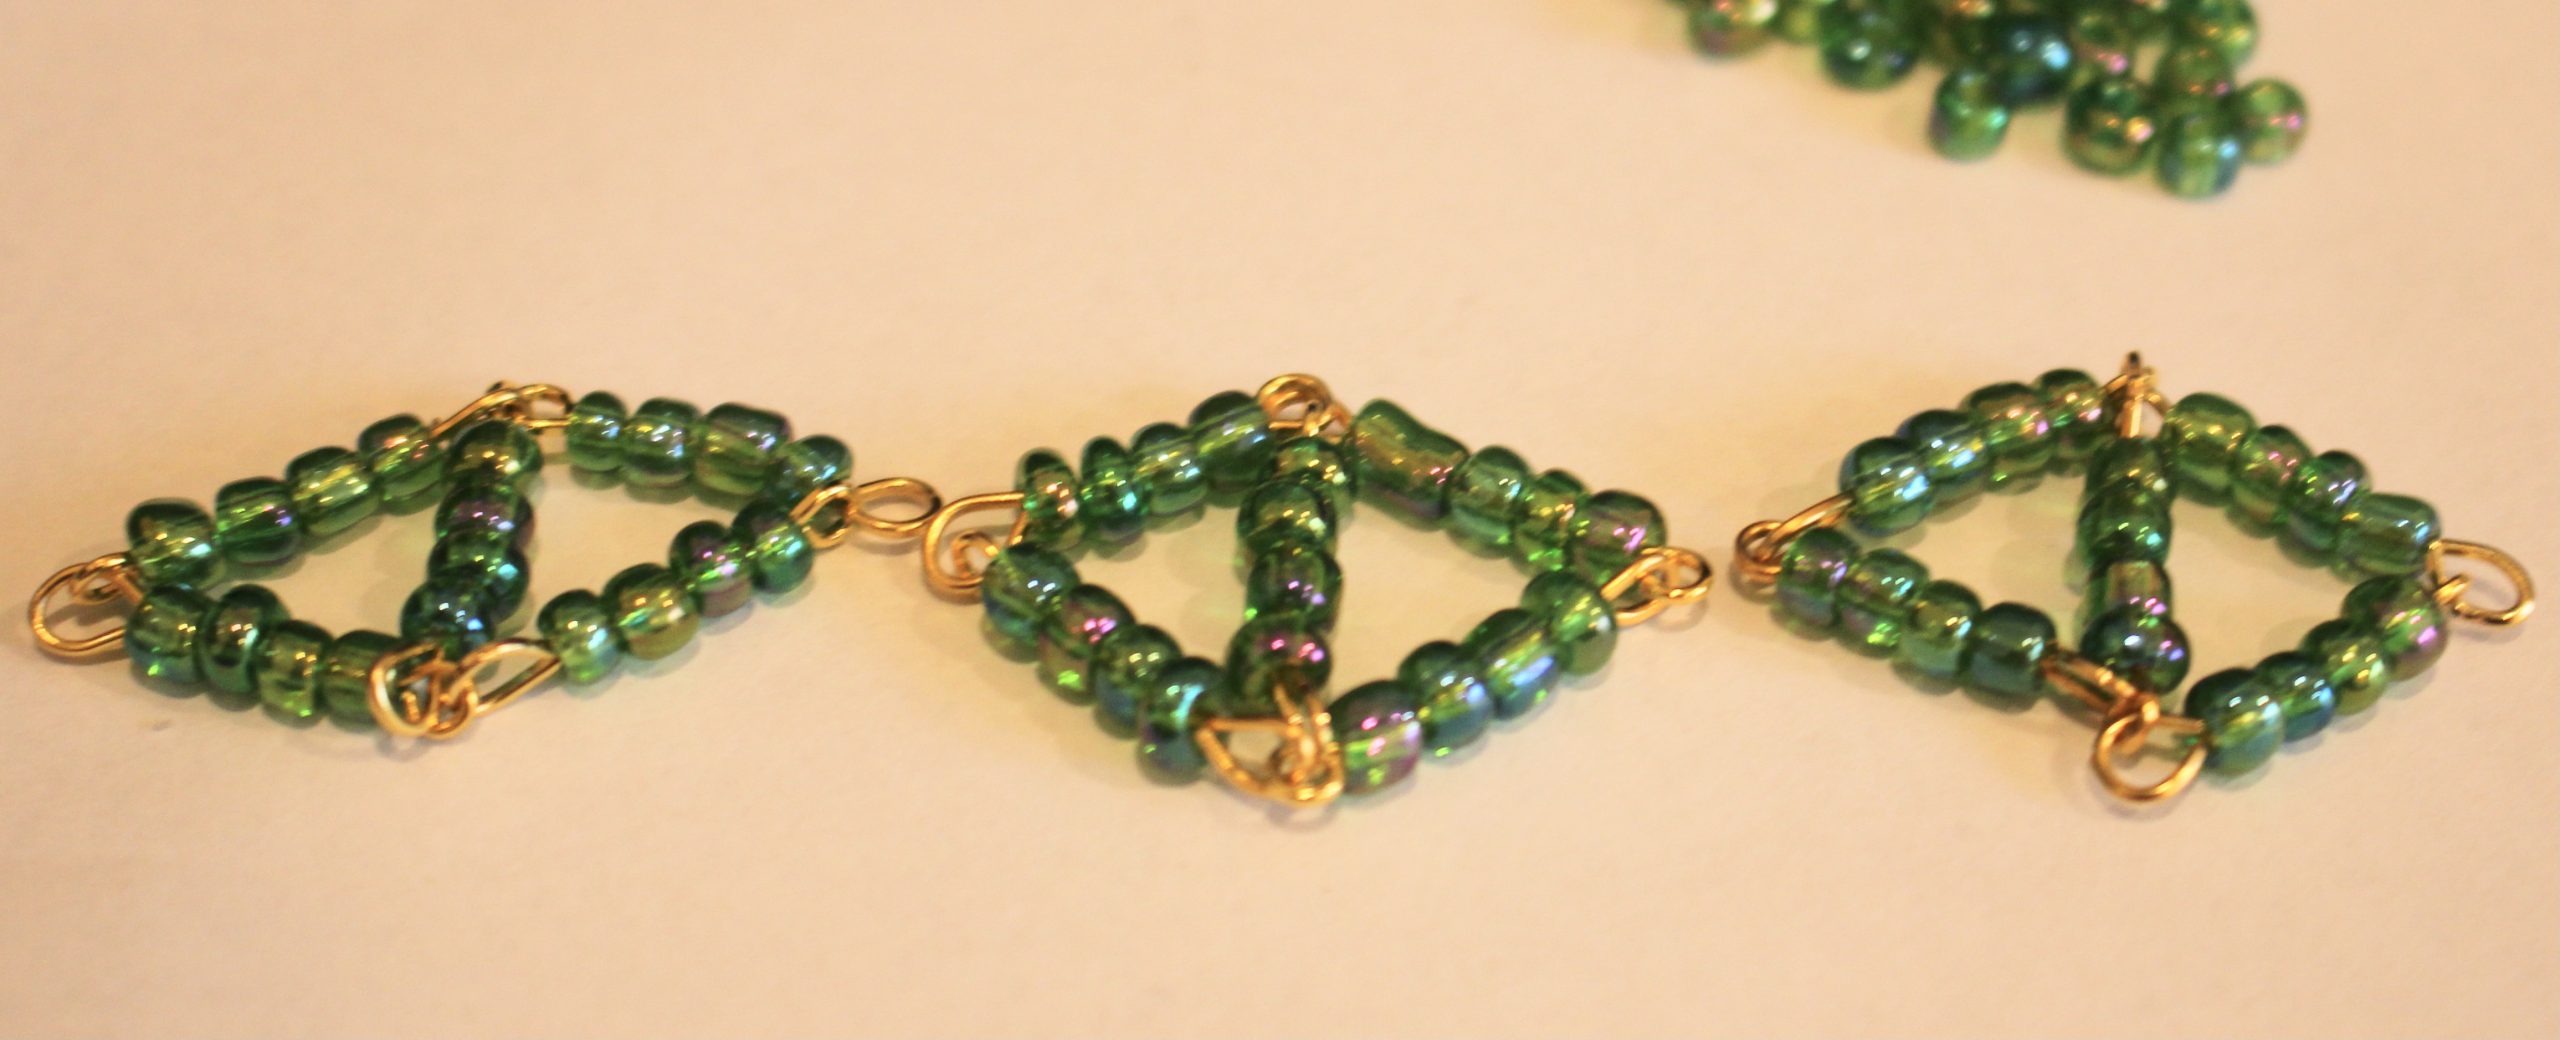
10: Attach each of the diamond shapes together with the small jump rings to form a chain.


11: Attach the clasp components to each end of the chain using the larger jump rings, this will finish the design off!


Now your beaded diamond bracelet is finished and ready to wear!


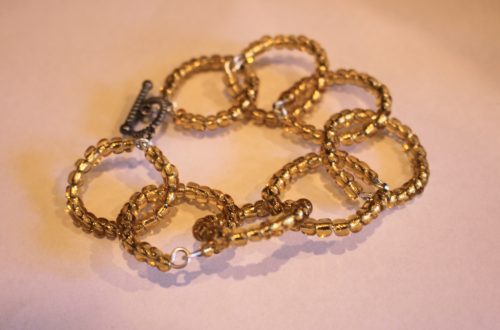
Here is another design you can make using this beaded diamond shape

-
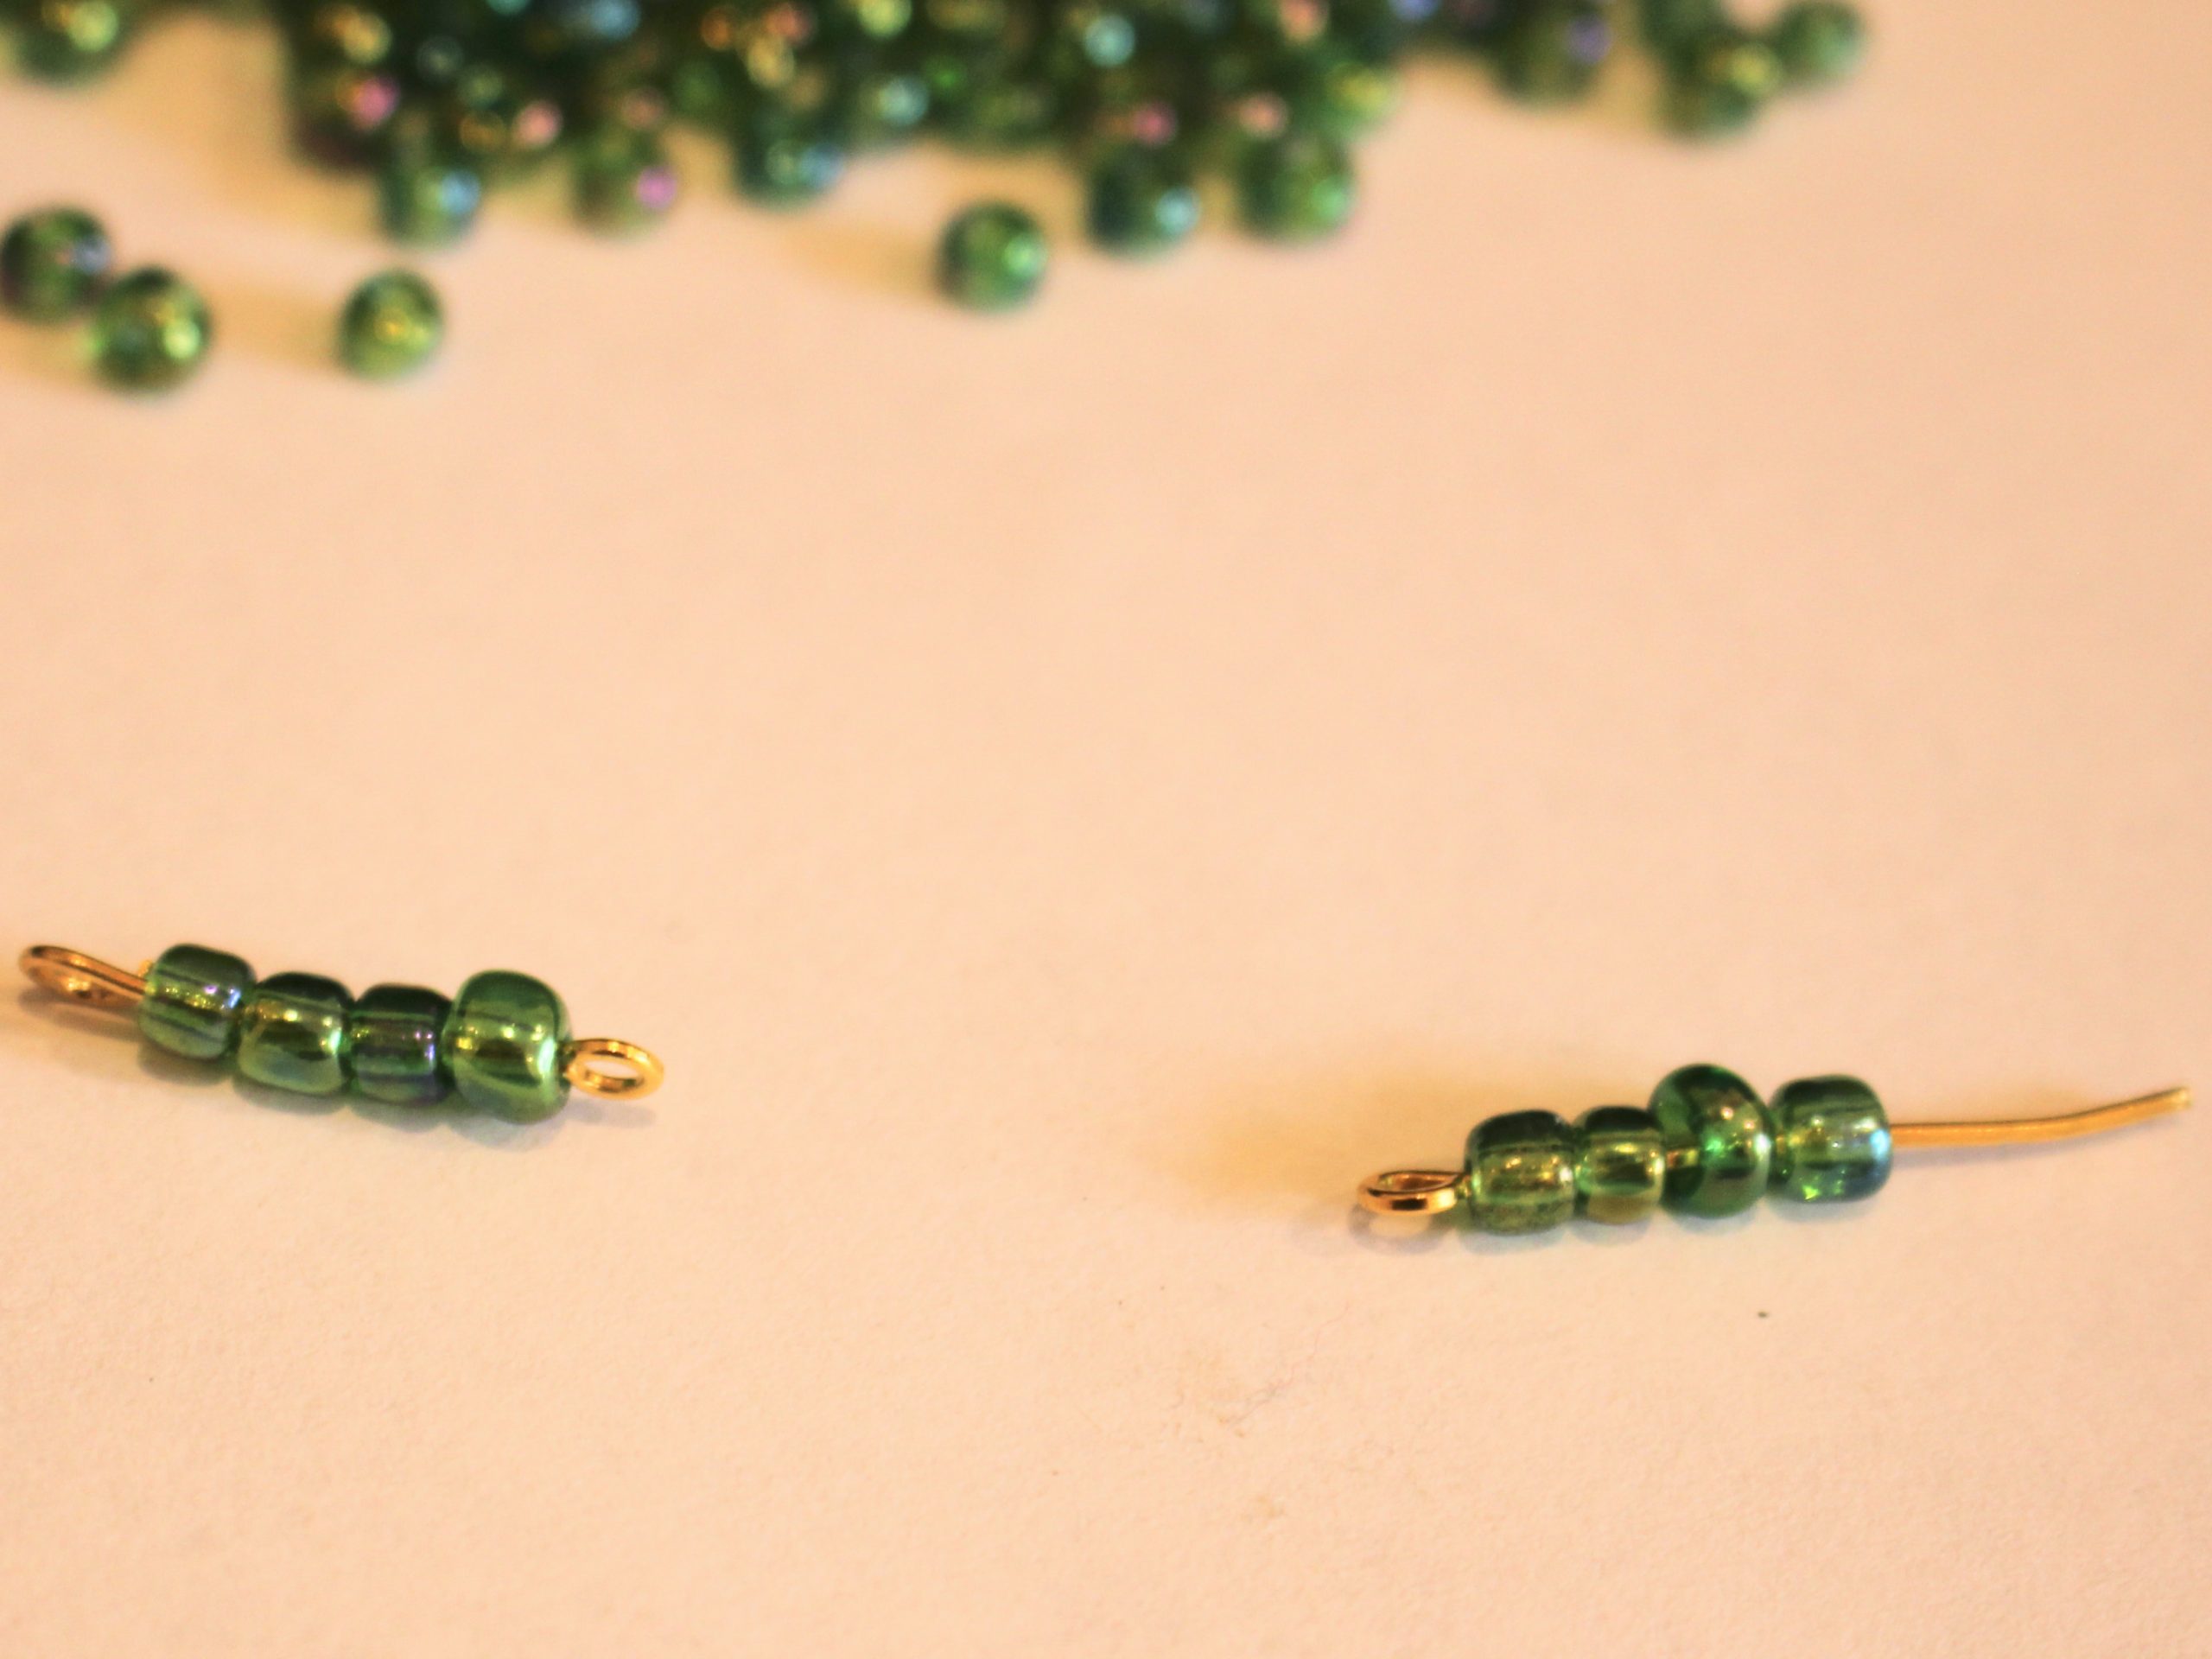
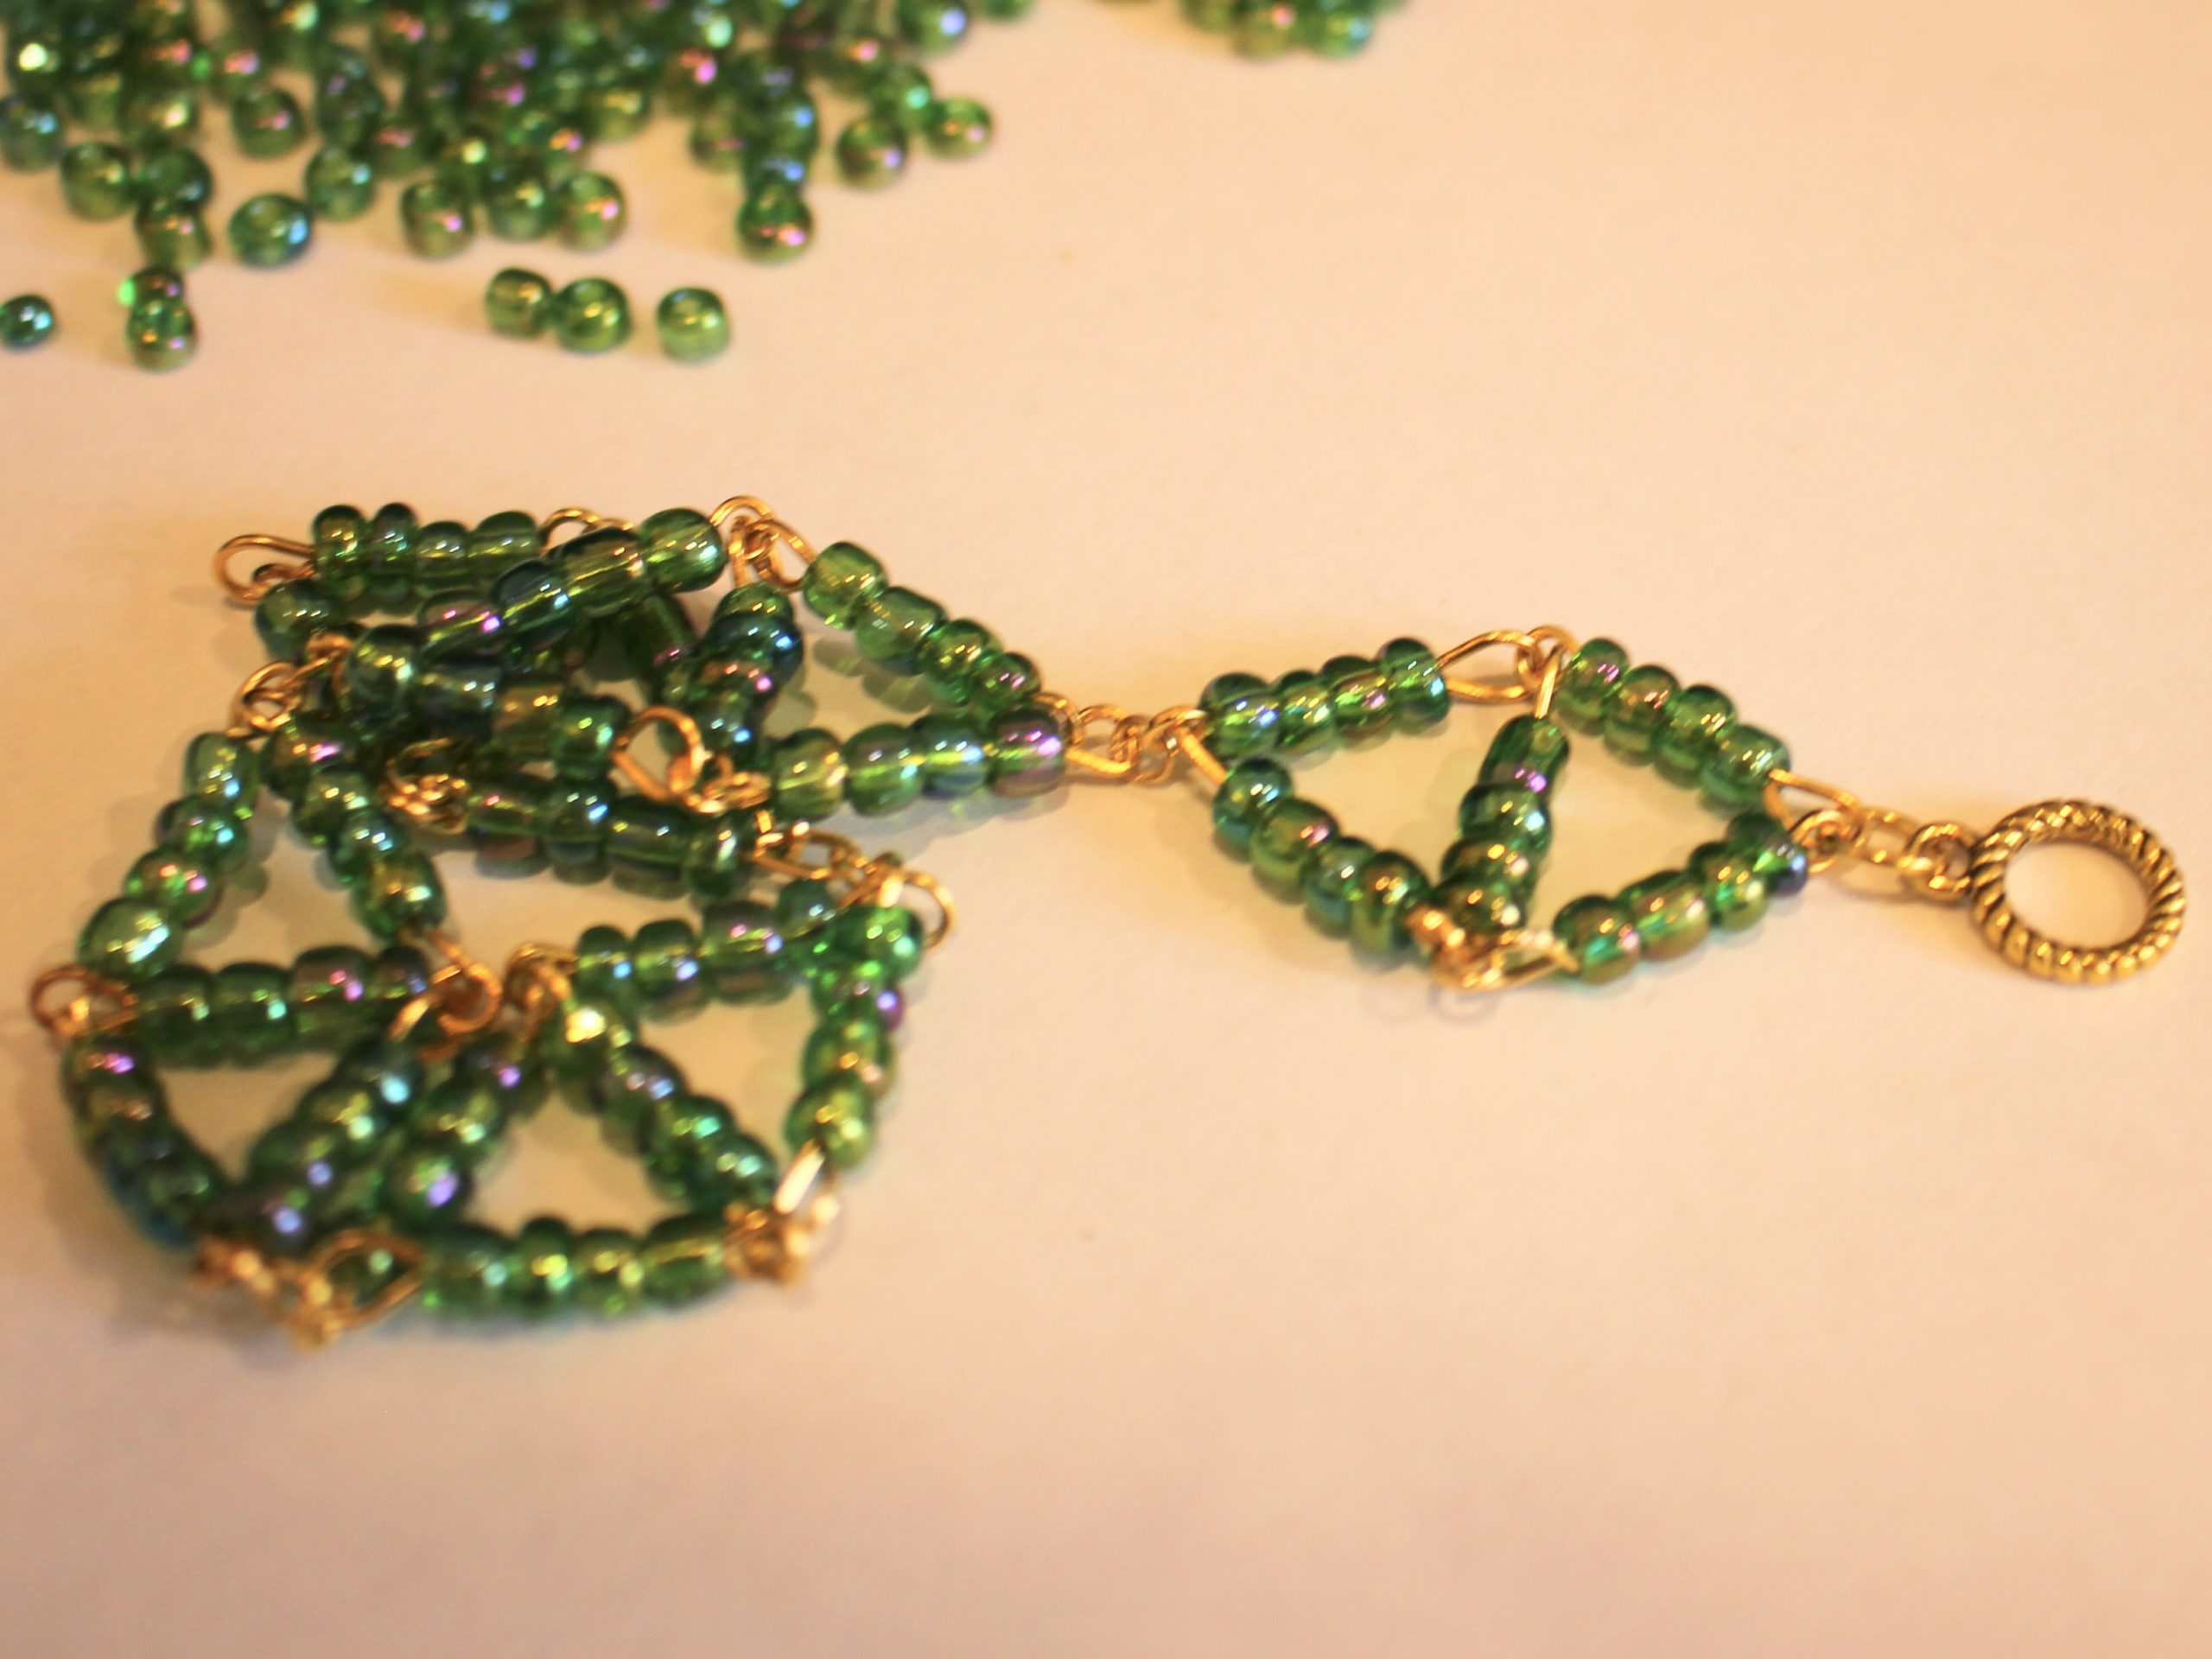
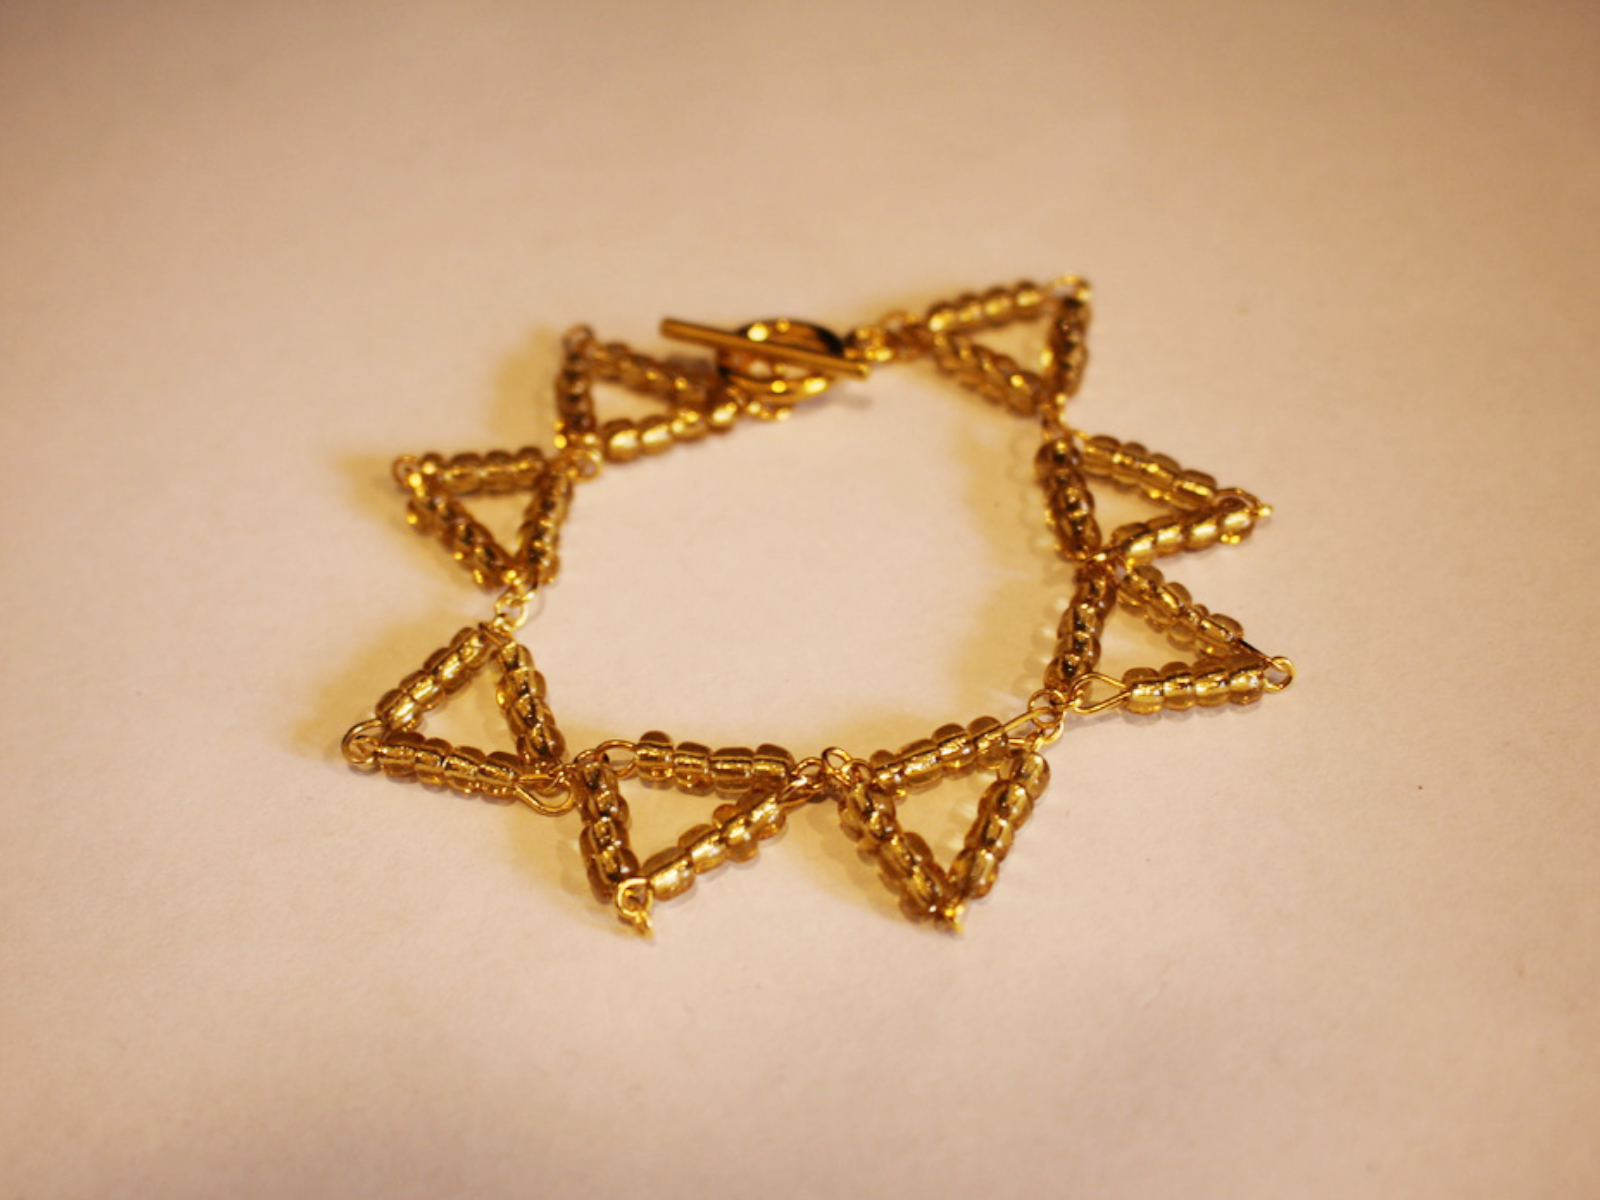
How to make a bunting inspired bracelet by making triangle shapes, so cute!
I was really excited when I came up with this bracelet design! It uses eye pins to make a series of triangles that are linked together to make wrist bunting! I love how there are lots of different ways you can use findings to make unique and sculptural pieces of jewelry. Please note that this tutorial contains affiliate links. This design might look complicated but its actually pretty easy bracelet making!
You’ll need these tools and materials to make this cute triangle bracelet:
1: Pliers. I used round nose pliers and flat nose pliers.
Here are some you can add to your jewelers tool kit:
2: Eye pins. I used a bunch of eye pins all the same length, 24 in total but you may need more or less depending on the size of your bracelet. I used gold tone for this design.
Here are some for your bracelet DIY:
3: Jump rings. I used 7 small jump rings in a gold tone. These were used to attach the triangles together.

4: Two larger jump rings to put the clasp onto the triangle chain.

Here’s a link to some different sized jump rings that you can add to your jewelry kit:
5: A toggle clasp. Mine was gold to match the rest of the hardware I used.

Check out this toggle clasp:
6: Beads. I used some yellow glass e-beads but you could use any colour.

Here are some links to beads you can use in crafting your bracelet:
Follow these steps to make your bunting inspired triangle bracelet:
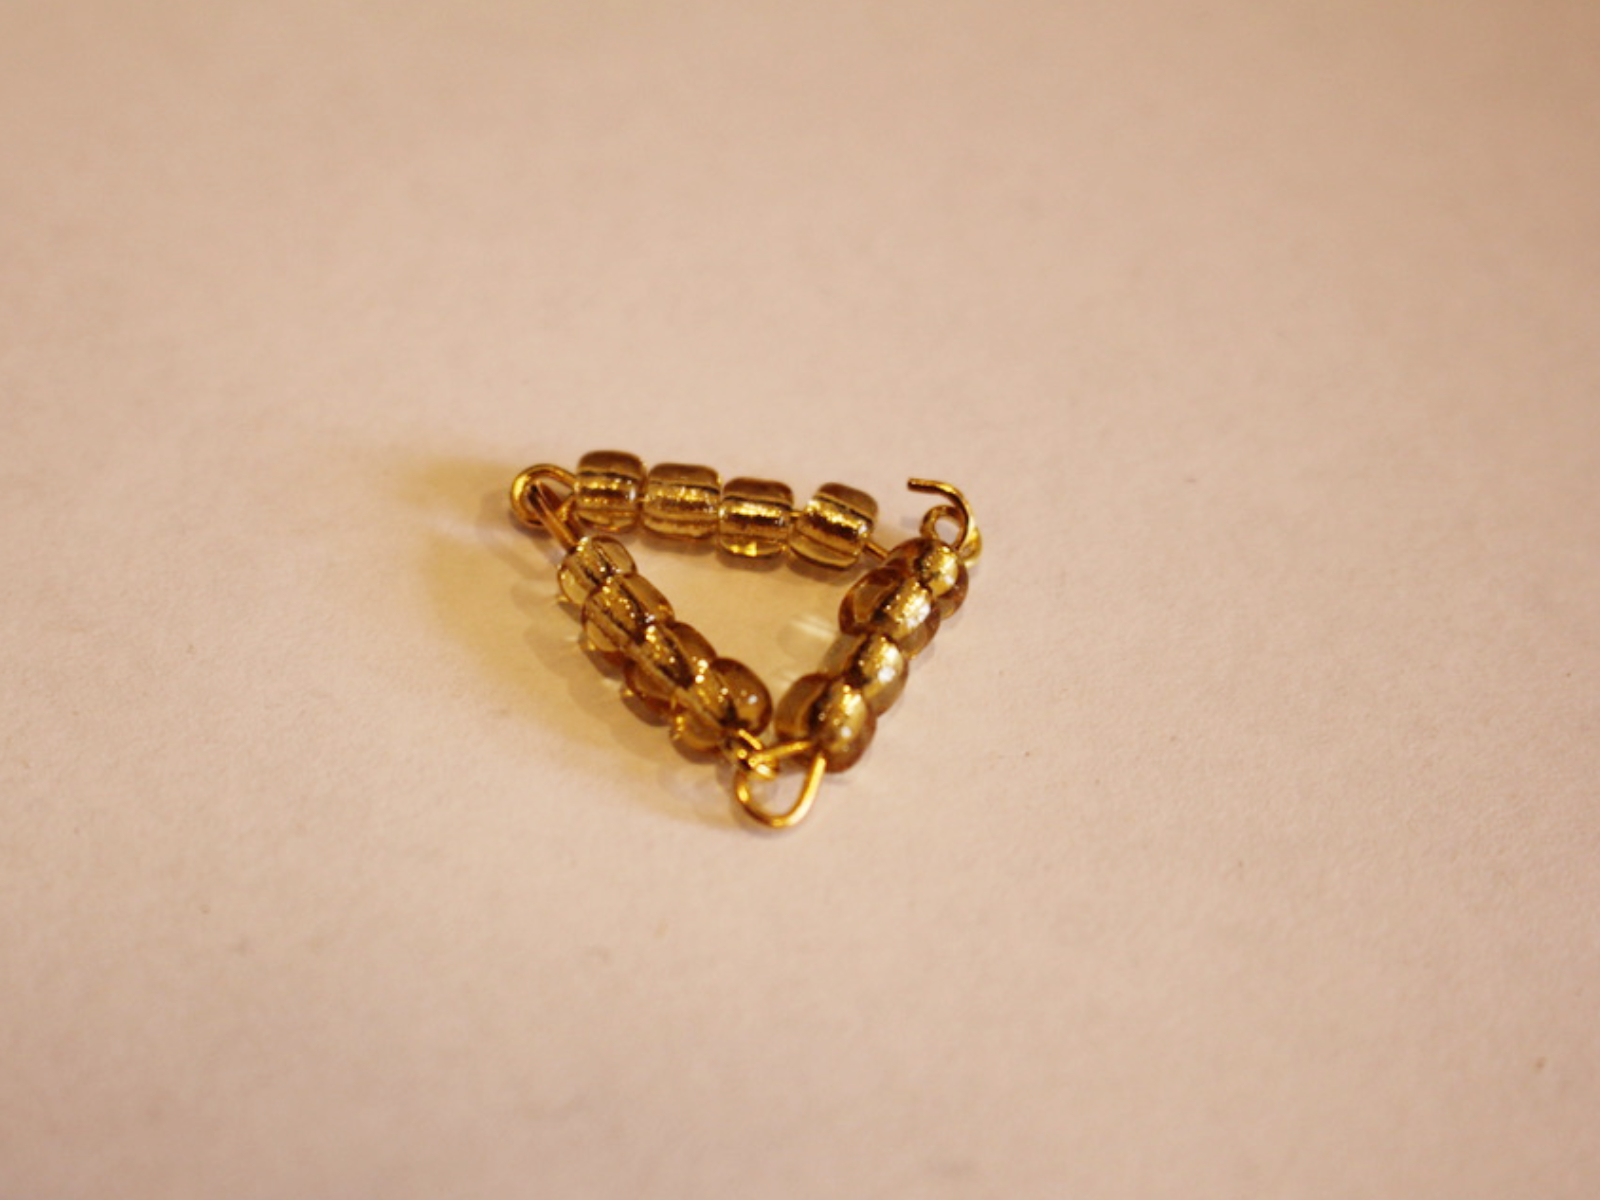
1: Take one of the eye pins and add beads until there is approximately 1cm left without beads.
2: Bend the unbeaded section so that it forms an angle to the beaded section. You can do this with your fingers if your pin is soft enough or use your pliers.

3: Bend the top of the pin around the barrel of your round nose pliers to form a loop.
4: Repeat steps 1 to 3 for a second pin. Open one of the loops at the end of a pin and attach it to the first pin you completed. Close the loop to secure the pins together.


5: Repeat steps 1-4 for another pin.

6: Take the chain you just made and open a loop at the end of one of the end pins.
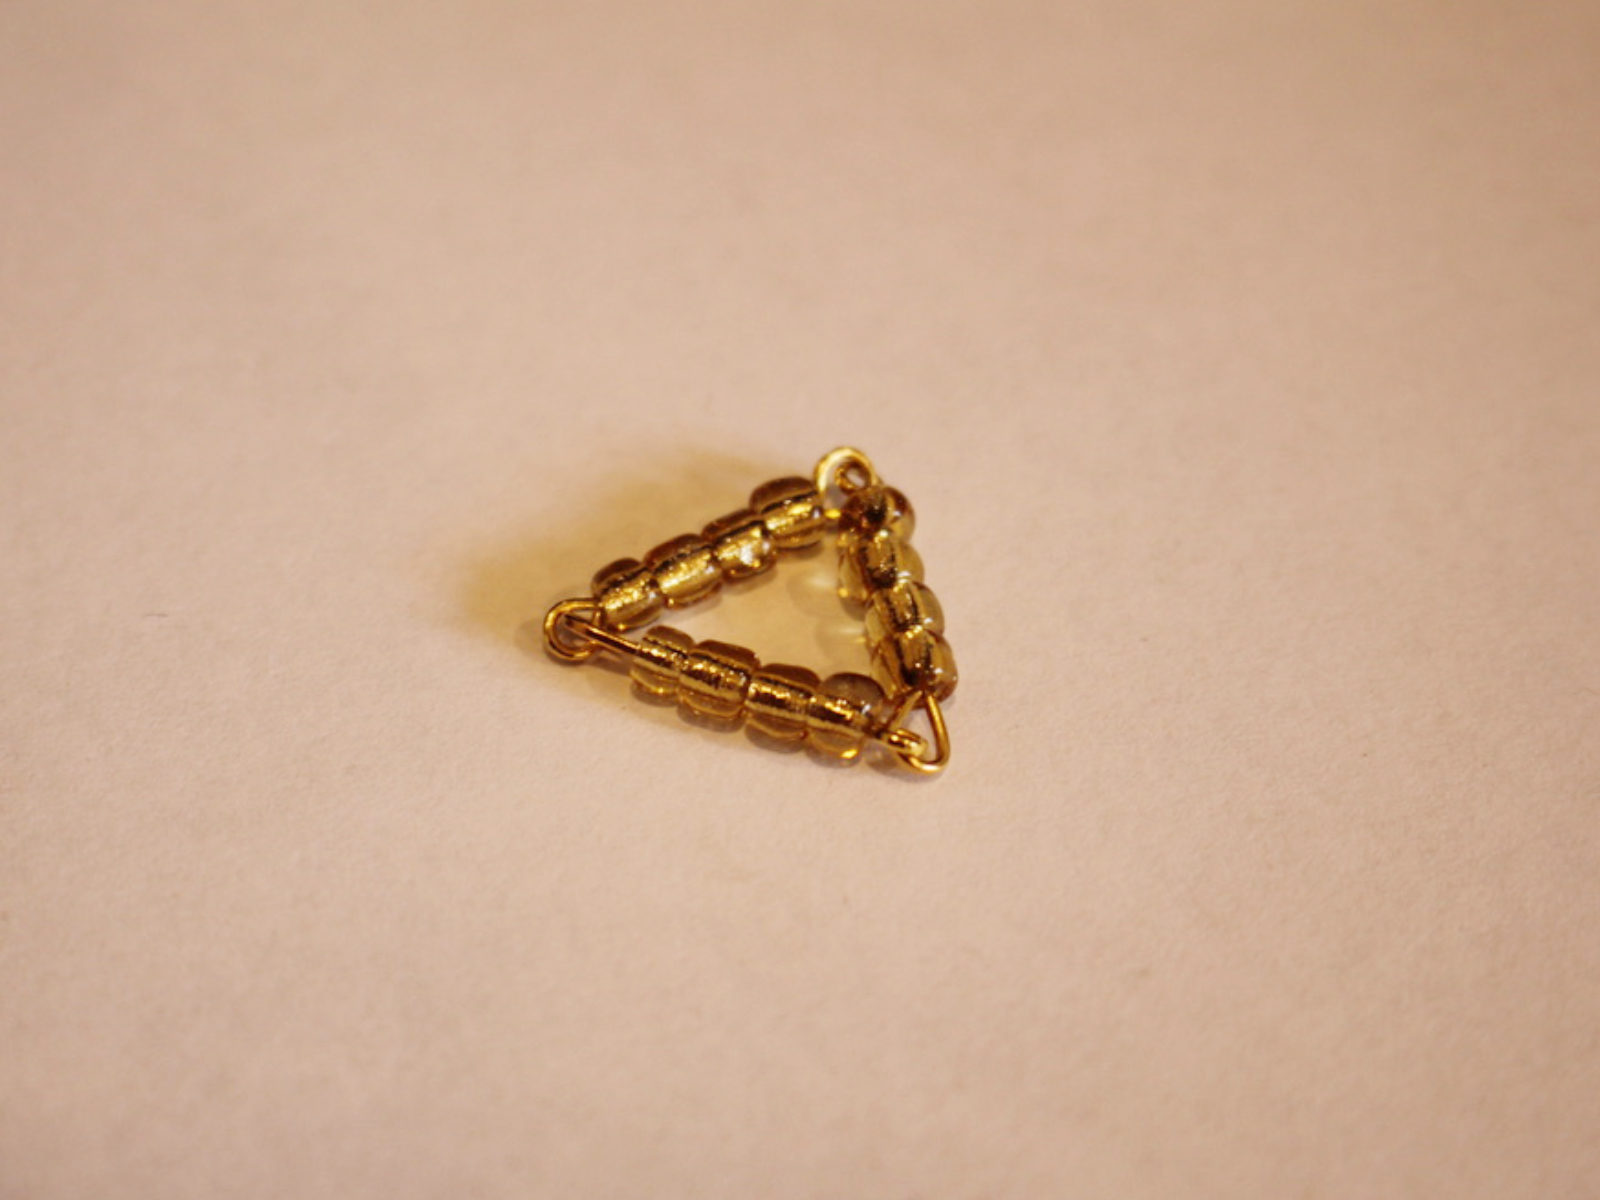
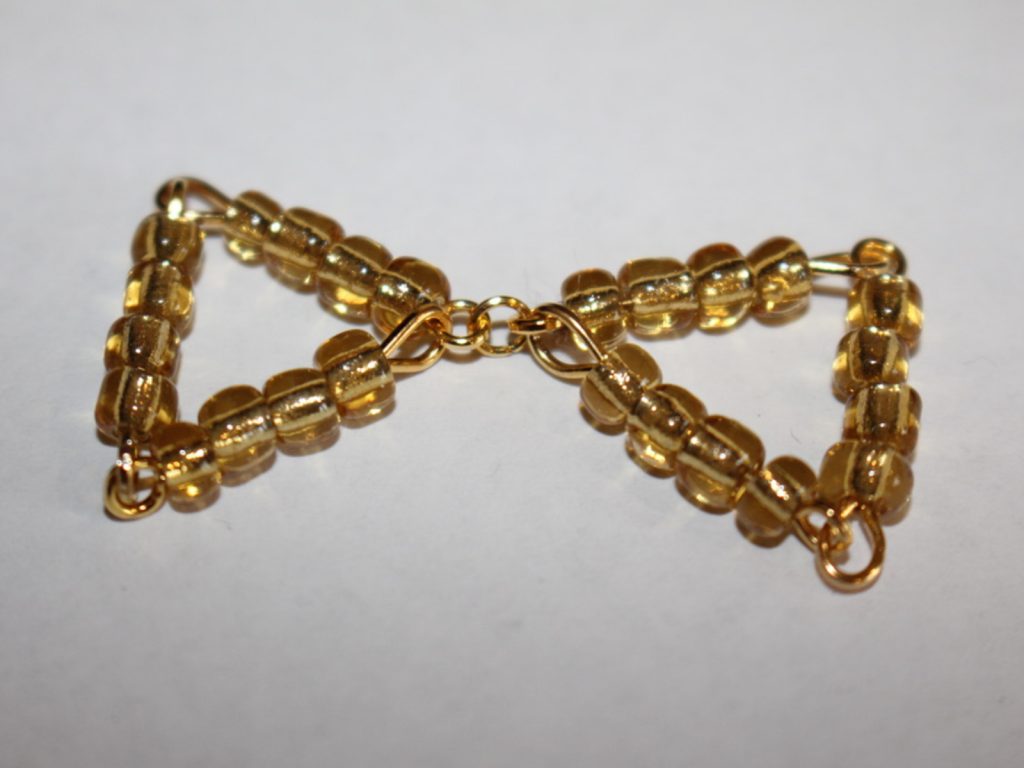
7: Link the two end pins and close the loop to form a triangle shape.

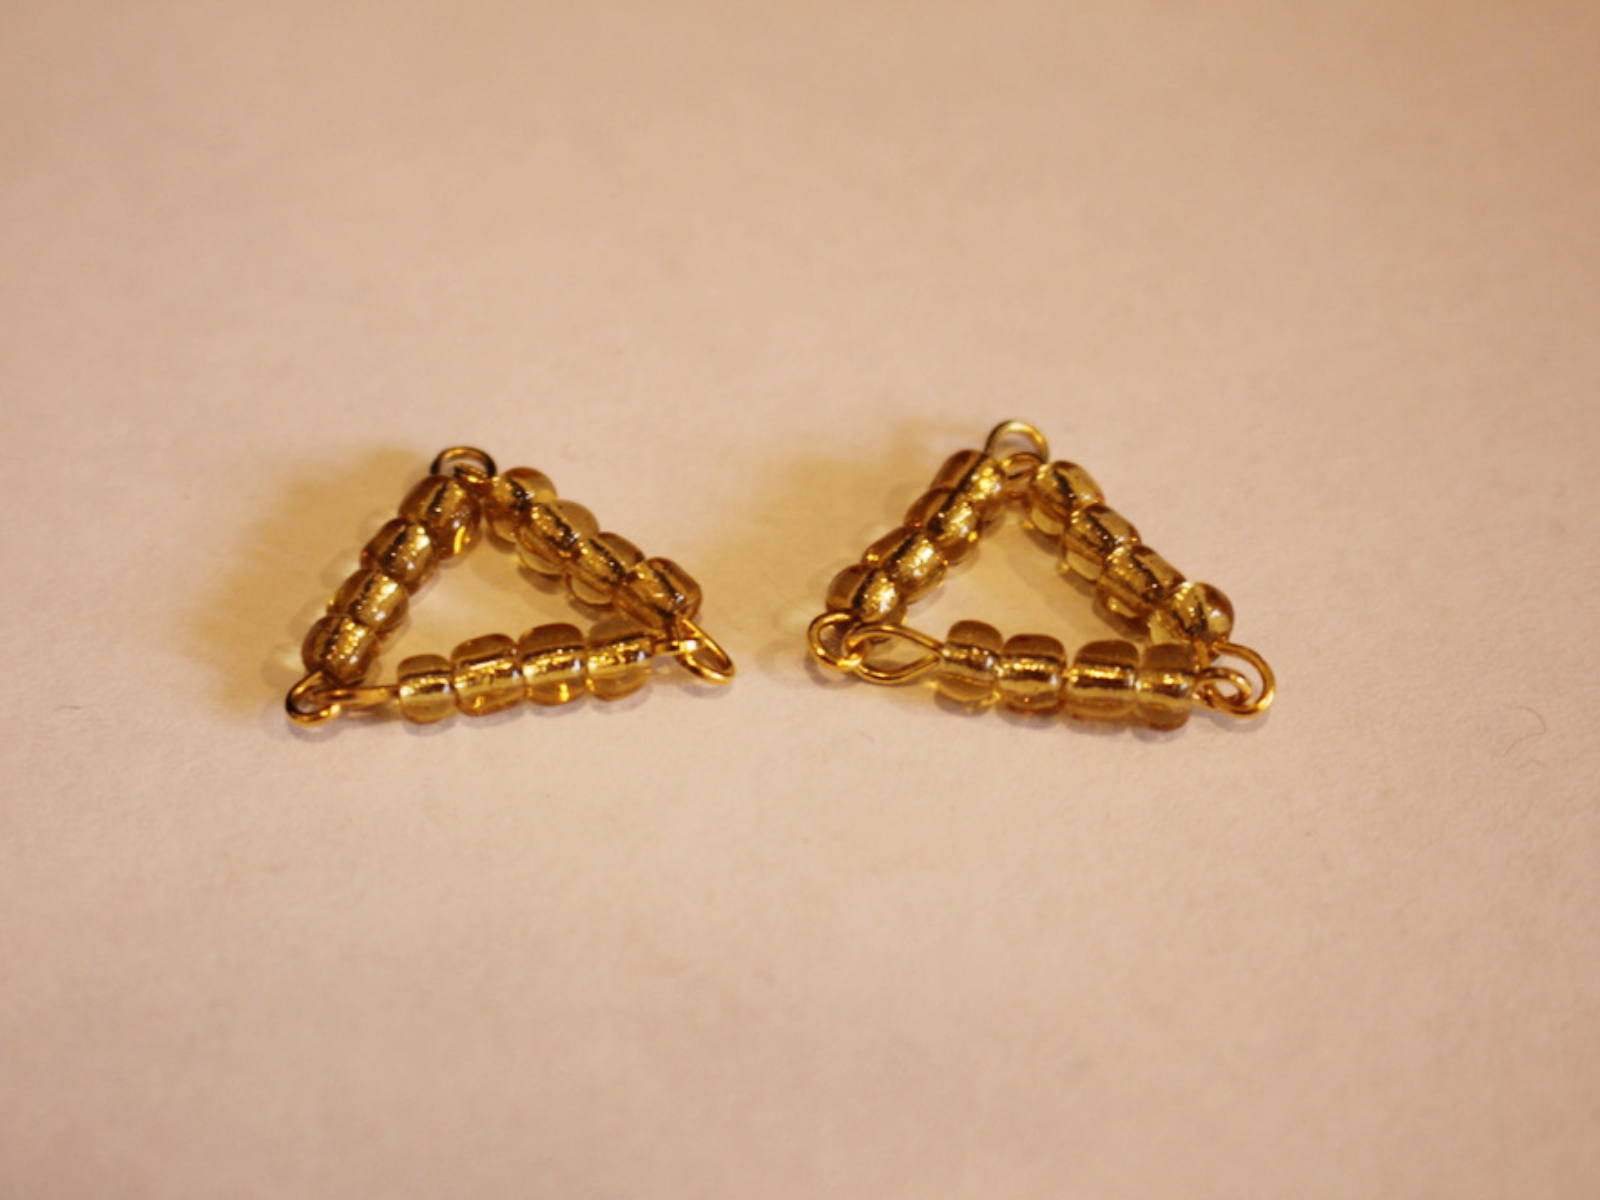
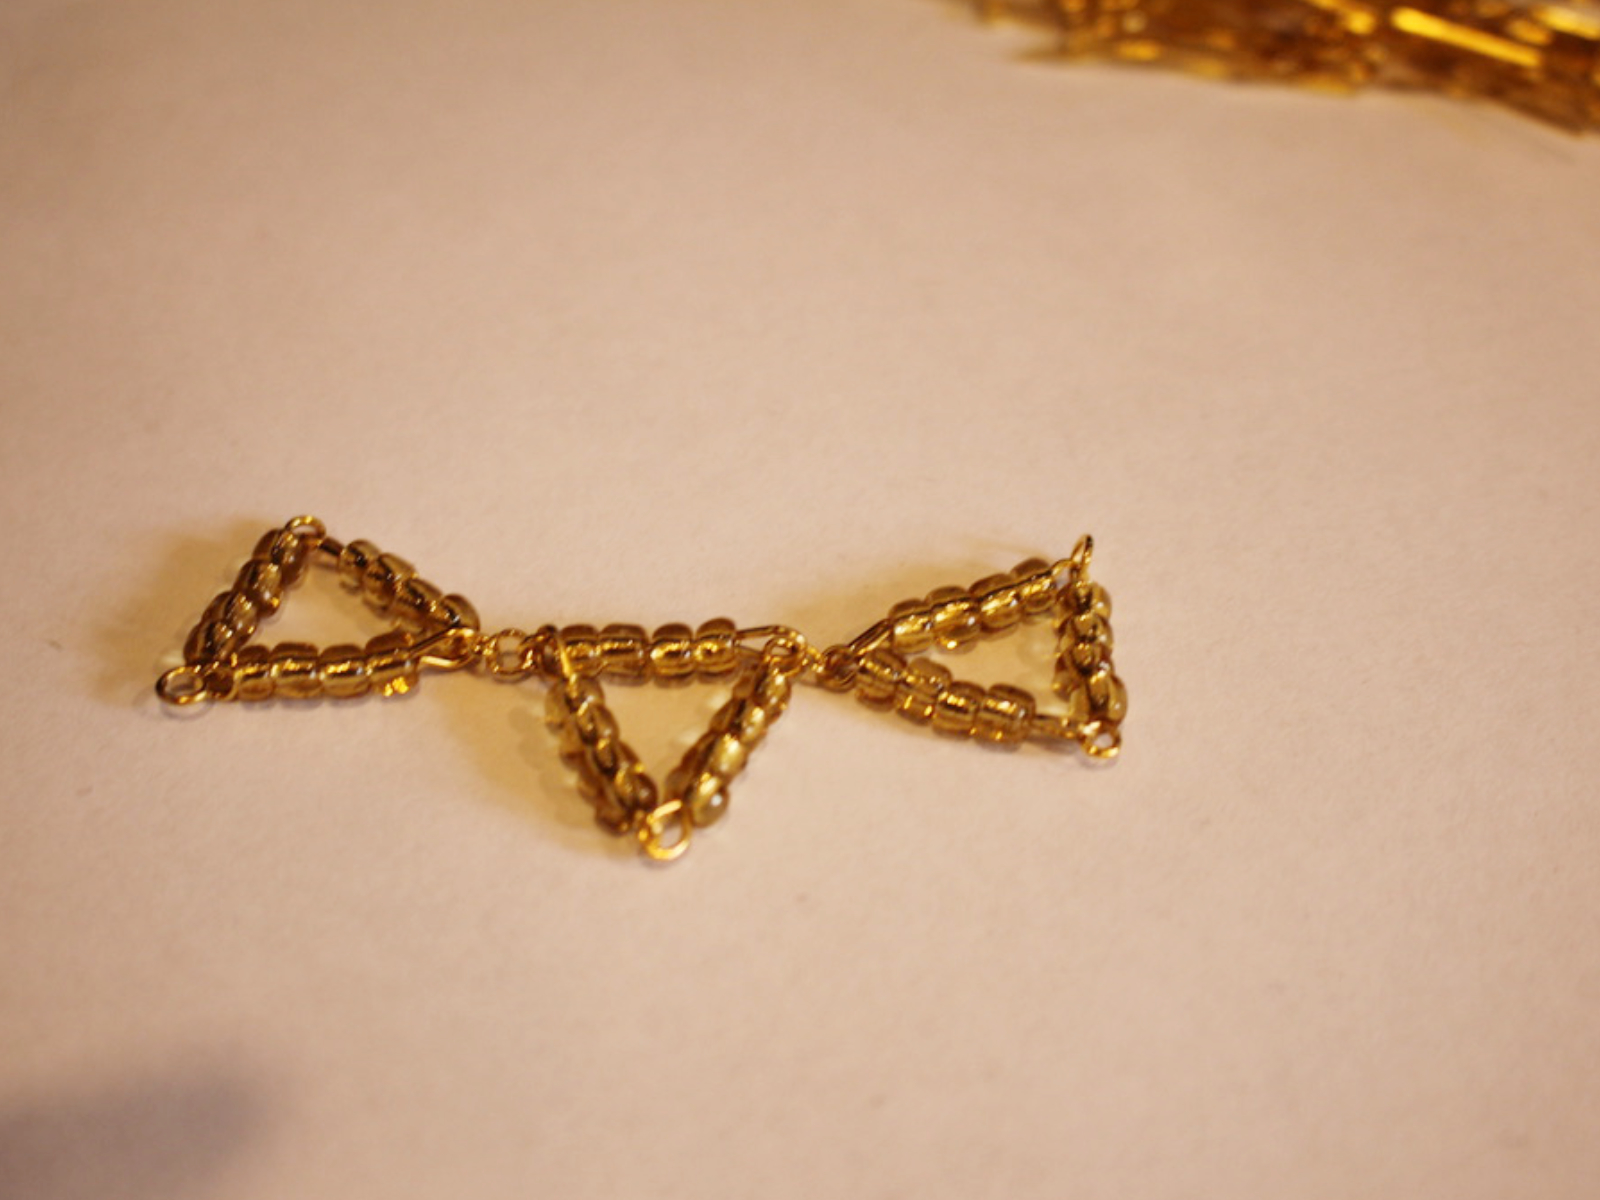
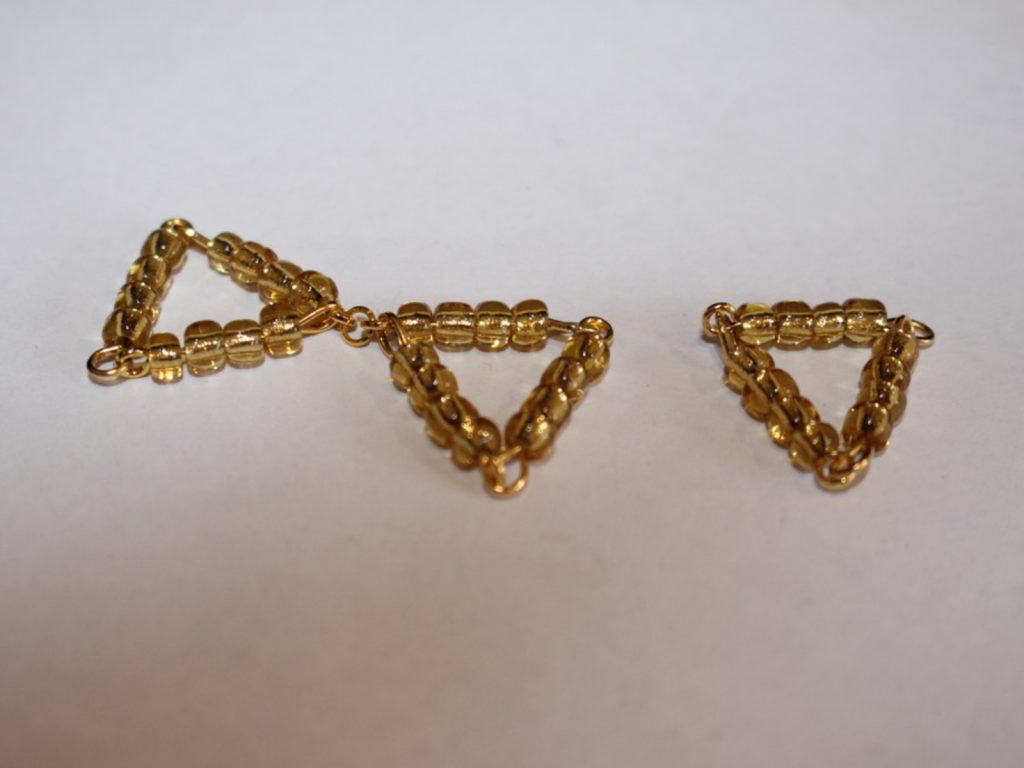
8: Make another triangle as you did in steps 1-7 and attach the two triangles together using one of the small jump rings, this is the start of your triangle chain.

9: Repeat steps 1-8 until you have a triangle chain long enough to fit your wrist. Make it a tiny bit smaller than you need to account for the length of the jump rings and toggle clasp.

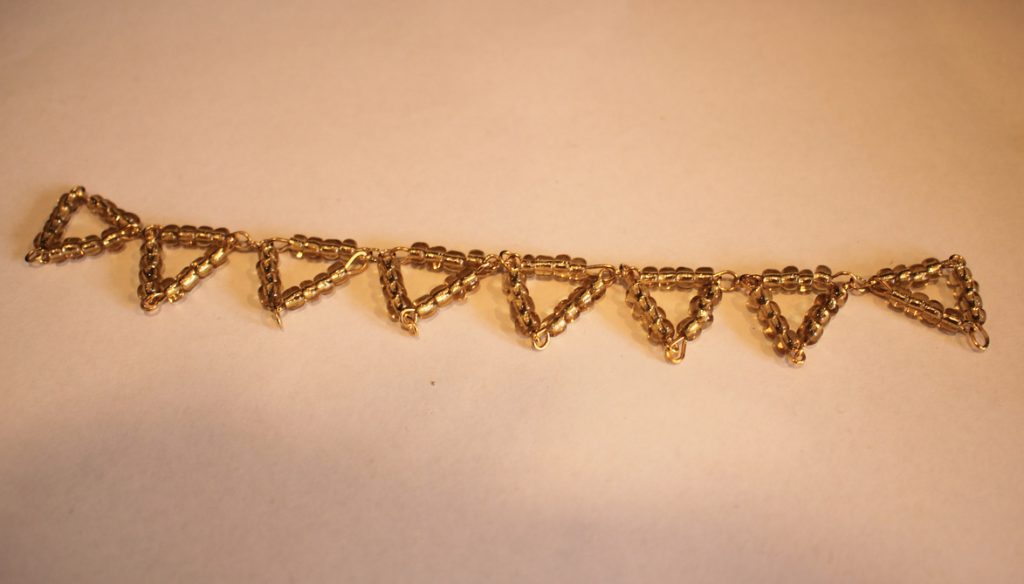
10: Attach the toggle clasp components to each end using the two larger jump rings.


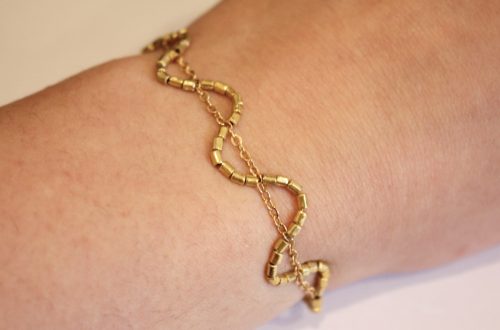
Now your cute triangle bracelet is finished and ready to wear! This bracelet is so fun to fidget with and will look great layered with other gold and silver tone jewellery. What colours will you make yours in?


I think if I make this design again I will bead it with a variety of pastel coloured beads for a cute vapor-wave look. How cute would that look when paired with a fun floral dress in summer?
I hope you have fun making your own adorable triangle bead bracelet! I sure had fun making mine <3
If you liked this tutorial, here are some other’s I have created that use eye pins and beads to form triangle shapes:
- This one uses gravity to form a triangle shaped pair of earrings!
- Follow this video tutorial to make some triangle tassel earrings.
- Here’s a triangle charm lariat.
- A pair of basic triangle earrings made with beaded eye pins.
- A chain and eye pin beaded triangle pendant.
- A triangle necklace made from long metal beads and string.
- Some cute beaded mini triangle earrings.
- A triangle statement pendant.
- Some chain and pin triangle drop earrings.
- Use triangles to make this 3D diamond pendant.
- Triangles form this flat diamond shaped bracelet charm.
I hope you enjoyed this tutorial and have fun finding some other pieces to make at home! Have fun!
-
Add a cool feature to your hoop earring designs by using toggle clasps… here’s how!
These earrings use toggle clasps to add an interesting feature to your standard beaded hoop earrings. Make lots of charms to switch them up and mix and match. This tutorial contains affiliate links.
You’ll need these tools and materials to make your toggle clasp hoop earrings:
1: Pliers. I used my cutting pliers, round nose pliers and flat nose pliers.
2: Two pieces of bracelet sized memory wire.

3: Two toggle clasp sets.

4: Four jump rings.

5: A pair of stud earrings with charm loops.

6: Beads. I used these silver lined clear glass beads and some wooden chip beads.


Follow these steps to make your toggle clasp hoop earrings:
1: Create a loop at one end of the memory wire using the round nose pliers.


2: Add beads to the wire in any pattern you choose.


3: When there is approximately 1cm of the wire left unbeaded, create a loop at the other end of the wire and thread it through the initial loop you made to close the beaded hoop.

4: Repeat steps 1-3 for the second hoop.

5: Add the circle parts of the toggle clasps to the top of each hoop, attaching them using two of the jump rings.


6: Add the toggle part of the clasps to each of the post earrings using the remaining jump rings.


7: Now you can attach the hoops to the earrings and wear them out!


If you like your earrings to be customisable, here’s another charm earring tutorial with clip on charms.
This tutorial contains affiliate links.
-
I keep hearing that chunky chain necklaces are trendy right now… here’s how to make a gold chunky chain necklace that makes a statement.

You might have seen our other tutorial that shows you how to make a chunky chain necklace. Well this one is a little different. It uses two gold chunky chains to make a cool statement. Please note that this tutorial contains affiliate links,
You’ll need these materials and tools to make your gold chunky chain necklace:
1: Pliers. Flat nose pliers and round nose pliers are the only tools you need to make your chunky gold chain statement necklace.
2: Two pieces of necklace length chunky gold chain.

3: Two large gold jump rings.

4: A gold toggle clasp.

Here are the steps you need to make your gold chunky chain statement necklace:
1: Fold the first piece of chain in half.

2: Fold the second chain in half and loop it around the first chain so that they are looped together.


3: Gather the matched chain ends together and secure them by attaching one of the jump rings.

4: Add one side of the toggle clasp and close the jump ring to secure one side of the necklace.

5: Repeat steps 3 and 4 for the other side of the necklace using the remaining jump ring and the other side of the toggle clasp.


Now your statement chunky chain necklace is finished! I think this is such a cool version of the current chunky gold chain necklace trend happening right now.
Here’s what it looks like on:

And here’s a sketch I did on my phone when I had the original idea… how cool is it that you can make sketches and write down your ideas when you’re on the go without any paper?!


Here are some other chunky chain tutorials:
-
Do you want a quick DIY? Here’s how to make a simple and fast knot chain bracelet.

This DIY is super duper quick and easy, all you need to do is tie a knot in some chunky chain and add a clasp! So simple and cool. I think this bracelet would make a great gift for the minimalist jewelry lover in your life.
You’ll need to use these tools and materials to make your knot chain bracelet:
1: Pliers. Round nose pliers and flat nose pliers will be useful for this DIY bracelet.
2: A piece of chain slightly longer than you would need to fit your wrist. I used this chunky gold chain.

3: Two jump rings. I used gold to match the chain.

4: A toggle clasp. I used a gold clasp to match the rest of my materials.

Now here are the steps to follow to make your knot chain bracelet.
1: Form a basic knot in the chain.
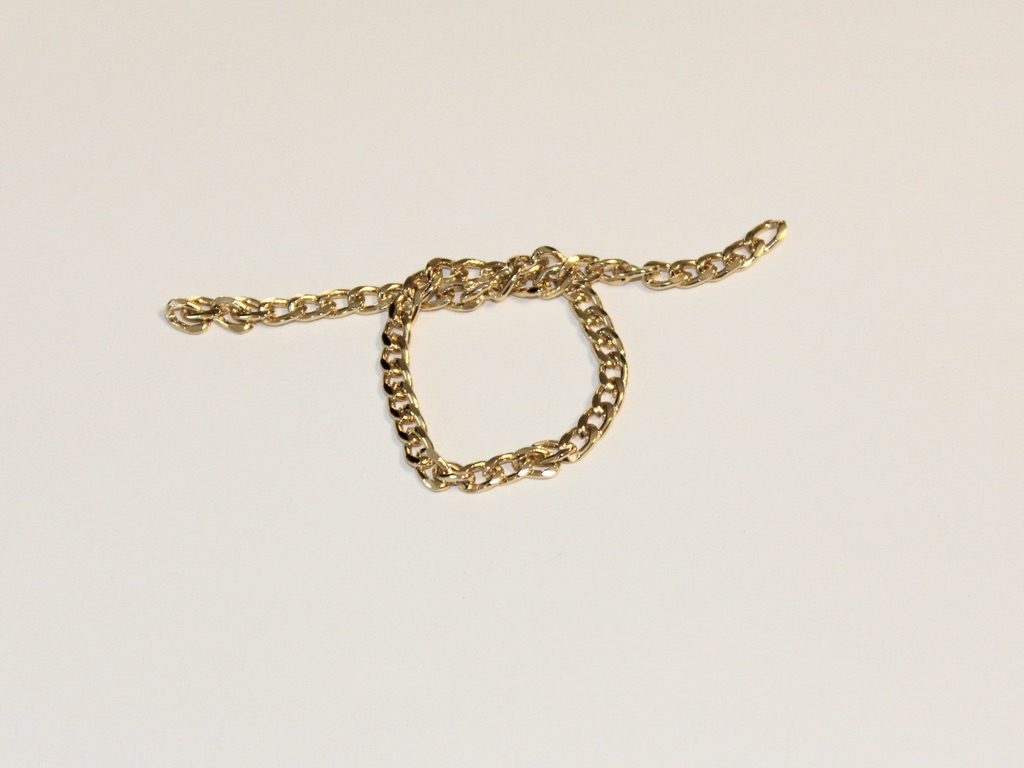
2: Pull the ends of the chain to tighten the knot. You might need to shift it slightly to make sure that the knot is in the middle.

3: Add one of the jump rings to one side of the knotted chain.
4: Add one side of the toggle clasp to the open jump ring. Close the jump ring using your pliers to secure the toggle component to the chain.
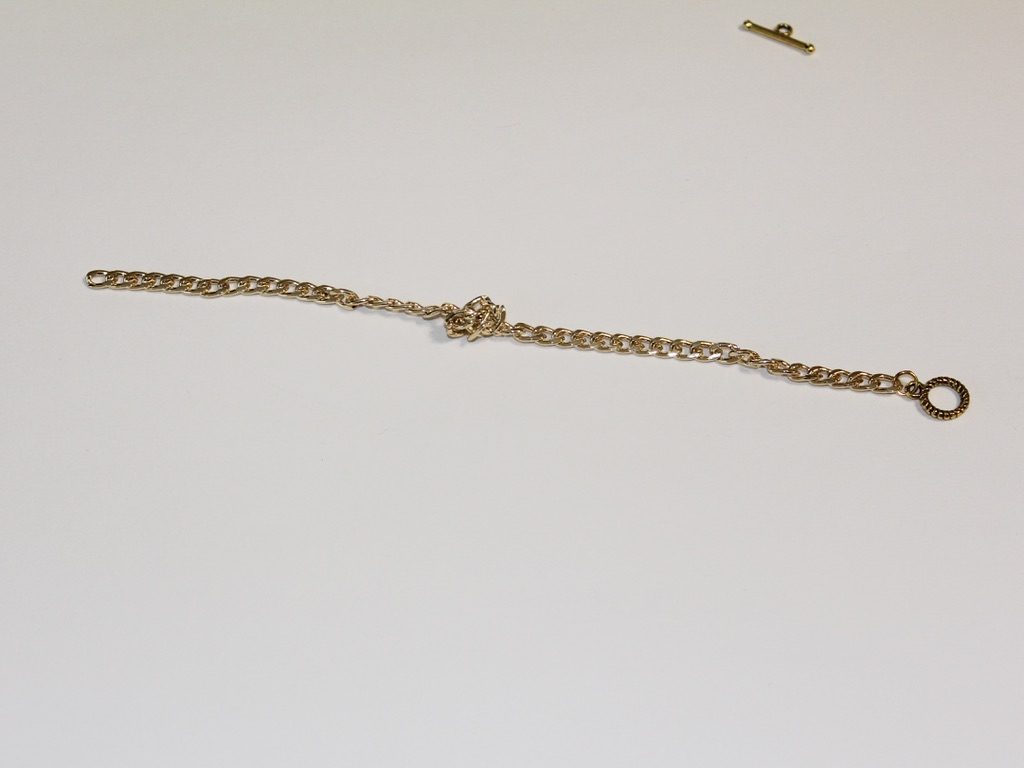
5: Add the other jump ring to the other side of the chain and attach the remaining toggle clasp component.
6: Close the second jump ring to secure the second part of the toggle clasp. Now that the clasp is in place your knot chain bracelet is ready to wear!

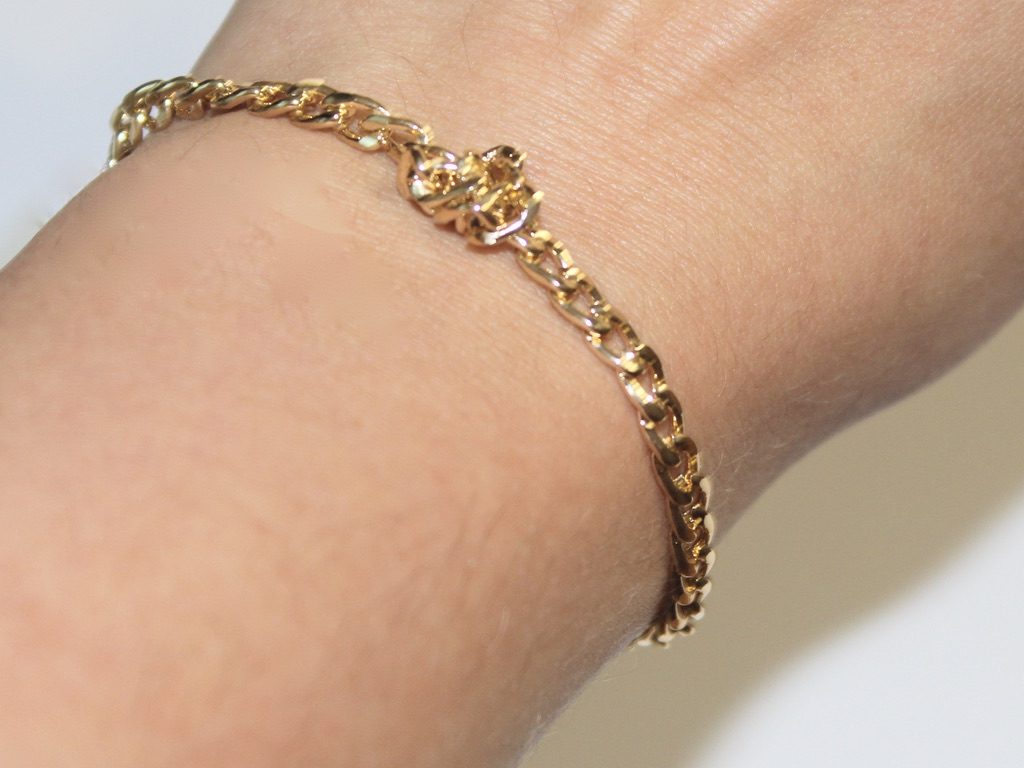
So cute!!!!! How perfect is this DIY for when you need a new accessory ASAP?!

Here are some other chain bracelet tutorials:
- A beaded chain bracelet
- Double chain bracelet
- Bead and chain bracelet
- Bar charm chain bracelet
- Velvet and chain bracelet
- Chain charm bracelet
This tutorial contains affiliate links.
-
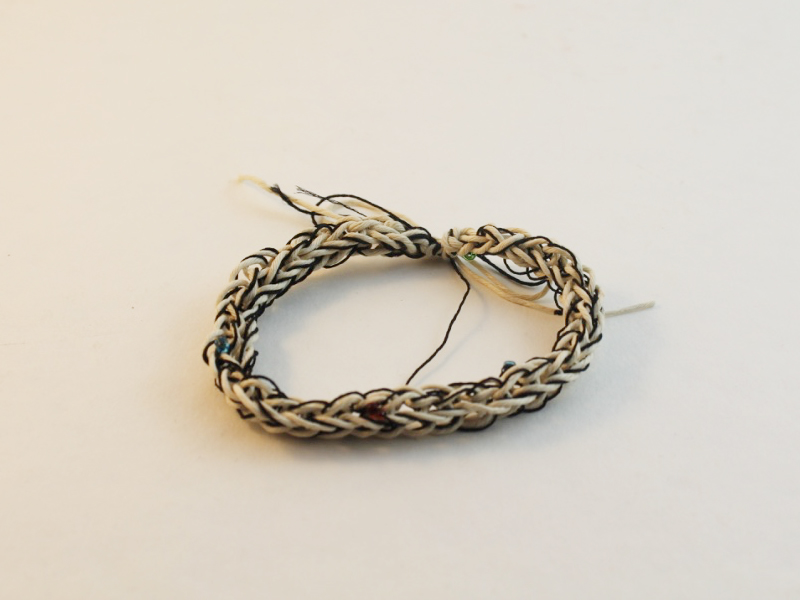
How to upcycle your old broken headphones into a bracelet!

I have a load of broken headphones, if you’re like me and don’t want to chuck them in the bin, here’s a way to upcycle them… turn them into a beaded finger-knit bracelet. Contains affiliate links.
You will need the following tools and materials to make your headphone bracelet:
1: Pliers. You’ll need cutting pliers, round nose pliers and flat nose pliers.
2: A pair of broken headphones. I used these broken apple headphones.

3: Some beads with large holes. I used these yellow plastic heart beads.

4: Two crimp ends.

5: Two jump rings.

6: A toggle clasp.

Follow these steps to make your headphone bracelet:
1: Clip the headphones so that you have one long thread.

2: Create a slip knot at one end of the headphone cord.

3: Put the knot around your finger and loop it again right next to the first loop. If you need a refresher on how to finger knit check out this video tutorial.

4: Pull the first loop over the second one and off your finger.
5: Add a bead to the next loop and repeat steps 3 and 4.

6: Continue this until your finger knitting is long enough to fit your wrist.
7: Knot the end of the finger knitting to secure it.

8: Add a crimp end to both ends of the headphone cord.


9: Attach the toggle clasp using the jump rings.


Now your upcycled headphone bracelet is ready to wear!

https://flic.kr/p/RqQsqF
-
Want to wear your heart on the outside? Make this adorable beaded heart necklace!

This beaded necklace looks so cute, you can wear your heart on your chest instead of your sleeve! Contains affiliate links.
You will need the following tools and materials to make your beaded heart necklace:
1: Pliers. You’ll need round nose pliers, flat nose pliers and cutting pliers.
2: Two pieces of wire. I used copper wire and cut mine to approximately 13cm long.

3: A chain.

4: One large jump ring.

5: Two smaller jump rings.

6: A toggle clasp.

7: Beads. I used some red glass seed beads.

Follow these steps to make your beaded heart necklace:
1: Create a loop at the end of each piece of wire using the round nose pliers.

2: Add beads to each wire leaving 1cm un-beaded.
3: Create a loop at the end of each wire to secure the beads in place.

4: Bend each wire to form a half heart curve.

5:Attach the loops at the top of the heart together.

6: Attach the other ends together to complete the heart.

7: reshape the heart if required.
8: Add the large jump ring to the top of the heart.
9: Add the beaded heart to the necklace chain.

10: Attach a jump ring to one end of the chain and one side of the toggle clasp.
11: Attach the remaining jump ring to the other side of the chain and slide on the other side of the toggle clasp to finish.

Now your heart necklace is finished and ready to wear!
Here’s another one I made with green glass beads.


-
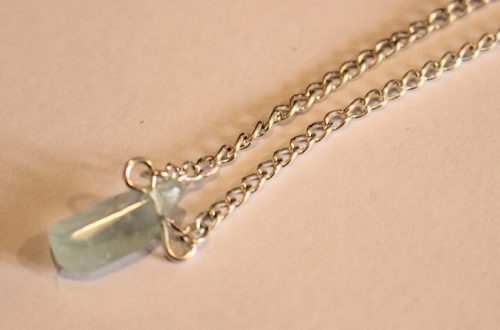
This necklace is special! Make one of your own today.
This necklace looks amazing, it’s a really cool way to use your favorite drop beads.
You will need the following tools and materials to make your necklace:
1:Pliers. You will need your flat nose pliers and round nose pliers.
2: Two pieces of chain to form the length of your necklace.

3: Two pieces of wire or two eye pins, one longer than the other.

4: A toggle clasp.

5: Four jump rings.

6: Beads of your choice. I used some frosted blue glass beads and a turquoise droplet bead.


Follow these steps to make your necklace:
1: If you are using wire, make a loop at the end of the longer piece of the wire.


2: Add the beads to the wire until there is only 1cm left without beads.


3: Create a loop at the other end of the wire.


4: Create a loop at the end of the shorter piece of wire.


5: Add the turquoise bead to the wire.

6: Create a loop at the other end of the wire using the round nose pliers to secure the bead on the wire.


7: Bend the longer beaded wire into a U shape and attach the drop bead to the inside of the U.


8: Attach each piece of chain to either side of the beaded U shape using two of the jump rings.


9: Attach each component of the toggle clasp to either end of the chain to finish the necklace. Secure them in place using the two remaining jump rings.


Now your necklace is finished!

Here’s another one I made with a longer U and a glass feature bead.


-
Make your jewellery work for you, this necklace is also a bracelet!

This choker necklace can also be worn as a cool bracelet. It’s super cool and easy to make.
You will need the following tools and materials to make your choker/bracelet:
1: Pliers. You will need your flat nose pliers, round nose pliers and cutting pliers to make this choker/bracelet.
2: A piece of leather or faux leather long enough to fit closely around your neck.

3: Two flat crimp ends.

4: Two jump rings.

5: A toggle clasp.

6: A head pin.

7: A bead or charm of your choice. I used this glass bead.

Follow these steps to make your convertible choker bracelet:
1: Add a crimp to each end of the leather, securing it in place by squeezing it around the leather using the flat nose pliers.


2: Add a jump ring to one end and attach one part of the toggle clasp.


3: Add the other jump ring and the second part of the clasp to the other end of the leather.


4: Put the bead onto the head pin.

5: Bend the head pin so that it is at a right angle to the bead using the round nose pliers.


6: Trim the end of the pin if required (it should extend approximately 1cm from the top of the bead). If no trimming is required, curl the pin into a loop using the round nose pliers.


8: Open the charm loop slightly and attach the charm to one of the jump rings that connects the leather and the clasp.

9: Close the charm loop to secure it in place. Once your charm is secured in place your creation is ready to wear, either as a choker or a bracelet!

Here’s the design worn as a bracelet.


And here it is as a choker necklace.